Contents:
- Introduction
- Part 0: Understanding the provided code
- Part 1: Graph Modifications
- Part 2: Using Dijkstra's Algorithm
- Part 3: Testing Dijkstra's Algorithm
- Preparing for Part 4
- Part 4: The Pathfinder Text User Interface
- Hints
- How to Turn In Your Homework
- Optional Additional Information: Text User Interface Specification
Introduction
It is sometimes difficult to navigate the 643 acres of the UW campus! To address this problem, UW Marketing has commissioned you to build a route-finding tool. It will take the names of two buildings and generate directions for the shortest walking route between them, using your graph ADT to represent buildings and pathways on campus.
In this assignment, you should continue to practice modular design and writing code for reuse. As before, you get to choose what classes to write and what data and methods each class should have. You will also get experience using the model-view-controller design pattern, and in later assignments you will reuse your model with a more sophisticated view and controller.
This assignment has four main parts. In the first part, you will make your graph class(es) generic. In the second part, you will implement a different pathfinding algorithm for graphs known as Dijkstra's algorithm. Third, you'll test your Dijkstra's algorithm implementation on some small graphs. Once you're satisfied with your Dijkstra's algorithm implementation, you'll move on to Part 4 and link your graph class and Dijkstra's algorithm implementation to a text-user interface we've provided so you can see everything you've worked on so far in action!
By the end of this assignment, you'll have a fully-functional application for finding the shortest paths between buildings on campus! In future assignments, you'll be adding a graphical user interface to this application using Javascript.
Part 0: Understanding the provided code
Unlike the Graph and Marvel assignments, the Pathfinder assignment includes a significant amount of starter code provided by the staff. The provided files are as follows:
pathfinder-
pathfinder.ModelAPI -
pathfinder.CampusMap
-
pathfinder.datastructurespathfinder.datastructures.Pathpathfinder.datastructures.Point
pathfinder.parserpathfinder.parser.CampusBuildingpathfinder.parser.CampusPathpathfinder.parser.CampusPathsParser
pathfinder.textInterfacepathfinder.textInterface.CoordinatePropertiespathfinder.textInterface.Directionpathfinder.textInterface.InputHandlerpathfinder.textInterface.Pathfinderpathfinder.textInterface.TextInterfaceControllerpathfinder.textInterface.TextInterfaceView
To make progress in this assignment, you must understand at least the basic purpose of each of these classes and
packages. To do this, you should read the documentation comments in those files. If you'd like, you can run the
hw-pathfinder:javadoc task in Gradle to generate html documentation in hw-pathfinder
/build/docs/javadoc/index.html, which you can open in a browser to read to documentation as a regular
javadoc. This will help you as you work on this assignment.
Now read this entire assignment spec before you write any code. This is very important to avoid doing unnecessary work.
Part 1: Graph Modifications
Make the Graph Generic
In Pathfinder, your mission is to find the shortest walking route between points on the UW campus. A graph is an
excellent representation of a map, and luckily you have already specified and implemented a graph.
Unfortunately, your graph stores only Strings, whereas Pathfinder needs to store other data in the
nodes and edges, such as coordinate pairs and physical distances. More generally, your graph would be much more
useful if the client could choose the data types stored in nodes and edges. Herein lies the power of generics!
Your task is to convert the graph ADT to a generic class. Rather than always storing the data in nodes and edge
labels as Strings, it should have two type parameters, one representing the data types to be stored
in nodes, and the other for data stored in edges. Directly modify your existing classes under the
graph package — there is no need to copy or duplicate code. In fact, you should not copy or duplicate
code.
When you are done, your previously-written hw-graph and hw-marvel tests and test
drivers and MarvelPaths will no longer compile. Modify these classes to construct and use graph
objects where the type parameters are instantiated with String. All code must compile and all tests
must pass when you submit your homework. In particular, your test drivers for both the hw-marvel
and hw-graph assignments must work correctly so we can test your code. Depending on your changes,
some of your JUnit tests may no longer be valid. Try to adapt your JUnit tests to your new
implementation, or discard them and write new ones: they should help you build confidence in your
implementation. But, don't overdo it: as with any testing, stop when you feel that the additional effort is not
being repaid in terms of increased confidence in your implementation. Learning when to stop working on a given
task is an important skill.
Be sure to briefly document any changes you made to your graph and marvel code outside of making your
existing implementation generic in hw-pathfinder/src/main/java/pathfinder/changes.txt.
While changing your graph and marvel code, you may find it helpful to only run your graph and/or marvel tests
when you run the test gradle task. Luckily, each assignment in this class is a separate gradle sub-project, as
you've seen in the past. So, to test only your graph code, run the hw-graph:test target. To test
your marvel code, run the hw-marvel:test target.
Making the Path Class Generic
We've provided some utility classes in pathfinder.datastructures, including a Path
class and a Point class that the Path class uses. The Path class
currently represents a sequence of edges between nodes that contain Point data. As you'll see later
in this assignment, this behavior works well for the campus paths dataset that we'll be working with in the next
few assignments. However, the test driver still uses Strings for the node data, like when you use
the AddNode command. Rather than modify the test driver to make it more specialized, you should use
your new generics skills to modify the Path class so that it can use any kind of node data that a
client of the Path class might want.
When you're done, you should be able to create a new Path<Point> and have it work just like
the original implementation of the Path class, but you should also be able to create a new
Path<String> and have it work well for when you're writing code for the old and new test drivers.
Remember to update the documentation of the Path class so it doesn't specifically mention points.
You're responsible for making sure the entire Path class makes sense with the modifications. You
also may need to make a few small changes to return types in ModelAPI and CampusMap, and
changes to the code in the showPath method of TextInterfaceView and some other files
so that they correctly parameterize the now-generic Path type.
You may have noticed that if you declare a type parameter for an outer class like Path, you can use
it directly in an inner class like Path.Segment, without declaring its own type parameter. The
inner class is actually getting the same type parameter as in the outer class. So if you parameterize
Path, your code inside Segment could use this parameter directly. Note that this means
that you need to be careful about how you write variables of type Path.Segment. For example, when
writing a variable declaration like Path.Segement segment = ..., you're actually doing something
similar to writing List list = ..., it's missing the type parameter! Since the type parameter is
part of the Path class declaration in this example, the parameter is written as Path<SomeType>.Segment
when you need to declare a Segment variable.
Build Tools and Generic Code
Double-check that you have configured IntelliJ to issue errors for improper use of generic types.
This is a great place to commit and push your code. The staff strongly recommends you do so to ensure you have your work backed up before moving onto the next part.
Part 2: Using Dijkstra's Algorithm
In a weighted graph, the label on each edge is a weight (also known as a cost) representing the cost of traversing that edge. Depending on the application, the cost may be measured in time, money, physical distance (length), etc. The total cost of a path is the sum of the costs of all edges in that path, and the minimum-cost path between two nodes is the path with the lowest total cost between those nodes.
In this assignment, you will build an edge-weighted graph where nodes represent locations on campus and edges represent straight-line walking segments connecting two locations. The cost of an edge is the physical length of that straight-line segment. Finding the shortest walking route between two locations is a matter of finding the minimum-cost path between them.
Dijkstra's Algorithm
You will implement Dijkstra's algorithm, which finds a minimum-cost path between two given nodes in a graph with all nonnegative edge weights. (This restriction is important, Dijkstra's algorithm can fail if there are negative edge weights. In this assignment, since all edge weights represent physical distances, all our edge weights are nonnegative and Dijkstra's algorithm will work well.) Below is a pseudocode algorithm that you may use in your implementation. You are free to modify it as long as you are still essentially implementing Dijkstra's algorithm.
The algorithm uses a data structure known as a priority queue. A priority queue stores elements that can be compared to one another, such as numbers. A priority queue has two main operations:
-
add: Insert an element. -
remove: Remove the least element. (This is sometimes called removeMin, for emphasis.)
For example, if you inserted the integers 1, 8, 5, 0 into a priority queue, they would be removed in the order
0, 1, 5, 8. It is permitted to interleave adding and removing. The standard Java libraries include a PriorityQueue
implementation that you should use.
// Dijkstra's algorithm assumes a graph with nonnegative edge weights.

start = starting node
dest = destination node
active = priority queue.
// Each element is a path from start to a given node.
// A path's “priority” in the queue is the total cost of that path.
// Nodes for which no path is known yet are not in the queue.
finished = set of nodes for which we know the minimum-cost path from start.

// Initially we only know of the path from start to itself, which has
// a cost of zero because it contains no edges.
Add a path from start to itself to active

while active is non-empty:
  // minPath is the lowest-cost path in active and,
  // if minDest isn't already 'finished,' is the
  // minimum-cost path to the node minDest
  minPath = active.removeMin()
  minDest = destination node in minPath

  if minDest is dest:
    return minPath

  if minDest is in finished:
    continue

  for each edge e = ⟨minDest, child⟩: // For all children of minDest
    // If we don't know the minimum-cost path from start to child,
    // examine the path we've just found
    if child is not in finished:
      newPath = minPath + e
      add newPath to active

  add minDest to finished

// If the loop terminates, then no path exists from start to dest.
// The implementation should indicate this to the client.
Implementing Dijkstra's Algorithm
Write an implementation of Dijkstra's algorithm that can work with a graph that has Doubles as the
edge data (i.e. you can write an implementation of Dijkstra's that assumes the Graph has Double
edges. You don't have to make this assumption if you'd rather make your code more generic (yay!), but
your code must work with at least Double edge data). You should not make any assumptions
about the node type in the graph, since Dijkstra's algorithm doesn't need to examine node data to work. There's
no particular location where you're required to put your Dijkstra's algorithm implementation. Put it
somewhere reasonable - remember that your Graph shouldn't be specialized to include particular path-finding
algorithms, so it shouldn't be inside Graph. Consider how/where your BFS was implemented for an example.
Part 3: Testing Dijkstra's Algorithm
The format for writing tests follows the usual script/JUnit structure, but with some details
changed to accommodate changes to the graph and the data stored in it. You should write the majority of your
tests as script tests according to the test script format defined
below, specifying the test commands and expected output in *.test, *.expected files,
respectively. As before, you should write a class PathfinderTestDriver to run your script
tests. We provide a starter file for the test driver which you are free to modify or replace. Do not
modify ScriptFileTests.java.
If your solution has additional implementation-specific behavior to test, write these tests in a regular JUnit
test class or classes and add them to src/test/java/pathfinder/junitTests as usual.
The specification tests do not directly test the property that your graph is generic. However, the
graph and marvel homework test scripts use String edge labels, while this
assignment uses numeric values. Supporting all three test drivers implicitly tests the generic behavior of your
graph.
When this assignment is tested we will also rerun the graph and marvel homework test
scripts to verify that those parts of the project continue to work as expected. You should be sure that you have
fixed any problems that were discovered previously so they don't occur when the tests are run again.
Dijkstras Test Script Format
The test script file format for this assignment uses the same commands and format as the marvel homework, but with a few
differences in arguments and output. Be sure to read this section carefully.
-
Edge labels are
Doubles instead ofStrings. If an edge label in a test script cannot be parsed as a number, the output is undefined. For ListChildren, the same rules as before apply for ordering output by nodes and edges, except that edges are now ordered numerically instead of alphabetically. -
LoadGraph now doesn't make much sense for use in this assignment, as it uses the comic book
names for edge labels instead of some number. Therefore, you should not include it in
PathfinderTestDriver. -
FindPath searches with Dijkstra's algorithm instead of BFS and prints its output in the
form:
path from NODE 1 to NODE N:
NODE 1 to NODE 2 with weight w1
NODE 2 to NODE 3 with weight w2
...
NODE N-1 to NODE N with weight wN-1
total cost: W
where W is the sum of w1, w2, ..., wN-1, and wk is the weight of the edge from NODE k to NODE k+1
In other words, the only changes in output are the way the edge labels are printed and the addition of a "total cost" line at the bottom. In the case that no path is found, the output should remain the same as in the
marvelassignment. If a node is not included in the graph, you should instead print the line (i.e. change "character" to "node"):unknown node NODE
The output should otherwise work the same as in the
marvelassignment for when there's a missing node: don't print the "path not found" output, and include the line twice if both the start and end node cannot be found. If there is no path found or there are one or more nodes that do not appear in the graph, do not include the "total cost" line in addition to the other output.If there are two minimum-cost paths between NODE 1 and NODE N, it is undefined which one is printed.
-
For readability, the output of ListChildren, AddEdge, and
FindPath should print numeric values with exactly 3 digits after the decimal point,
rounding to the nearest value if they have more digits. The easiest way to specify the desired format of a
value is using format
strings. For example, you could create the String "Weight of 1.760" by writing:
String.format("Weight of %.3f", 1.759555555555);In FindPath, the total cost should be computed by summing the actual values of the individual weights, not the rounded values. Rounding should only be done when values are printed.
-
As in the
marvelassignment, a path from a node to itself should be treated as a trivially empty path. Because this path contains no edges, it has a cost of zero. (Think of the path as a list of edges. The sum of an empty list is conventionally defined to be zero.) So your test driver should print the usual output for a path but without any edges, i.e.:path from N to N: total cost: 0.000
This applies only to nodes in the graph: a request for a path from a node that is not in the graph to itself should print the the usual "unknown node NODE" output.
You should put all of your script tests for your Dijkstra's algorithm implementation in the folder src/test/resources/testScripts/.
To illustrate the use of the above format changes, there is a sample test included that demonstrates Dijkstra's
algorithm correctly finding the minimum cost path on a simple example graph. Remember to use what you've learned
in this class about designing a quality test suite. Once again, this is a good place to commit
what you already have, and the staff recommends you do so before starting the next part.
Take a Break
Congratulations on successfully implementing and testing Dijkstra's algorithm on your shiny new generic graph! You'll be using that algorithm in the next part on a dataset containing information about paths to and from different locations on campus in order to find the shortest path between any two places!
For now, take a break from working for a little while and get some fresh air. Let your eyes relax from staring at a screen, and make sure you've eaten recently. :) You're almost there!
Preparing for Part 4
Model-View-Controller
The Pathfinder application makes use of the Model, View, Controller design pattern to factor out logical portions of the code and reduce coupling, thus making the code much more maintainable. In this homework assignment, you'll be completing an implementation of a Model that will work with a View and Controller that we're providing (the text user interface). In future assignments, you'll be using said Model with a new View and Controller that you get to design and create yourself. Specifically, you'll be using web technologies like Javascript to design a graphical user interface for your applications that users can use to find the shortest path between two points on a map of campus. That's the power of Model-View-Controller design - you can have the same code handle all of the work of parsing and representing the campus data and finding paths within it (the Model) and just swap out a View and Controller for something entirely different later! If your code didn't make use of the Model-View-Controller pattern and had a lot of coupling between different parts, it would be a lot harder to make that change later.
Below, you'll find a description of the different parts of a Model-View-Controller system, and how they're
intended to work together. For a text user interface, it's very difficult to completely separate the view and
controller, so you'll see in our provided code that it's might be a little harder to tell the difference between
the two parts. In general, the TextInterfaceController class handles most of the work of the
controller, while the TextInterfaceView class does most of the work of the view, however those two
classes are very heavily coupled. The difference/separation between the Model and the View/Controller, however,
should be very clear. Your job, in part 4, will be to make CampusMap class correctly implement the
interface ModelAPI by coding up the methods specified in ModelAPI. Note: ModelAPI
isn't the entire model, but it's the part that the View/Controller interact with. The model also includes things like:
your graph implementation, your data parser, and dijkstra's algorithm. You can think of ModelAPI as
the set of behaviors that the view and controllers expect from the model. By creating this small layer that is
the only thing the view/controller know about, we dramatically reduce the amount of coupling between the model
code and the view/controller code.
The Three Pieces: Model, View, Controller
-
The model consists of the classes that represent data, as well as the classes that load,
store, look up, or operate on data. These classes know nothing about what information is displayed to the
user and how it is formatted. Rather, the model exposes observer methods the view can call to get the
information it needs.
In general, functionality of a model includes:
- Reading data from the data source (text file, database, etc.) to an in-memory representation
- Storing data while the program is running
- Providing methods for the view to access data
- Performing computations or operations involving the data and returning the result
- Updating the in-memory state (if the application allows the user to modify data)
- Writing to the data source (text file, database, etc.)
-
The view implements the user interface. It should store as little data and perform as
little computation as possible; instead, it should rely on the model for data storage and manipulation. The
view decides how the user sees and interacts with this data.
The view answers questions like: Does the user interact with a text interface or a GUI? What does the user type and/or click to get directions from CSE to Odegaard? How are those directions formatted for display? Is there a screen at all, or will your directions be read aloud to the user? What language is used to communicate to the user? What message does the user see upon requesting directions to an unknown building?
-
The controller listens to user input. Based on the user's keystrokes, mouse clicks, etc.,
the controller determines their intentions and dispatches to the appropriate methods in the model or view.
For a simple interface like in this assignment, the view and controller may be intermingled somewhat in code. Don't worry too much about the separation there; the key point for now is that the model is cleanly separated and reusable.
The Campus Dataset
We're providing a dataset containing information about a large network of pathways between many different locations on and around campus. You'll use this dataset to construct a graph representation of the campus map, which you can then use your implementation of Dijkstra's algorithm on to determine the shortest path between any two points.
In the src/main/resources/data directory, we have provided four files related to this dataset. Two
are tab-separated-value (tsv) files, similar to the ones you used in the marvel assignment: campus_buildings.tsv
and campus_paths.tsv. The other two are image files: campus_map.jpg which is a
standard (but old) map of campus, and campus_routes.jpg, which is a graphical representation of the
data contained in campus_paths.tsv. You will not use either of the image files for this assignment,
they're included just for your reference to help you understand the data included in the tsv files.
Note: just like the marvel assignment, there is no src/test/resources/data directory. If
you would
like to use your own tsv files in tests, you should put them with the other data files in
src/main/resources/data. To use the actual campus dataset, use the file
campus_paths.tsv
for the path data parser method, and campus_buildings.tsv for the building data parser method).
Just as in the marvel assignment, you can open the tsv files with any standard text editor to view
them. Their formats are described below for your reference. In this assignment, we are providing an
implementation of a parser for you that can read the campus_buidings.tsv and
campus_paths.tsv files and return Java objects representing the data contained in them. The
provided parser works similarly to the parser you wrote in the marvel assignment. You are free to modify or
completely remove/replace the provided parser, if you would like. The provided parser already works
correctly with this file format, and the information included in the next section is included only for your
reference if you'd like to implement your own parser. You should still read the section, however, so you
understand the meaning of the data you'll be working with.
The Campus Dataset Format
campus_buildings.tsv contains information about all buildings on campus, based on the time the file
was created. (This is a little out of date, the dataset we're working with is based on a map of campus from
2006, so you'll notice some minor differences from what campus looks like now.) The file often contains the
locations of multiple entrances for the larger buildings, such as Mary Gates Hall. Each line in the file is of
the form:
shortName longName x y
Each of the fields are separated by tabs. In the above, shortName is a short nickname for the
building/entrance being described by the line. You'll use this short name to refer to buildings in your user
interface, so your users don't have to type out or read the full name of buildings. longName is the
full name of the building/entrance, and is useful when displaying information to your user. An example shortName/longName
pair is "MGH (E)" and "Mary Gates Hall (East Entrance)". There may be spaces in the long or short names of a
building, as seen in the example. You may assume that both short and long names are unique; that is, no two
entries have the same short or same long names. The x and y fields make up a
coordinate pair (x,y) that represent the location of that building/entrance (in pixels) on campus_map.jpg.
campus_paths.tsv contains information about a large number of straight-line paths between two
points on campus (there are over 5500!). These points may be buildings, as defined in
campus_buildings.tsv, or just additional points throughout campus, such as the intersection of two
sidewalks. The vast majority of the points in this file do not correspond to particular buildings, and instead
make up parts of larger multi-segment pathways between buildings. See campus_routes.jpg for an
image of what the data in this file looks like. Each line in campus_paths.tsv is of the form:
x1 y1 x2 y2 distance
(x1,y1) and (x2,y2) are two coordinate
pairs representing points (measured in pixels) on campus_map.jpg. distance is the
distance of the straight-line path between those two points, measured in feet. You should not attempt to
calculate the distance between two points in this assignment by using the pythagorean theorem (or any other
math). Instead, just use the provided distance in this file wherever you need the distance between two points.
You may assume that there are no duplicates in this dataset. Some of these points are exactly the same as points
found in campus_buildings.tsv, and represent paths that begin/end at those building entrances.
The information here is included for your reference so you can understand the data. Remember that you can use
the provided parser, CampusPathsParser, in the pathfinder.parser package, which will
return lists of CampusBuilding and CampusPath objects that contain all the data
described above, for you to use as you please. See the documentation in the classes in the pathfinder.parser
package for more information on how this works.
Part 4: The Pathfinder Text User Interface
You will make use of provided View and Controller classes for a text user interface, and connect them with your
model (your graph and supporting classes) to create a fully-functional application that you can interact with!
You're encouraged to take a moment to explore the provided code in the pathfinder.textInterface and
pathfinder.datastructures packages, which implement a view and controller for the text user
interface in addition to a number of supporting classes used by the view and controller.
See the Pathfinder class in pathfinder.textInterface for the main method
that will be run when your application is started. It creates objects for the model, view, and controller, and
properly links them together. The CampusMap class is a class that implements
ModelAPI
you'll implement that interface later in this part. The TextInterfaceView class implements a "view"
for
command-line interaction that determines how things are printed out to the user. The view class is provided with
a reference to the controller class (using setInputHandler) so it can pass input events to the
controller for it to handle. The TextInterfaceController class implements most of the controller
for this application, and needs a reference to the model so it can query the model for data and computations,
and a reference to the view so it can call view methods to respond to the user input events it receives as an
InputHandler. Once all this is set up, the main method calls the controller's launchApplication
method to tell the controller it's time to prompt the user for input and start responding to it. Both the
TextInterfaceView and TextInterfaceController are expecting an object that implements
ModelAPI.
Since we are providing an implementation of the text user interface to you, you do not need to worry about the specifics of the interface being described. However, you are encouraged to explore the codebase provided and understand how and why the view, controller, and supporting classes work the way they do. Provided at the end of this spec is an additional section that describes the specification of the text user interface, so you can see why certain decisions were made. It is not required that you understand all these specifics, but it is useful to look at and good preparation to do so before you implement your own view and controller in a later assignment.
Implementing your Model
The existing controller makes calls to a CampusMap object which implements the
ModelAPI interface.
The controller expects to return data from the model or request that the model do some computation. Right now,
the CampusMap class is mostly empty, and only implements an interface. It's your job to implement
the
methods according to the provided specifications in the ModelAPI interface, using things like
your
generic graph implementation, dijkstra's algorithm implementation, and the provided parser. You should implement
the
method stubs exactly as specified and not change the specifications, as the provided code is using those methods
according to their provided specifications. (This is a good example of how important specification decisions can
be - once other code has come to rely on specifications, it can be difficult or impossible to change them
later).
You are free to add any other methods or classes as part of your model if doing so makes sense for your design.
You should continue to practice good design principles throughout this assignment. Once you've finished your
implementation of CampusMap and any supporting classes, the Pathfinder application should be
ready to run! Use the hw-pathfinder:runPathfinder gradle task to run your finished application and
interact with it in the command line. Have some fun with it - you've worked hard over the last few weeks to get
to a fully-functional application that uses your generic graph to do something really interesting!
As described in the marvel assignment, IntelliJ sometimes has some issues when using interactive text entry
after running a gradle task using the Gradle window or IntelliJ's run menus. For that reason, we
strongly recommend that you run the hw-pathfinder:runPathfinder task from a command line,
such as the IntelliJ terminal window at the bottom of your screen.
Testing your Application
The behavior of the provided methods (that used to be stubs) in the CampusMap class are based
primarily on the dataset used and are implicitly tested as part of the final functionality of the text user
interface of your application. For the purposes of this assignment, you don't need to write JUnit tests for
those methods. You should, however, test any additional methods that you write as part of your model or
any supporting classes. Write these tests as JUnit test cases and place them in test/java/pathfinder/junitTests.
Hints
Documentation
When you add generic type parameters to a class, be sure to describe these type parameters in the class's Javadoc comments so the client understands their purpose.
As usual, write inline comments to clarify complicated blocks of code when necessary. We recommend you write loop invariants for any complex loops to help save you from having to debug loop errors later, but you aren't required to write them for this assignment. Be sure to include an abstraction function, representation invariant, and checkRep in all classes that represent a data abstraction (ADT). If a class does not represent an ADT, place a comment that explicitly says so where the AF and RI would normally go. (For example, classes that contain only static methods and are never constructed usually do not represent an ADT.) Please come to office hours if you feel unsure about what counts as an ADT and what doesn't.
Make sure you remember what you learned from the earlier assignments - design and document your solutions to these parts before jumping straight in and writing code. You'll have a much better structured application if you put some thought into the design first. Think about how different parts of your application will work together.
How to Turn In Your Homework
Refer to the Assignment Submission Handout and closely follow the steps listed to submit your assignment. Do not forget to double check your submission as described in that handout - you are responsible for any issues if your code does not run when we try to grade it.
Use the tag name hw7-final for this assignment. To verify your assignment on attu,
run the gradle task: hw-pathfinder:runPathfinder and use your application to make sure it's working
as-expected.
Your TA should be able to find the following in your repository:
src/main/java/pathfinder/*.java[Your text user interface and dijkstra's algorithm implementation.]src/test/java/pathfinder/junitTests/*.java[JUnit implementation tests that you write for all parts.]src/test/resources/testScripts/*.expectedsrc/test/resources/testScripts/*.test
Additionally, be sure to commit and push all updates you make to the following files:
hw-graph/src/*/java/graph/*[Your graph ADT and test classes]hw-marvel/src/*/java/marvel/*[Your Marvel Paths application and its tests]
Optional Additional Information: Text User Interface Specification
These are the requirements for the text user interface. It has already been implemented and supplied for you with the starter code, so you will not have to create it. The requirements are given here to help you understand what it does and how to use it.
Your program should begin each prompt with a blank line followed by the line:
Enter an option ('m' to see the menu):
Each prompt should end with a single space and no newline, so the user enters their input on the same line as the prompt. Each line of user input that your program reads from the standard input should be one of the following:
-
b: This command should list all buildings as found in the
campus_buildingsdataset in the formshortName: longName. There should be one entry of that form per line, and one extra empty line should be printed after the last building. There are no spaces before the colon, and exactly one space after the colon, not counting spaces that are part of the short or long names of the buildings as found incampus_buildings.tsv. Each line should be indented by one tab character (\t). The buildings should be printed in alphabetical (lexicographical) order byshortName. At the beginning of this output should be a single lineBuildings:with no indentation or additional whitespace. -
r: This command should prompt the user for the short names of two buildings, then print the
path between those buildings. The prompts are of the form:
Abbreviated name of starting
            building:
Abbreviated name of ending building:
There should be exactly one space after each prompt, to separate the user input from the output of the program. The user should input their desiredshortNameon the same line as the prompt. Your program should use Dijkstra's algorithm to find the shortest path between those two buildings, then print the path out to the user. See below for a description of the format of route output. - m: This command should print a menu that describes all the commands available in your pathfinder application. This menu should list all commands in the format described below.
-
q: This command should quit the application. It should do so by causing the
mainmethod of your program to return. You should not callSystem.exitor use any method other than returning frommainto exit your program, as doing so might prevent certain methods of testing from working correctly. -
A line beginning with
#: This should be treated as a comment line and be printed to the output exactly as it was input, including the#. - An empty line: This should also be printed to the output exactly as it was input. That is, an empty line should be output.
If the input does not match any of the above cases, your program should print the line:
Unknown option
Route Format
There are a few parts to printing out the route that your algorithm finds between two paths. When the r command is received, your program should prompt the user for the short names of two buildings in the dataset, as described above. If one or both of the buildings is not in the dataset, your program should output the following:
Unknown building: SHORT_NAME
Where SHORT_NAME is replaced with the short name of the building that could not be found. If both
buildings could not be found, two of these messages should be printed, in the order that the buildings were
input by the user. These messages should not be printed until both buildings have been entered by the
user, even if the first building is unknown.
You may assume that, if both buildings exist in the dataset, that there will be a path between them. When your program finds a path between two known buildings, it should print that path as follows. First, it begins with a line:
Path from START_LONG to END_LONG:
Where START_LONG is the long name of the building at the beginning of the path,
and END_LONG is the long name of the building at the end of the path. This should be followed by a
sequence of lines of the form:
Walk DISTANCE feet DIRECTION to (X, Y)
In the above DISTANCE should be replaced by the length (in feet) of that segment of the path, and
X and Y should by replaced by the x and y pixel coordinates of the point at the end of
that segment of the path. All three of those numerical values should be rounded (not truncated) to the nearest
integer. Each line should be indented with a single tab (\t) character.
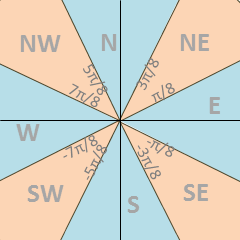
DIRECTION should be one of the eight compass directions N, E, S, W, NE, NW, SE, SW. You can
determine the direction of each segment by comparing the start and end points of the segment and doing some
math. The method Math.atan2 and constant Math.PI may be helpful to you in doing this.
Remember that the image coordinates (and therefore your pixel coordinates) begin in the top left of the
image, while standard cartesian coordinates (like those used with Math.atan2) begin in the bottom
left. Think very carefully about how you should determine which direction should be used. It may be helpful
to sketch some examples out on paper first.
Use the following image to determine which angles correspond to which compass direction that should be printed. If a segment angle exactly lines up with the border between two compass directions, you can select either one.
Finally, you should print the line:
Total distance: DISTANCE feet
In the above, DISTANCE should be replaced with the total distance of the path. It should also be
rounded to the nearest integer, but only once the final sum of all the segments are calculated. You should not
add up the rounded distances of each path segment. The above line is not indented at all.
Menu Format
The menu printed should be identical to the following, where the last three lines are indented by a single tab.
Menu:
  r to find a route
  b to see a list of all buildings
  q to quit