Contents:
- Introduction
- The Overall Picture: What is CampusPaths?
- Roadmap: Suggested Path Through This Assignment
- Backend: Your Spark Java Server
- Frontend: Your React Web Application
- Optional Extra Features
- Useful Info, Common Issues, and Other Hints
- Resources: Useful Links all in One Place
- Assignment Submission
Introduction
In a previous assignment, UW Marketing commissioned you to write a route finder tool. Marketing is pleased with your initial results, but now they've asked for a graphical user interface (GUI) that visually draws routes on a map.
You will build your GUI using React (like in the Connect the Dots assignment) and the Spark Framework. Unlike the pathfinder and Connect the Dots assignments, this time you are building both the frontend and the backend! You will get practice using these tools, event-driven programming, and the model-view-controller (MVC) design pattern. You'll probably write less than 50 lines of Java code and about 250 lines of TypeScript to complete the basic requirements.
You are expected to fix any bugs from previous homeworks that affect the correctness or performance of your application in this assignment. You are also required to fix code quality/organization issues in your pathfinder code.
When you're done, you can show off your awesome looking campus-map-route-finding application to your friends and family!
The Overall Picture: What is CampusPaths?
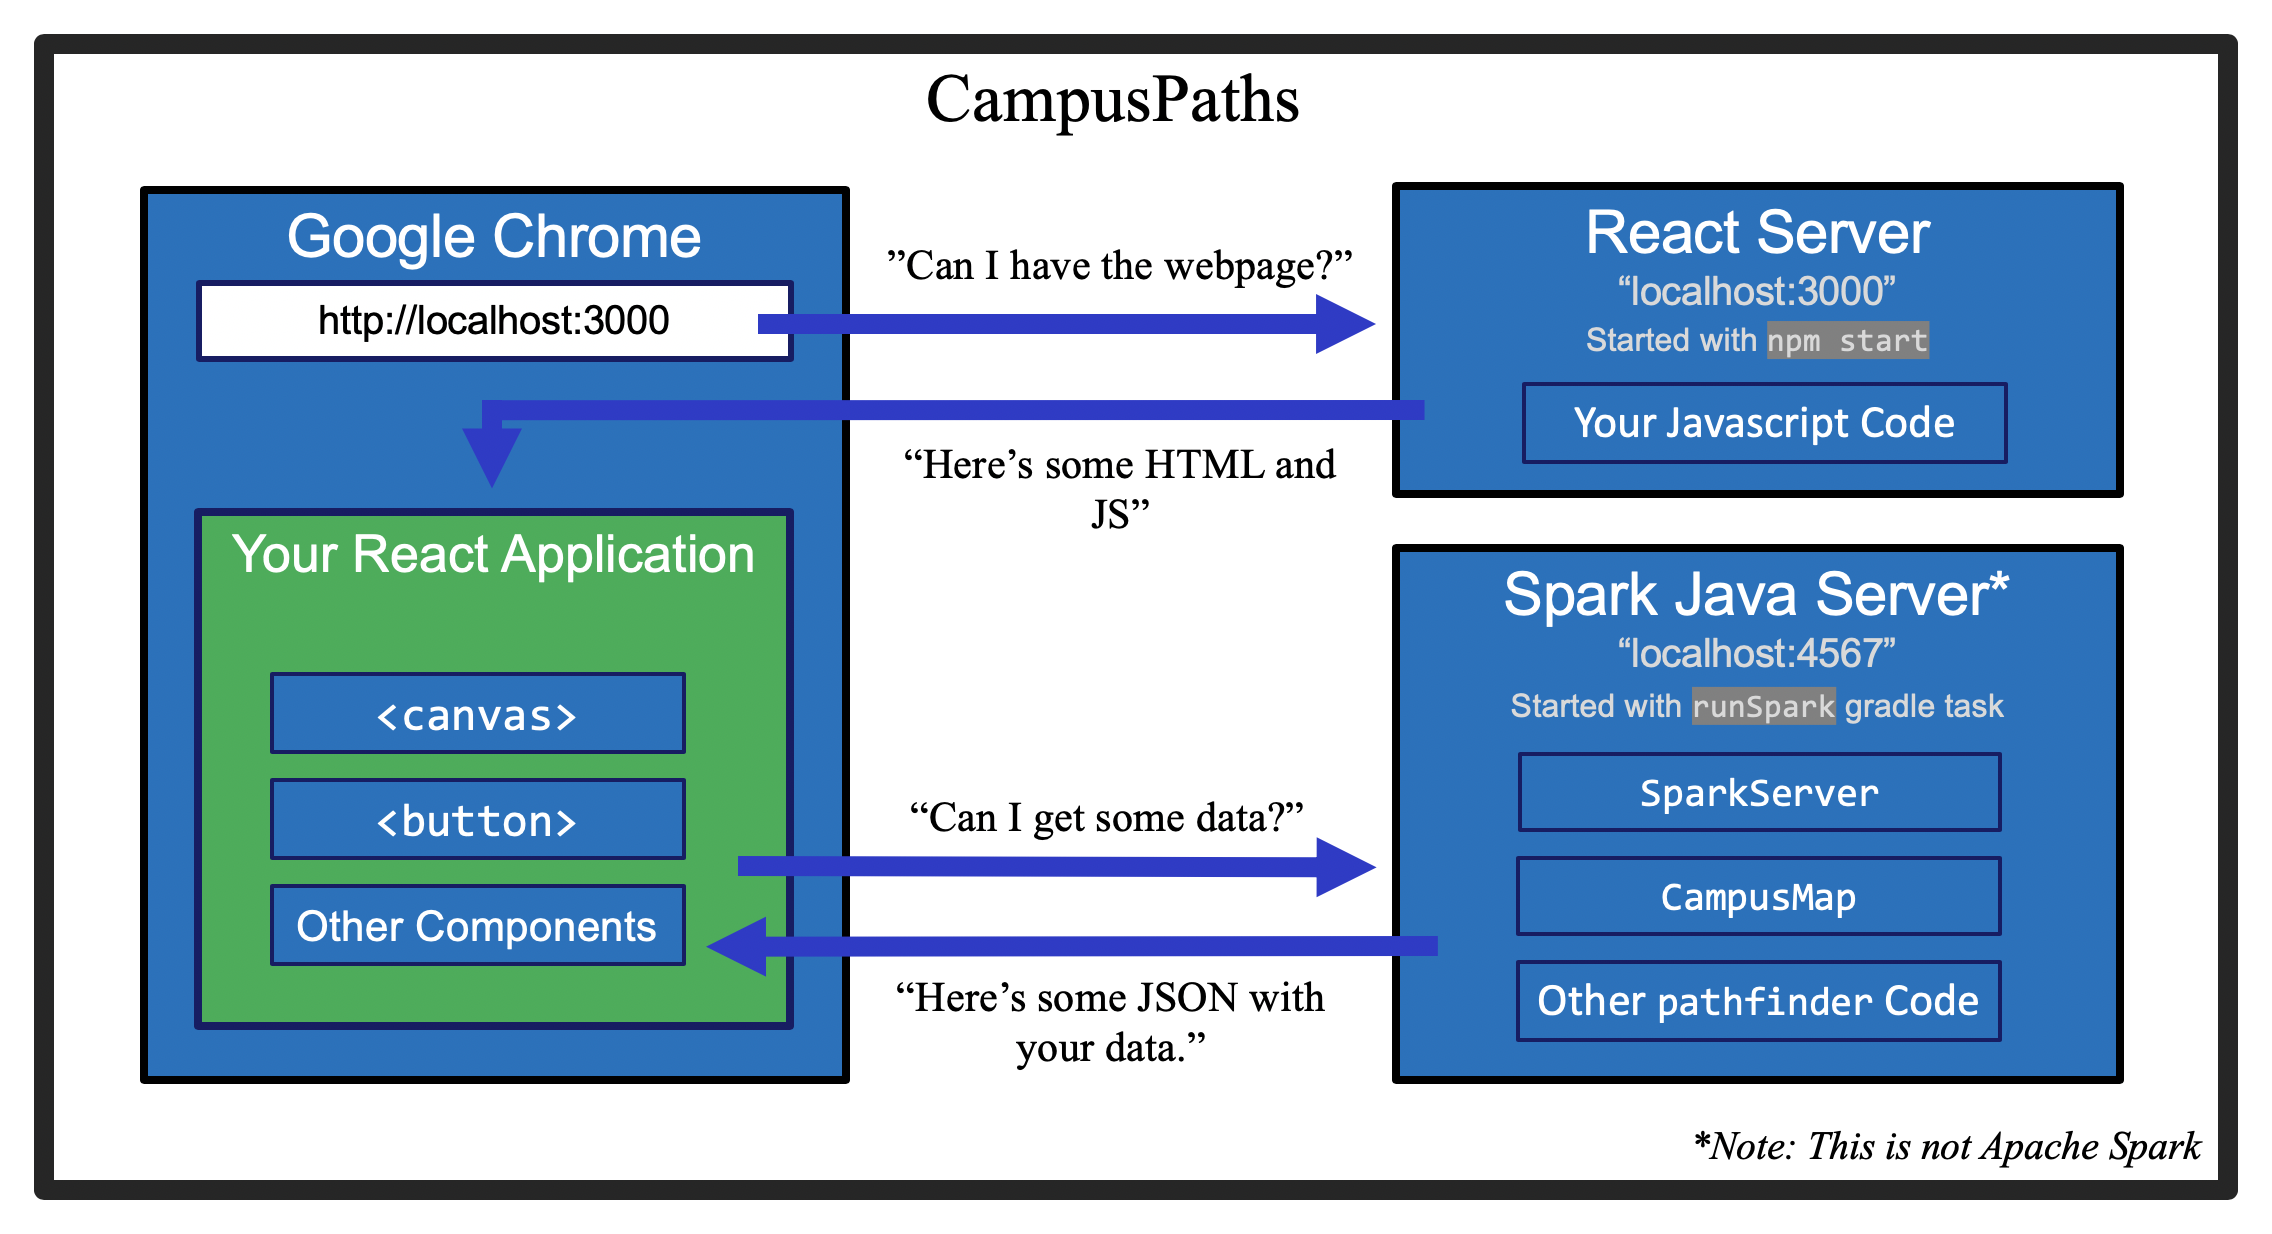
The above diagram is an overview of the basic structure of the application that you'll be building in this assignment. Note that there are two servers this time around. In the Connect the Dots assignment, you had one client (Google Chrome) and one server (the React server). The React server is a part of React, not something you needed to write. It was the React server's job to put all the different parts of your application together before sending it to Google Chrome to be shown to the user. In this application, the React server has the same job.
The additional interesting part of this assignment is the second server, which is a server you'll be writing in Java using the Spark Java framework. There are many more details in the "Backend" section of this assignment spec, but the main job of the Java server is to allow the React application to access the campus paths data. This might take the form of requesting information about buildings on campus, or asking the server to calculate the shortest path between two buildings and respond with the answer. Fortunately, you've already written all the Java code you need to manage this data and perform those calculations, you just need to create a server the allows clients (like your React app running inside Google Chrome) to make requests for data.
Roadmap: Suggested Path Through This Assignment
In an effort to give you a clear path to completing this assignment, there is a suggested order listed below. You are not required to complete this assignment in this order, but it might be helpful to.
- Read the entire spec before doing anything. Having the context of knowing how you're going to use the different parts of your application together is incredibly important.
- Consider a basic idea of how you might want your React app to work, and what data it might need to be able to access.
- Work on writing a simple backend (Spark Java server) that can provide this data to your React application when it's called. Consider this a first pass - if you decide you need more/less functionality once you've written your GUI, you can always go back and modify your server.
- Sketch the basic design of your GUI web application on paper, and make sure it can implement all the required features listed in this spec.
- Break down your application into small, manageable sections that can each become their own React components. Think about how data may flow between these components. The React documentation has extensive discussion of how to properly organize data in a way that makes sense, if you're curious. The basic idea is the same thing we've been doing since we started React: data flows downward from parent components to children through props, which means data should be stored in the common parent of all components that need access to a particular piece of data. React calls this "lifting state up."
- Start writing some simple versions of the React components you're going to use, and get some basic structure of your app on the screen. Maybe hard-code a request for a path from "CSE" to "PAB" (for example) and make sure that that path displays properly as a stepping stone between a blank map and allowing your user to select any two buildings to find a path.
- Fill out the rest of your application. Pull/commit/push your code regularly as you complete small parts, and add more functionality slowly, testing as you go, until you've completed all the basic requirements outlined in the spec. Go back and modify your server if you need to, either to add missing functionality or remove unnecessary functionality.
- Once you've completed the requirements outlined in the spec and thoroughly tested for functionality and error-handling, commit your code and go take a break. Maybe have a cookie (or other treat) to reward yourself for a job well done at completing the final assignment!
- If you'd like to, add some styles (CSS or otherwise) to make your application pretty.
- If you'd like to, add some extra features/functionality to possibly earn a little extra credit.
In designing your React frontend in more detail, it may be helpful to read the React documentation's Thinking in React section (as well as maybe the Lifting State Up section for some more gritty details). The "Thinking in React" section walks you through a simple application built in React, and discusses how a React developer might start with an idea of an application and work her way up to having a completely functional application. You certainly don't need to follow that section step-by-step, but it has some suggestions about what to think about when you're designing at a high-level, and your final application needs to use good React style.
Backend: Your Spark Java Server
Since you already know the basics of creating a React application from the connect the dots assignment, the
backend is where you'll encounter the majority of the new material for this assignment. Fortunately, Spark is a
very simple Java framework that requires very little code to get a fully-featured Java server running. You saw
Spark in lecture, so we won't be repeating all of the basics here. If you're curious, Spark has some
documentation on their main webpage, and they also offer a complete set of javadocs for the API. We're
providing a class called SparkServer (inside hw-campuspaths-server/) with a
main method that is where you should create all your routes and do any other initialization that
you may need to. (For example, you probably want to create an instance of CampusMap that you
can use to fulfill requests that are sent to your server.) Note that you should not create a new
CampusMap each time your server receives a request, because then all the work of loading data and
creating a graph needs to be repeated for each request, slowing your application down.
Creating this application shows us exactly why the Model, View, Controller design pattern is so helpful. You
originally implemented the CampusMap class to be used with the text user interface from the
pathfinder assignment, but now you'll be able to reuse parts of it for this assignment without having to modify
it much (if at all). Separating the model (all your graph code, pathfinding code, and parsing code) from the
view and controller in the pathfinder application by using CampusMap (and the ModelAPI
interface that it implements) has made it much easier to reuse all of that code for something completely
different!
You should implement a Spark Java server that allows other applications to make requests to query data and
computation from your preexisting pathfinder application. You're writing this server specifically to support the
React application that you'll be building, so you can design this server to respond to exactly the requests that
your React application will make. Your SparkServer class shouldn't do much more than contain a the
main method and define all the different routes in your application - your routes will probably
only do a very small amount of processing and leave most of the work to calling the methods of a
CampusMap
object. You're free to create whatever routes make sense for your overall CampusPaths application, the server
will probably be very minimal. For reference, the staff solution only has two routes, and those two routes do
almost no processing other than call methods inside CampusMap. You may modify
CampusMap,
but you probably don't need to in order to fulfill the base requirements of this spec, and you should do so
carefully. In particular, you should not change/break any preexisting functionality - the pathfinder application
should still work as it did before this assignment.
Using JSON to Send Data
One of the trickiest parts of communicating between two separate programming languages, like Java and TypeScript, is effectively sharing data between them. A Java object works completely different from a TypeScript object, so how are we supposed to send information from the server about paths, and buildings, and other campus data, and have the TypeScript code in your React app be able to understand it? This is where JSON comes in. JSON stands for TypeScript Object Notation: it's a way to take a TypeScript object and turn it into a string that represents it. The powerful thing is that you can also go the other way: take a JSON string and turn it into an actual TypeScript object that you can then pass around, read fields of, and update as you wish. To solve this problem of communication, we're going to have the server always respond to requests by sending a JSON string. That way, the TypeScript code that made the request can just turn the JSON string into an object and read the fields inside that object to get the information it's looking for.
How do we take a Java object inside our server (maybe one that represents a path, or some other data that we want to sent) and turn it into JSON? The folks at Google realized a while back that they had this same problem and invented something called Gson that can do just that. Gson is an extremely powerful and feature-filled Java library, but the basic idea is that it can take a Java object and turn it into a JSON string that contains all the same data. (It can actually go the other direction too, take a JSON string and turn it into a Java object, but that's a much more complicated process and not necessary for this assignment.)
We now know the basic ideas behind this server: when your React application makes a request to it, one of the
routes you defined in your Spark server is run. That route's handle method should get any
additional info from that request (if there is any), and call methods of CampusMap to get the
information that was requested. Then, the handle method will use Gson to turn the response data
into a JSON string, and return that JSON string. Spark will take the String you returned from the
handle method and send it back to your React application that made the request.
Running and Testing Your Server
To start your server once you've written some code, use the provided hw-campuspaths-server:runSpark
gradle task. Note that gradle will start the server and then keep running, you won't get a "BUILD SUCCESSFUL"
message until after you stop the server. Also note that, unlike React, if you change any of your Java code, you
won't see the changes right away. You'll need to completely stop and re-start your server to have the new
changes take effect. You'll see in the starter code (SparkServer.main) that there's a CORSFilter
object that's created, and has the apply method called on it. You should not remove or modify this
code, and you should leave it at the very top of your main method. This just sets up some extra
settings to make sure that the React application and the Spark server can talk to each other even though they're
running on different ports. (React is running on port 3000 and Spark on port 4567 – normally this isn't allowed
for web security reasons, but the CORSFilter object tells Google Chrome that this is OK.)
Once you've got some of your server running, you probably want to test it. Fortunately, you don't need to create the whole GUI before you can test it. Since requests to the sever are just made up of web addresses, you can send a request to your server by hand and see what the results are. (Note that you don't need to do any automated or unit testing for the server code you wrote, manually checking that your server is working is enough.) First, make sure you've started your server and that it's running. Then, open Google Chrome and, in the address bar, type:
localhost:4567/YOUR-ROUTE-HERE
You can replace "YOUR-ROUTE-HERE" with any route that you've defined (and optionally add query parameters as described in the slides from lecture) to send a request to your Spark server. The JSON string that your server sends back will be displayed in the browser window as plain text. Try sending a couple requests for paths between buildings on campus and make sure the server looks like it's sending the right thing back. Congratulations, you're now the proud owner of a shiny new Java web server!
Frontend: Your React Web Application
Now that you've created this fancy server, it's time to create a React application that'll use it! Here's your chance to get super creative: you can design your GUI application to look however you want, as long as it meets some basic requirements that we're outlining below. Most of your time on the assignment will probably be spent creating the GUI. While this interface is a little more complicated that what you did in the Connect the Dots assignment, and there isn't as much provided starter code, the core concepts are the same. You're encouraged to look back the the code you wrote in the Connect the Dots assignment and the lecture/section slides and demo code about React to remember how to structure a React app and create your own components.
You'll be creating your application in hw-campuspaths/, most of your code will go in hw-campuspaths/src/
and there is a provided image file of the campus map that you should use in hw-campuspaths/public/.
You are encouraged to use the provided starter code that loads the image and sets up the canvas to be the same
size as the image. If you want to modify or replace this starter code, you're welcome to, but beware that canvas
sizing can be very tricky to get right. Note that aesthetics do not matter for this assignment.
As long as your interface is easily understandable and usable, it doesn't matter how ugly it looks. You're
welcome and encouraged to make it pretty if you'd like, but wait until you have all the required functionality
complete first before doing so.
Remember the basic commands for getting your React application up and running: npm install the
first time you start working on this project, and npm start to get your React server running. You
should run these commands from hw-campuspaths/. (To see what directory you're currently inside, use
the pwd command. To change into a directory, use the cd command. This means that if
you're in the base directory of your repository, use cd hw-campuspaths to change into the correct
directory.)
The following are the requirements for your application to get full credit. Note that a lot of these are open-ended: you're free to choose how to implement them and design the interface for doing so yourself. However, it must be easy and intuitive to understand how to use all the features described below.
Your campus paths GUI must:
-
Prominently display the map of campus as found at
hw-campuspaths/public/campus_map.jpg. - Allow the user to select two different buildings. You can do building selection any way that makes sense - you might use a drop-down list, a text box, or something completely different. A user of your application shouldn't need to know anything specific about our dataset, such as the format of building short names or long names. This means that if you use something like a text box (instead of a drop-down or some other format that has predefined choices), you'll need to make sure the user has a way to know what things are valid to put into the text box.
- Draw the shortest path between the two selected buildings directly on the map. What the path looks like is your choice, but it should be clearly distinct from the rest of the map and easy to see. You may choose to wait to find and draw the shortest path until the user clicks a button, if you wish, but you don't need to.
- Have some kind of "reset" button that resets all parts of the GUI to their initial states, as if the page was just loaded for the first time. This should clear any markings on the map, clear text fields or drop-down lists if you have them, and otherwise reset the rest of your application. If you choose to add additional features beyond the requirements of this assignment, the reset button should also reasonably reset those features to their default/starting states.
-
Operate Robustly: Your application should deal with bogus input from the user and possible server errors
gracefully. An exception should never be allowed to bubble up and show the React error message
screen on the website. Depending on the error situation, it may make sense to display a message to the
user (perhaps with
alert()) describing the error and how they might fix it. Your GUI should never crash or reach a buggy or invalid state. When in doubt, ask your friend/roommate to try their best to cause an error, and make sure your application can handle anything they can throw at it.
Beyond these requirements as listed, you're allowed to do whatever you'd like to make this application your own. Make sure you've completed the basics of this application before you spend too much time experimenting.
Sending Requests to your Spark Server from React
Sometimes your React application will want to send requests to your Spark server to get data to display, this may be in response to some user input, or just as the React application is setting itself up for the first time. TypeScript can make web requests from inside the browser by doing a "fetch".
A fetch is just like a normal request, as if you were typing a URL into your browser address bar and looking at
the output in the window. Instead of using the browser GUI, though, you create the URL to request inside
TypeScript, and the response to the request is returned to you in the TypeScript for you to do whatever you want
with. The fetch documentation has a
few sections that'll be particularly important to check out: "Response/Body", and "Checking that the fetch was
successful". Remember that your application should be able to gracefully handle errors that the server reports
(or if the server never responds, such as if it was never started). Note that the examples in that documentation
use the traditional Promise syntax for TypeScript. You're welcome to use that if you'd like, but we highly
recommend (and support) the async/await syntax for dealing with Promises, which will look different. In
particular, you won't need calls to .then() or .catch(), instead using keywords like
await or try/catch blocks. See the section demo code and section slides for more
information and examples on using fetch to communicate between the server and your React application.
In the industry, there are some technologies that can be used for testing GUIs. However, they are often complicated and are definitely beyond the scope of this course, so you don't need to worry about any sort of automated testing for your GUI or your TypeScript.
General Advice
Remember to think about where you are in the React lifecycle whenever you're writing code, and make sure that
what you're doing is always appropriate for that place in the lifecycle. See the Connect the Dots code for
examples of proper lifecycle management. Make sure you're always using good React style: don't use
document.getElementById or similar methods, the only call to ReactDOM should be in index.tsx
(we provided it for you), and you should use state and props correctly. In the React
documentation, there is a sidebar on the right labelled "Main Concepts." In that sidebar, sections 5 (State and
Lifecycle), 10 (Lifting State Up), and 12 (Thinking in React) might come in handy for this assignment in
particular, and are recommended, though they can be slightly more advanced that we're used to.
Optional Extra Features
You're encouraged to express your creativity with this assignment. Once you have a complete, working version of the basic assignment as described above, commit a final working copy to your repository so you'll always be able to go back to it in case you need to. Then, consider implementing some extra features or improving the visual aesthetic of your application.
The only rule for extra features is this: don't break existing rules or feature requirements. None of the things you add should get in the way of your application satisfying the requirements outlined in this spec: you're still bound by those requirements even if you do extra stuff. Outside of that: go crazy! Some ideas are listed below, in no particular order:
- Allow the user to select buildings by clicking on the buildings (or markers for the buildings) directly on the map.
-
When the user selects a building, mark that building's location on the map before they even click a button!
(You probably will need to modify
ModelAPIand/orCampusMapto allow your server to send more data to your React app - you'll need some kind of data that has the building names and their x/y locations so they can be drawn on the map.) - Zoom the map automatically when a path is found, so the path is as big as possible and only the part of the map that contains the path is visible.
- Add zoom buttons so the user can automatically zoom the map in/out. You could also additionally make the map respond to a scroll wheel. (There are lots of different event listeners you can use to detect different things users do with their mice/keyboards, look up Mozilla's Javascript event documentation for examples.)
- Allow the user to click and drag the map around to see different parts of it.
- Add some cool/silly/fancy animations of your choice.
- Generate a MapQuest-style list of walking directions your user can follow once you've found a path. Think about what format might be the most useful for your user trying to find their way to another building on campus.
- Email a list of directions to your user, or maybe a picture of the map with the path drawn, or both!
For this assignment, you're allowed to edit hw-campuspaths-server/build.gradle and/or hw-campuspaths/package.json
if you'd like to add additional libraries to help you implement these extra features only. Be absolutely
sure you know what you're doing, and that you don't change/break any preexisting functionality of those
files. The staff isn't able to support any additional libraries you may add to your application.
If you decide to add any additional features to your application, document them in
hw-campuspaths/extras.txt. If the functionality/features you add show significant effort, you can earn
some extra credit for this assignment! Note that purely aesthetic changes, like changing the font or the
background color, aren't enough to warrant extra credit. Only features documented in extras.txt
will be considered for extra credit. Again, make sure your additional features don't break any of the
functionality that is required above. Extra credit can help you earn back points that you lost elsewhere in this
assignment, or might be considered when determining final grades for this course, but it's ultimately a small
source of additional points.
Useful Info, Common Issues, and Other Hints
-
You don't need to worry about installing Gson, Spark Java, or fetch. We added instructions in
build.gradleandpackage.jsonthat tell gradle and npm to install them for you. You can skip any instructions about installation that you might see in their documentation and just import and start using them in your code. - React will automatically recognize any changes you make to TypeScript files that are part of your application when you save them, and it'll reload the page in Google Chrome for you. This means that once you start the React server, you probably won't need to stop and restart it while you're developing.
-
Unlike the React server, the Spark Java server will not recognize changes you make to your
Java files as you develop - this is because Java needs to be compiled before it's run. If you make a change
to your Java server, you need to stop the current server and re-run the
hw-campuspaths-server:runSparkgradle task to compile your new Java and restart the server with the changes. - Don't try to make your application pretty or add any additional features until you've completed the basic functionality and have a complete solution to the assignment. It's easy to get caught up in picking the perfect background color or font style, but that isn't the point of this assignment.
- Check out the React Developer Tools Google Chrome extension, created by Facebook (the people that made React). It's a useful tool that adds a tab to your Developer Tools in Google Chrome, and can help in debugging your React application - you can view how your components are connected, the current values of their props and state, and more.
- You should use the most up-to-date version of Google Chrome only for this assignment. Other browsers may not work properly and can cause some confusing issues.
- Test your application on your friends and roommates - watching someone use your application who doesn't know anything about it (so don't tell them how to use it!) can be extremely informative and help you understand what might be confusing about your design so you can fix it. Friends and roommates are also great at causing bogus input and weird errors that your application should handle gracefully.
- Remember everything you've learned this quarter and before about good code design: don't write repetitive code (you can write your own TypeScript functions!), make sure your code is easy to read, and factor out huge methods into smaller chunks that each do one thing.
- You are required to comment your TypeScript code. There is no one standard way to comment JS code like there is in Java, so you're welcome to come up with your own strategy. Just make sure that your comments are clear, consistent, and understandable. No need to overthink this - it doesn't have to be something particularly fancy or formal - but think about future-you coming back to this code in 3 months, or your TA's who will be reading your code. What might they want to know about what your code does?
-
Sometimes you can accidentally start a React or Spark server, forget about it or not properly shut it down,
then attempt to start another one. Generally, this causes an error because the first server you started is
still using the port it's configured to (3000 for React or 4567 for Spark). If you're having trouble finding
the first server that's running so you can shut it down, see below:
-
Linux/Mac Users: Run the command
lsof -i:3000, where you replace the3000with whatever port number is being used that you need to free up. It'll list all the applications that are using that port, including their PIDs (Process IDs). Find the previous version of the React or Spark server that you created (the React sever might be called "npm" or "node", the Spark server might be called "java"), and find it's PID. You can use thekill PIDcommand to kill that server, just give it the PID of the process you want to kill. Be careful with kill, only kill applications that you personally started and you're sure you want to shut down. It's not a graceful way to stop an application and should be avoided unless absolutely necessary, but it can sometimes be helpful. - Windows Users: Use Control-Alt-Delete (not backspace, delete) to open the Task Manager. You might need to click "More Details" button at the bottom of the page. In the "Processes" tab, under "Background Processes," find the server that's still running. It might be called "Node Server Side js" or "java." Select those processes and click "end task" to shut down those processes. Again, be careful with this tool - it's not a graceful way to end processes but it can be useful. Make sure you know what you're doing before you do anything.
-
Linux/Mac Users: Run the command
-
When you want to stop the React server, click into the terminal window where you ran
npm start, and press Control-C. Remember that you don't need to restart the React server to see changes you make to your JS code - changes will be detected automatically by React. -
If you want to stop the Spark server, use the red "stop" button in the window that opens at the bottom of
IntelliJ when you run the
hw-campuspaths-server:runSparkgradle task. Note that gradle will probably complain that the "BUILD FAILED" - you can ignore this message if it was caused by you clicking the stop button. Gradle isn't happy about being stopped in the "middle" of what it was doing, but that's fine for stopping the server for our purposes. - IntelliJ might offer to "Switch language to React JSX" - you should click "Yes" or "Switch". This allows IntelliJ to correctly understand the React syntax and help highlight, autocomplete, and error-check your code more accurately.
-
If you're having trouble importing components from other files, make sure you haven't forgotten the
export
            default ...
line at the bottom of your files! (See the provided JS code for examples.)
Resources: Useful Links all in One Place
- React Documentation
- State and Lifecycle (Useful info about methods in your components. The last few sections are extra useful.)
- Lifting State Up (Managing data, sharing info between components.)
- Thinking in React (General info about designing with React.)
- fetch Documentation
- Spark Java Main Documentation (Mostly more advanced than we need, check out the lecture slides/demo for the extra-useful stuff.)
- Spark Java Javadocs
- Gson Homepage
- JSON Format Description (just some additional info, not super necessary)
- JSON Formatter (helpful for reading JSON when testing)
- React Developer Tools Extension
- Mozilla Javascript Tutorial
- Mozilla async/await Documentation (Fairly technical, see the lecture materials for a more friendly explanation)
-
The lecture demo code and slides contain huge amounts of
useful information. Includes advice on using
fetch, creating aSparkserver, and more.
Assignment Submission
What to Turn In
You should pull, then commit and push all changes you made to your model, including and especially your CampusMap
class. Include all changes/additions you made to the SparkServer class. Additionally, make sure to
include any changes you may have made to build.gradle and/or package.json, and include
all of the .tsx and other files that you created in hw-campuspaths/. Don't
forget to document any extra-credit additions you made in extras.txt.
You should use the tag hw9-final for this assignment.
Refer to the assignment submission handout for complete turn in instructions.