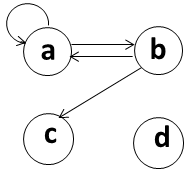
Figure 1: A simple directed graph with four nodes.
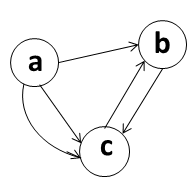
Figure 2: A directed multigraph.
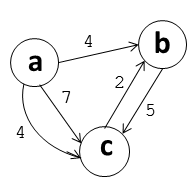
Figure 2: A directed labeled multigraph.
Contents:
Note: we made some changes to the tools for this assignment. See the discussion under Tools Changes to make sure that your environment of choice is set up properly for this assignment.
The goals of this assignment are to give you practice
Note that you may lose points on this assignment if you
The rules for doing so were discribed in lecture and are also described in our documentation on specifying classes and methods and on documenting ADT implementations.
As in Homework 4, you may still lose points on this assignment if you
As discussed in lecture, invariants are necessary to be able to reason about loops and check that they are correct, and writing code that is readable is important not only correctness but also changability and understandability.
In this assignment, you will design, implement, and test a graph ADT. Given an abstract, high-level description of the desired ADT, you will develop a working Java implementation. You get to choose both the public interface and internal representation, then decide what unit tests to write to demonstrate that your implementation works correctly.
Although this is an individual assignment, in the design stage you will learn more and produce a better design by bouncing your ideas off others and incorporating their own ideas. To encourage discussion, we are relaxing the standard collaboration policy somewhat fo Problem 2 (the interface design stage). You must first attempt to come up with an interface design on your own, but then you are strongly encouraged to discuss your design with your classmates who have also attempted a design (as well as the course staff during office hours) as much as you like, without restrictions on what materials you can bring to or from meetings. On the other parts of this assignment, including the implementation stage, the standard collaboration policy still applies.
(Review this before starting Problem 2 below. You can start do Problem 1 right away.)
A graph is a collection of nodes (also called vertices) and edges. Each edge connects two nodes. In a directed graph, edges are one-way: an edge e = ⟨A,B⟩ indicates B that is directly reachable from A. To indicate that B is directly reachable from A and A from B, a directed graph would have edges ⟨A,B⟩ and ⟨B,A⟩.
The children of node B are the nodes to which there is an edge from B. In Fig. 1, the children of B are A and C. Similarly, the parents of B are the nodes from which there is an edge to B. In Fig. 1, B has only one parent, A.
A path is a sequence of edges ⟨node1,node2⟩, ⟨node2,node3⟩, ⟨node3,node4⟩, .... In other words, a path is an ordered list of edges, where an edge to some node is immediately followed by an edge from that node. In Fig. 1, one possible path is ⟨B,A⟩,⟨A,B⟩,⟨B,C⟩. This path represents traveling from B to A to B to C. A path may traverse a particular edge any number of times.
In a multigraph, there can be any number of edges (zero, one, or more) between a pair of nodes. Fig. 2 shows a multigraph with 2 edges from A to C.
In a labeled graph (Fig. 3), every edge has a label containing information of some sort. Labels are not unique: multiple edges may have the same label. In theory a graph could contain two "identical" edges with the same starting point, ending point, and label, but for this project you may decide whether or not to allow identical edges in your implementation. (Whatever you decide, make sure it is clearly documented so clients understand how they can use your ADT.)
If you want to learn more, read Wikipedia's definition of a graph. Graphs are also a major topic in CSE332. If you still have questions, ask the course staff.
Many interesting problems can be represented with graphs. For example:
Your repository was initially setup using a version of Gradle that we have since discovered has some problems in Java 11. To fix that, we have upgraded to a more recent version.
Here is what you need to do, depending on your chosen environment:
Command Line: No changes necessary.
Eclipse: No changes should be necessary, but keep an eye out for the error messages described below, and let us know if you run into any of those problems.
IntelliJ: If you set up your project to use the "gradle wrapper", then it should work fine. However, if you set yours up to use the "local gradle distribution" (as the instructions said), then it will not do the upgrade automatically.
To fix that, navigate to View | Tools Windows | Gradle in the menu. In the windows that appears, click on Gradle Settings and update it to use the default gradle wrapper, as shown here:

Keep an eye out for error messages from gradle that say "failed to read class file". These occur because gradle's test support is using a library to read class files that does not support Java 11. The upgraded version will fix this.
This part is designed to test your understanding of some of the ADT concepts from lecture. To get started, update your working copy of your repository using git pull to get the files for this assignment. Place your answers in the file src/main/java/hw5/answers.txt.
To start, you will specify the API for a Java class or classes representing a directed labeled multigraph. The API, or public interface, is the collection of public classes and methods that clients of your graph ADT can use. We recommend that you work in iterative layers of detail. Start rough — preferably with pencil and paper — by identifying what operations the ADT needs to support, how it might be logically broken into classes and interfaces, and how these classes and interfaces rely on each other. Then, jot down a list of methods for each class that provide these operations.
Keep your initial design rough — don't write formal class and method specifications with all the proper clauses right away. Your design will likely go through multiple iterations, and it's easier to throw away parts if you have invested less effort in them.
Once you are satisfied with your high-level design, write a Javadoc specification for each class and method. Follow the format you saw in Homework 4 for properly documenting your ADT classes and methods. (Note that there are no abstraction functions or represention invariants yet as that is part of the concrete representation, which will come later, in part 2.) Remember to include both standard Javadoc tags (param, returns, throws) and ones introduced for this course (spec.requires, spec.effects, spec.modifies).
The abstract state of your class can be a mathematical graph. You can assume that the reader already knows what a graph is. You do not need to define this again for them. However, you will probably want to remind them that this graph is directed, supports multiple edges between the same pair of nodes, and has labelled edges.
One good approach to creating your ADT is to create skeleton implementations of your classes containing only method “stubs”, then write your specifications in the right place in the source file. A stub is a not-yet-implemented method whose body simply throws an exception, as you saw in the Homework 4 starter code. Stub methods give you the flexibility to run client code and tests before all your methods are implemented correctly.
As you write the JavaDoc specifications and implement the stub methods, take advantage of the JavaDoc tool to generate formatted JavaDoc web pages. Reviewing specifications in this format can provide useful feedback on the quality and completeness of the work you've done. See the instructions for your chosen environment (Eclipse, IntelliJ, or command-line) on how to build the javadoc using gradle.
Also, in src/main/java/hw5/answers.txt, write a brief description (one to two sentences for each operation) of why you included the operations you did and why you feel they are a sufficient interface to a graph. If your design includes multiple classes or interfaces, explain why you included each one; if not, explain whether you considered additional classes and why you decided not to include them. So your total work in this problem is this brief write-up plus the Javadoc class and method specifications in .java files. (The implementation of the methods will come later.)
Note that design problems such as this one are open-ended by nature: there is not one “right” answer. You will encounter these problems frequently in industry, and you may even be asked one in an interview! So use this problem as an opportunity to get more comfortable with them.
The hints section below has suggestions for working through design problems that you may find useful.
Broadly speaking, your design must make it possible to create a graph containing a desired set of nodes and labelled edges and then to query useful information about that graph.
In addition, we can offer the following additional pointers:
It is not sufficient to just provide a method that retrieves all the edges in the graph. You must provide a way to retrieve all the edges from a given parent node.
You may assume nodes are uniquely identified by their labels. I.e., you cannot have two different nodes that with the same label.
For this assignment, you may restrict your graph to store the data in nodes and edge labels as Strings. We strongly recommend you DO NOT use Java generics for this assignment, but we do not absolutely forbid it. If you do use generics, you MUST heed the warning about compiling your code in the hints section. In a future assignment, you will use generics to make your ADT work with other data types — text, integers, doubles, etc.
Write a high-quality test suite for your Graph ADT. Note that, since we are writing tests before the code, these tests will not actually pass yet!
In lecture, we discussed the difference between specification tests, which only test the behavior described in the specification, and implementation tests, which can test additional behaviors. For this assignment, where creating the specification is the problem, we will split up the tests somewhat differently. We will refer to tests that depend on your chosen specification as implementation tests (even though they may not test details of your implementation of your specification). And we will refer to tests that could be used with any student's specification as specification tests.
You will create tests that do not depend on your particular graph ADT by writing the tests using a special test script file format. See the Test Script File Format section below for details.
Each specification test case consists of a “test” file containing a series of commands, and an “expected” file containing the output that the commands should produce. The file names should have the same base name but end with .test and .expected, respectively. For example, you may have a command file named testAdd.test with expected output in testAdd.expected. These files must be in the src/test/java/hw5 directory alongside ScriptFileTests.java. They should have descriptive file names and comments that explain what case is being tested, and just like methods in unit tests, each test file should test only one distinct condition.
The actual output produced by the implementation you write, later on, in Problem 4 will be compared to the contents of the .expected file to ensure that it matches. Note that this comparison includes whitespace, so check very carefully that your expected output is correct.
To create your test suite, complete each of the following:
What to turn in: you are required to commit any new JUnit test classes you add, your updated version of ImplementationTests.java listing these new classes, and the .test and.expected files you write. You should not modify SpecificationTests.java.
This is the end of Part 1 of HW5. You should commit and push your changes to your GitLab Repository and add the tag hw5-part1-final. Your submission for Part 1 should not include any of the requirements for HW5 Part 2.
At this time, your code will not validate. Your code should, however, generate a javadoc without any errors.
There are many ways to represent a graph. Here are a few:
Choose the representation that you think will work best for implementing the methods of your ADT. Once you have done so, complete each of the following:
As you implement your ADT in step c, be sure to practice the reasoning process from earlier Homework 1 and 2 to ensure that your methods are correct. You cannot skip reasoning and expect to produce high quality code, especially as the coding problems get harder. Also, do not forget to document your loop invariants and include comments so that it is easy for readers to also see that the code is correct.
Make sure that all of your implementation tests pass at this point by running the ImplementationTests JUnit test. Once those are passing, move on to Problem 5 to try the specification tests as well.
The provided SpecificationTests class invokes ScriptFileTests to perform the tests described in the test script files. It will find all of the test files in that directory and run them, saving their output in a file whose name ends with .actual (e.g., testAdd.actual) in the bin/hw5 directory of your project. It then compares the actual file to the expected file and fails if they are different.
Neither of these classes, however, yet know how to use your graph ADT (since we do not yet know what it will look like)! You must give them the ability to use your graphs by filling in the missing parts of the HW5TestDriver class. We have provided a skeleton implementation that takes care of parsing the test script file format. Complete this file by adding code where specified in the comments to perform the appropriate operations on your ADT. Please be sure to use the PrintWriter stored in the output field in the tester to print the desired output (do not use System.out).
Warning: If the test driver does not work properly it will likely cause some or all tests to fail when your assignment is graded. That could result in significant deductions for other parts of the project since they cannot be verified to work, even if they have been implemented correctly.
You should add, commit, and push the following files to your CSE 331 GitLab repository:
Additionally, be sure to commit and push any updates to hw5/src/test/java/hw5/ImplementationTests and src/test/java/hw5/HW5TestDriver.java.
When you have committed and pushed all of your changes and are done with the assignment, create and push the hw5-final tag.
Make sure that you see a success message from GitLab on your submission. That will confirm that your code correctly compiles and passes the tests and that your tag was also pushed.
Because you and your classmates will have different specifications for the class(es) in this assignment, it is important that there is a standardized interface to use and test your code. To that end, we specify a text-based scripting format used to write instructions that will be executed by your graph.
The testing script is a simple text file with one command listed per line. Each line consists of words separated by white space. The first word on each line is a command name. The remaining words are arguments to that command. To simplify parsing the file, graph names and node and edge data may contain only alphanumeric ASCII characters (in other words, numbers and English letters (upper or lower case)).
There are example programs in the src/test/java/hw5 directory.
The following is a description of the valid commands. Each command has an associated output which should be printed to standard output (typically, the console) when the command is executed. Lines that have a hash (#) as their first character are considered comment lines and are only echoed to the output when running the test script. Lines that are blank should cause a blank line to be printed to the output. These commands were chosen for ease of testing and are not meant to suggest what methods you should include in your graph specifications or how you should implement them. For example, it is unlikely to make sense for your graph ADT to store a name for the graph.
created graph graphNameIf the graph already exists, the output of this command is not defined.
Note that graph names are used purely in the test script; it is unlikely to make sense for your graph ADT to store a name.
added node nodeData to graphNameIf a node with this data is already in the graph, the output of this command is not defined.
added edge edgeLabel from parentNode to childNode in graphNameIf either node does not exist in the graph, the output of this command is not defined. If an identical edge (same parent, child, and label) already exists, the output of this command is not defined either, as it is left to your discretion whether to allow identical edges in your implementation.
graphName contains:and is followed, on the same line, by a space-separated list of the node data contained in each node of the graph. The nodes should appear in alphabetical order. There is a single space between the colon and the first node name, but no space if there are no nodes.
the children of parentNode in graphName are:and is followed, on the same line, by a space-separated list of entries of the form node(edgeLabel), where node is a node in graphName to which there is an edge from parentNode and edgeLabel is the label on that edge. If there are multiple edges between two nodes, there should be a separate node(edgeLabel) entry for each edge. The nodes should appear in alphabetical order by node name and secondarily by edge label, e.g. firstNode(someEdge) secondNode(edgeA) secondNode(edgeB) secondEdge(edgeC) thirdNode(anotherEdge). There is a single space between the colon and the first node name, but no space if there are no children.
We have provided example input and output files in your src/test/java/hw5 directory. The behavior of the test driver on malformed input files is not defined; you may assume the input files are well-formed.
In addition, HW5TestDriver has a main method that allows it to be run
directly in your IDE or from the command line. You can enter commands at the
console, and it will echo the results. (To run it from the command line, run
./gradlew test).
To give you some sense of the kinds of issues you should be considering in your design, here are some questions worth considering. These don't in general have simple answers. You'll need to exercise judgment, and think carefully about how different decisions may interfere with each other.
entrySet method of java.util.Map?In choosing what operations/methods to include, strive to include enough that the ADT will be convenient and useful for a client, but avoid the temptation to write an “everything but the kitchen sink” API. Generally speaking, it is better to design a minimal than a maximal API. In the real world, you can always add methods later. However, you can never remove them from a published API, and such methods may over-constrain the implementation in the future.
Make good use of the course staff. If you have concrete questions, then take your specification to office hours for feedback on your design and style. Doing so could save you a lot of time.
Although it is generally a bad idea to start coding before you have thought deeply, it often makes sense to work incrementally, interleaving design and coding. Once you have a sketch of your specification, you may want to write some experimental code. This should give you some concrete feedback on how easy it is to implement the methods you've specified. You may also want to write code that uses your type even before finishing your ADT implementation, so that you can be confident that the methods you provide will be sufficient.
This strategy can backfire and degenerate into mindless hacking, leaving you with a pile of low-quality code and an incoherent specification. To avoid that:
It can be difficult to come up with a good test suite. You would like to test a variety of “interesting” graphs, but what are interesting graphs? One possible approach is a “0, 1, 2” case analysis: test scripts with 0, 1, and 2 graphs are interesting; graphs with 0, 1, and 2 nodes and 0, 1, and 2 edges are interesting. For each method, 0, 1, and 2 parameters and 0, 1, and 2 results are interesting; for example: AddEdge on nodes that currently have 0, 1, and 2 children; ListChildren on nodes with 0, 1, and 2 children; etc. This approach, while certainly not required, can give a good way to structure your tests to cover many important cases without too much redundancy.
Include an abstraction function, representation invariant, and private checkRep() method in all new classes you create that represent an ADT. If a class does not represent an ADT, place a comment that explicitly says so where the AF and RI would normally go.
Be conscious of how certain operations in checkRep(), particularly iterating over a large dataset, may affect the “big-O” runtime of your methods. If your program suffers performance problems in Homework 5 or 6, checkRep() is a good place to start looking for problems.
You may find it useful to define a class or classes that implement method equals, overrding the definition in Object. If you do, be sure to also provide a consistent definition of method hashCode, otherwise your objects may behave strangely if used in containers like HashMaps. There is a good discussion of the issues involved in Effective Java (item 9 in the 2nd edition) — we will also discuss it in an upcoming lecture but have not yet had time.
You are permitted but discouraged from implementing generic classes on this assignment (that will come later). A generic class is one defined as something like:
public class Graph<N,E> {
   ...
}
where a client could then construct a Graph<String,String>, Graph<City,Road>, etc.
If you choose to write a generic class, be aware that Eclipse's built-in compiler sometimes handles generics differently from javac, the standard command-line compiler. This means code that compiles in Eclipse may not compile when we run our grading scripts, leaving us unable to test your code and significantly impacting your grade. So be sure to check regularly that your code compiles (builds) with javac by running ./gradlew build from the hw5 directory.
If Gradle reports that the build succeeded, all is well: your code compiles with javac.
Hint: after encountering build errors in Gradle, you may find that classes which
previously compiled are now reporting "[some class] cannot be resolved" errors
in Eclipse. You can fix these errors by doing a clean build: ./gradlew clean.
This warning is directed only at students writing their own generic classes. Simply using, say, a List<String> or Comparator<Foo> (as you have been doing all along) should be fine.
Q: Does the graph ADT have to support an edge connecting a node to itself?
A: Yes. Although this won't be necessary for Homework 6, it's common for graphs to have these kind of nodes, so your ADT should allow them.
Q: Does the graph ADT have to support multiple edges between the same nodes with the same text?
A: No, you can choose how to handle this case.