Assignment Submission Reference
Contents:Turning in your assignment
To turn in your assignment:
- Commit all your changes.
- Push your changes to GitLab.
- Create a
hwN-finaltag to mark the final commit for assignmentN. See below for instructions on making tags. - Push your tag. See the instructions below for details.
Once you have committed and pushed the hwN-final tag, your assignment has been
submitted. The staff will grade the files in your repository that are labeled with that tag.
Creating a Tag
To create a tag, use the VCS > Git > Tag... option in IntelliJ. By default, the tag is placed on the most recent commit that you've made. This means that, when you're placing a tag, you should make sure you've committed all your work so the TA will see your complete assignment. We will grade all work up-to and including the work done in the commit that's tagged.
When you create a tag, DO NOT add a message. Adding a tag message changes what kind of tag is created, and can cause problems later on. You should name the tag appropriately, but leave the tag message blank.
Pushing a Tag to GitLab
When you create a tag, it's created in your local repository only, just like commits. In order to let GitLab know that you made a new tag, you need to push the tag, just like commits! Unfortunately, tags aren't included in a normal push, so we need to do something slightly different to push a tag. Use the VCS > Git > Push... window like normal, but make sure the "Push Tags" checkbox in the bottom left is checked. If not, you won't push tags to GitLab and we won't be able to find your final assignment!
The above works just like a normal git push, except it also includes tags in the push. Be sure that tags are pushed, so the TA can find your assignment when we get to grading!
Moving a Tag
If you've already created and/or pushed a tag, but you decide to take a late day or make change to your code and want to move the tag, we can do the following. Since removing tags is a little more complicated and is fairly rare, there isn't a menu for this in IntelliJ. We'll need to use the IntelliJ terminal window for a few parts of this (the same one you use to run gradle tasks). (Windows users may need to run these commands from Git Bash instead of the terminal. Contact the course staff if need help with this.) The basic process is broken down into four steps:
- Remove the old tag locally.
- Tell GitLab that you've deleted the old tag.
- Create a new tag on the commit you want tagged.
- Push the new tag to GitLab.
Note: Some mac users may recieve an error message or a request to install xcode or the command line
developer tools when running the git command from the IntelliJ terminal. Instead of typing
just git, use /usr/local/bin/git. If you're still having issues, contact
the course staff for help.
To remove the old tag, run the following command from the IntellIJ terminal. (The "-d" means "delete".)
git tag -d TAG-NAME-HERE
To remove the tag from GitLab, run the following. This will remove the tag with whatever name you specify from GitLab. This needs to be done separately because of how tags behave in git. If you tried to push the new tag without removing the old one from GitLab first, you'd get an error.
git push origin master :refs/tags/TAG-NAME-HERE
Create the new tag on your updated code, just as described above in the "Creating a Tag" section. Then, push the tag as described in the "Pushing a Tag to GitLab" section. If you get an error about the tag already existing, make sure you have deleted the old tag from GitLab by running the above command.
Using a late day (turning in your assignment late)
To use a late day, just don't tag your repository on the day it is due. Be sure to tag your repository when you complete the homework, though!
Double-checking your assignment
Optionally, you can double-check your submission, using the following two steps.
-
Ensure that your code passes the validation tests. There are multiple
equivalent ways to do this, so it is enough for any one of them to work (in case of
flakiness in the CSE computer systems).
- Run on attu:
./gradlew HW-NAME:validate
and examine the output on the terminal. -
Have a passed GitLab runner result. Browse to
https://gitlab.cs.washington.edu/cse331-19au-students/cse331-19au-MyCSENetId /pipelines
Here is an example of your code passing the validation tests (note the GREEN checkmark):
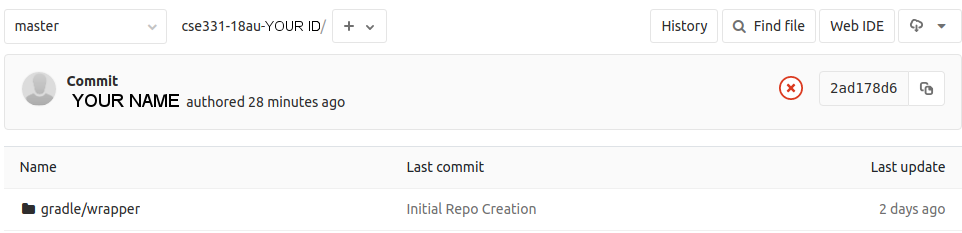
On the contrary, here is an example of your code failing the validation tests (note the RED X mark):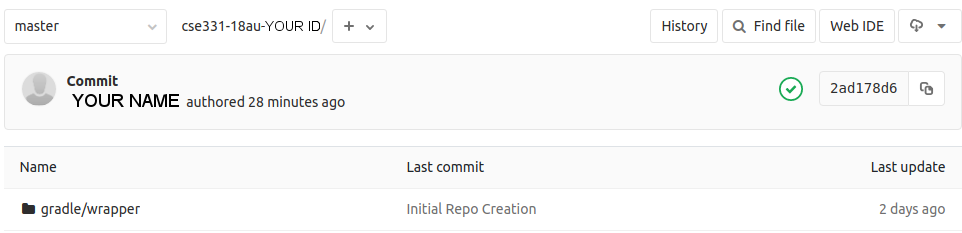
- Run on attu:
- Ensure that GitLab has the
hwN-finaltag by browsing to https://gitlab.cs.washington.edu/cse331-19au-students/cse331-19au-MyCSENetID/tags.
validate
Validating your code checks it for common errors, such as your code not compiling or not passing tests. Such errors could prevent you from receiving credit for your code. However, validation is not guaranteed to catch all errors in your code.
Validation happens every time you push a final tag to GitLab. You will receive email if your code fails validation, but no email if it passes. You may also perform validation at other times, if you wish. You may perform validation on your own computer on or a CSE-managed computer such as attu.
To validate your code, run ./gradlew HW-NAME:validate
If the validate output indicates errors, you should fix them before the deadline, or you will lose points on your assignment.
The validation script tests your code against your own test suite.