
CSE 331: Software Design and Implementation, Spring 2011
SVN Instructions for Project Groups
Once you have submitted your group information to us, you will receive an email from the TA or instructor containing your group's name such as cse331f.
A project folder has already been set up for you on the CSE department's shared server, attu. Your group's project folder is located in the following directory on attu.cs.washington.edu:
/projects/instr/11sp/cse331/GROUPNAME
For example, group cse331f has its project folder in the following directory:
/projects/instr/11sp/cse331/cse331f
An empty SVN repository has been created for you in your group's folder. You will use this as your repository for the project and will check in your work to that repository for each turnin deliverable. The following steps describe how to set up an Eclipse project in that repository and setting up each group member's computer to use the repository.
- Installing Subclipse
- Creating your project (one group member)
- Accessing an existing project (other group members)
1. Installing Subclipse:
We strongly recommend using the Eclipse editor and the Subclipse extension that integrates SVN into Eclipse. You may use other editors or other SVN software if you prefer, but we will not provide tech support if they fail to work properly.
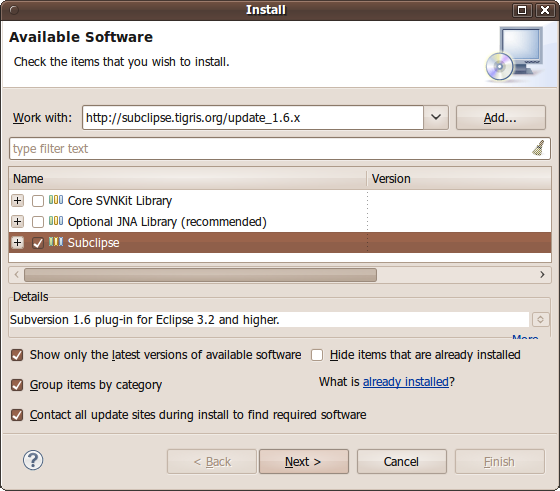
To install Subclipse, load Eclipse and click Help, Install New Software. In the dialog box that appears, paste the following URL into the Work with: text box.
- http://subclipse.tigris.org/update_1.6.x
A set of installable options will now appear. Check the box for Subclipse and click Next. The rest of the installation should be fairly straightforward; check appropriate boxes and click Next or Finish to complete the install.
2. Creating your project (one group member):
One person should create your initial Eclipse project and check it into the SVN repository. That person should use Eclipse to create a New Java Project as usual. You can name the project anything you want, but of course its name should probably be something descriptive like group-project or 331-project or yahtzee. Once the empty project is created, right click it in Eclipse's left Package Explorer window and choose Team, then Share Project.... In the dialog box that pops up, choose the following:
- repository type: SVN (Next)
- Create a new repository location
- URL:
svn+ssh://attu.cs.washington.edu/projects/instr/11sp/cse331/GROUPNAME - use project name as folder name
- Finish
Subclipse will ask you for your SSH login credentials. Type your CSE NetID into the Username box and your CSE password into the Password box. You can check the Save Information box to avoid having to type your password every time you use the repository.
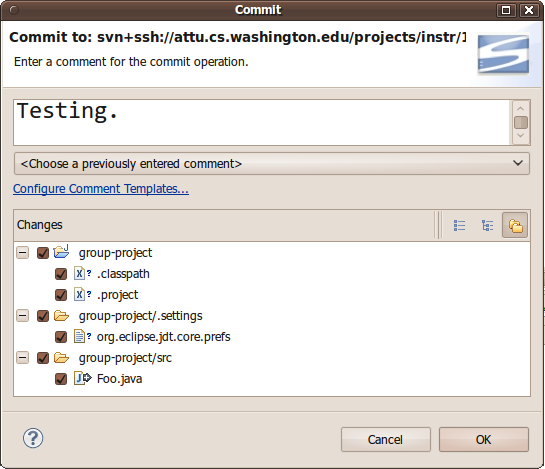
If you did this properly, your Eclipse project should now be in the repository. Now try adding a file to the system. Create a new Java class within your project and save it. Then right-click the class in the Project Explorer and click Team, Add to Version Control. Then right-click your project and choose Team, Commit... and check in all of your files.
3. Accessing an existing project (all other group members):
Now that your project is created, the other students in your group can check out a local copy of it. (The person who created the project and checked it in does not need to do this step.) On each of the other group members' computers, load Eclipse and install Subclipse.
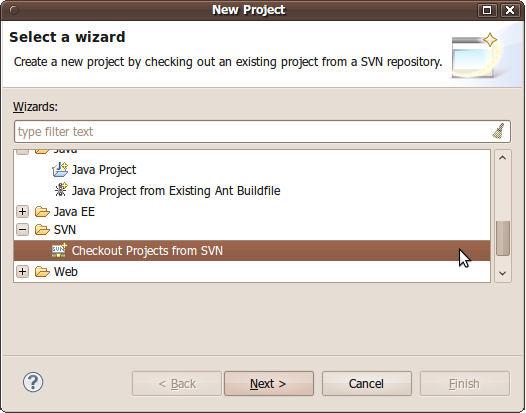
- Choose File, New, Project..., and instead of choosing a new Java Project, scroll down to the SVN category and choose Checkout Projects from SVN.
-
In the next dialog, choose Create a new repository location. In the URL text field, type:
svn+ssh://attu.cs.washington.edu/projects/instr/11sp/cse331/GROUPNAME - In the "Select Folder" dialog box that now appears, click the [+] sign next to the top svn+ssh item to show the project inside it. Click on that project to select it, and then choose Finish.
If you did it properly, you will now have the project in your Eclipse Package Explorer and can use it like everyone else. Don't forget that when you create new files, you must add them to the repository by right-clicking them and choosing Team, Add to Version Control.