Swing is a platform independent graphical toolset for Java applications. It contains a set of customizable components for building user interfaces, like buttons and text fields, as well as an API for creating 2D graphics. Applications built in Swing look roughly the same on all platforms.
Creating a Graphical User Interface (GUI) involves significant design. For this section, we will focus on the design and implementation of layouts, event handling and drawing. First, we'll go over how to make basic components, like a windows and text labels and then we'll show you how to put together a simple GUI application that checks the weather for a City.
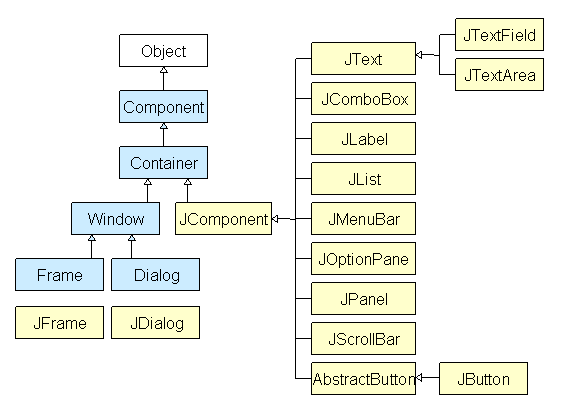
The Swing library is built on top of the Java Abstract Widget Toolkit (AWT), an older, platform dependent GUI toolkit. All components in Swing are JComponents, which can be added to windows like JFrames or JDialogs.

Most of Swing's classes are AWT Containers -- technically, you can add any component to any other component. In practice, however, many components have this inheritance as a vestigial property, and don't actually expect to have anything added to them. User interfaces can be created by adding components to a window's pane, or to a nested series of panels which then get added to the pane.
Each component arranges its children based on a layout manager. We'll talk more about these later.
You will often need to import both Swing and awt classes in your code. You can import all of them if you wish, using:
import javax.swing.*;
import java.awt.*;
Please be warned however that this section provides only a very brief introduction and overview of Swing. We provide you with some sample code and appendix of commonly used Swing classes. To learn more about Swing, you should check out Sun's Swing Tutorial.
The first step in GUI creation is design. After you've drawn a picture of what you want your user interface to look like, you'll need to figure out how to layout its components using the Swing LayoutManagers.
You should begin by dividing the application into
regions. Recursively divide the rest of the regions until you have
either a single component, or a simple panel of components.
In this section, we'll use BoxLayout and FlowLayout. There are other useful layouts such as BorderLayout, GridLayout and GridBagLayout, and you can find out how to use them in Sun's Tutorial on Layout Managers. Sun also has a Visual Guide to Layout Managers that can be very helpful when selecting layouts.
| Drawing the GUI. Make a simple sketch of how we would like the GUI to appear. |
|
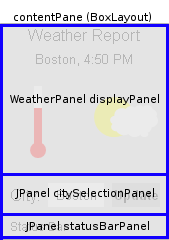
| First, divide the drawing into regions. Decide on which layout managers to use. BoxLayout and FlowLayout make sense here. |  |
| The contentPane is the area of the JFrame one can modify. Access it using the getContentPane() method of a JFrame object. BoxLayout lets you stack one component on top of another (or arrange them side by side, in rows). Here, three boxes have been created and stacked vertically. The top box will be a WeatherPanel which is a subclass of JPanel that has been defined. Below it, two more JPanels will be stacked. Each JPanel will have its own layout, which will be described next. |  |
|
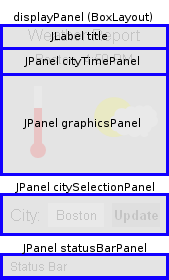
The displayPanel has been divided into to three regions. The top part contains a
JLabel
and underneath it is
JPanel that contains information about the city and local time. Below that is a JPanel, which is called graphicsPanel, will use a FlowLayout to arrange the Therometer and Clouds side by side in a row. Therometer and Clouds extend JComponent.
The other two JPanels that we subdivided in the first step will also have FlowLayout. |
 |
When a JComboBox's selection changes, the ActionListeners registered with it are triggered. We've written an ActionListener for changing the city when the city selection in our weather program's combo box changes. Take a look at NewCityListener (an inner class in MainFrame), and understand what it does.
Whenever a button is pressed, JButton
calls the actionPerformed method on all
ActionListeners registered with the button. The updating functionality
of the WeatherPanel has been registered the with
the update button, so it will do what we want.
Other types of listeners can be registered. Look for methods of the form addFooListener if you want to deal with the user doing foo to your object. Examples are addSelectionListener, addMouseListener, addKeyboardListener, and more. Some of these types of listeners are more complicated to write than others; look in the API for details.
A good technique for drawing on the screen is extending JComponent (which is an empty component) and overriding the public void paint(Graphics) method. This technique allows us to customize the graphics for a single component without having to customize the paint method for the entire container (e.g. JPanel or JFrame). In short, if you want to create a frame that at some point draws something like a circle or a thermometer, don't change your frame's paint() method. It's better to extend JComponent, change its own paint() method and add an instance of your class to the frame.
You should not, however, call the paint() method
yourself. In general, the Swing library takes care of figuring out
when components should be painted. When you're making an animation,
you can use the repaint() method to let Swing know to schedule
that component for redisplay.
That's exactly what we have done here. Thermometer and Clouds extend JComponent, and their paint() methods are overridden. The method takes a Graphics object as an argument, which is simply what we will be drawing on. Some of the methods for drawing simple graphics in Java, found in the Graphics class and are summarized here:
There are also methods for drawing other shapes, such as drawString,
drawImage and drawPolygon.
Drawing images from files in Java is also fairly easy. First, we need to load the image from the file. One way to access external files is to use the Toolkit and ClassLoader classes. This allows us to access files that might be included in a jar file instead of the standard file system. As an example, the following code loads an image called "storm.gif", located in the gui/images directory of our default toolkit.
Toolkit toolkit = Toolkit.getDefaultToolkit();
this.image = toolkit.getImage(
                ClassLoader.getSystemResource("weather/gui/images/storm.gif"));
Alternatively for a file in the file system:
Toolkit toolkit = Toolkit.getDefaultToolkit();
this.image = toolkit.getImage("weather/gui/images/storm.gif");
ImageObserver
When loading an image, we might want to monitor the progress of the this process, which might be useful for example if we are downloading a picture from the web, or even from a local resource. The ImageObserver class is a Swing class that exists for this purpose, and it is used as an argument to many methods such as Graphics.drawImage(...). For our purposes, you can pass this as an argument to methods that require an ImageObserver, even if this is not explicitly created for this purpose.
Much of what has been discussed here can be found in a small application contained in the following files:
Standalone windows are implemented as JFrames in Swing. This code creates a JFrame:
JFrame myFrame = new JFrame("Title");
myFrame.setBounds(200,200,300,400); myFrame.setVisible(true);
You should not try to add anything directly to a JFrame. Instead, to make components appear in a JFrame, use JFrame.getContentPane().add(yourComponent)
A JPanel is a simple, empty container meant to be used as a container for other components. Every JPanel has its own Layout, an object that describes how the components will be placed on it. Here is an example of how to create a JPanel whose Layout is initially a FlowLayout (by default), and then changes to a BorderLayout.
JPanel myPanel = new JPanel();
JPanel.setLayout(new BorderLayout());
A JLabel is used to create a single uneditable line of text. The user may not change this text. However, you can change it programatically with JLabel.setText():
JLabel myLabel = new JLabel("This is a Label");
myPanel.add(myLabel);
A JButton is used to create a button:
JButton myButton = new JButton("Press me");
myPanel.add(myButton);
A JTextField is used to create an area displaying a single line of editable text.
A JTextArea is used to create an area displaying some text. This area can be edit able by the user (true by default). Another useful property is the line wrapping, which is false by default.
JTextArea myArea = new JTextArea();
myArea.setEditable(false);
myArea.setLineWrap(true);
A JScrollPane is a useful JComponent that allows us to surround an area (a JTextArea for example, or an image) with scroll bars. The constructor of JScrollPane takes the JComponent that we want to surround with the scroll bars, and two integers, that correspond to whether we want the vertical and horizontal scroll bars to be never, as needed or always visible.
JScrollPane myScrollPane = new JScrollPane(myArea,
   JScrollPane.VERTICAL_SCROLLBAR_ALWAYS,JScrollPane.HORIZONTAL_SCROLLBAR_NEVER);
myScrollPane.setPreferredSize(new Dimension(150, 200));
myPanel.add(myScrollPane);
A Timer is used to fire an ActionEvent after a specific delay. For information about ActionEvents, see the Events section. Using a Timer we can implement, for example, an animation. In this example, the Timer is used to implement an automatic update of the weather every minute. This is the code used: (UpdateListener is an ActionListener we defined that will listen for ActionEvents fired by timer and other JComponents.
int delay = 1000*60; //1 minute
Timer timer = new Timer(delay, new UpdateListener());
timer.start();
WARNING: this section refers to javax.swing.Timer. java.util.Timer also exists, but is not designed for use with Swing user interfaces