CSE 163, Spring 2020: Homework 6: Processing Image Data
Overview
In this assignment, you will do a bit of data analysis involving image data to get an idea of what image analysis looks like.
Learning Objectives
After this homework, students will be able to:
- Read in an image into a program from a file.
- Work with
numpyarrays to perform computations. - Read a technical description of an algorithm and implement it in code.
Expectations
Here are some baseline expectations we expect you to meet:
Follow the course collaboration policies
- You do not need to write any tests for this assignment, but you may find doing so helpful!
Files
You should download the starter code hw6.zip and open it as the project in Visual Studio Code. The files included are:
cse163_utils.py: A file where we will store utility functions to help you write any tests you might want to write.images: A directory storing various images for this assignment. You can see the original images in the box below
You can use the HW6 Playground to develop your assignment initially.
Images
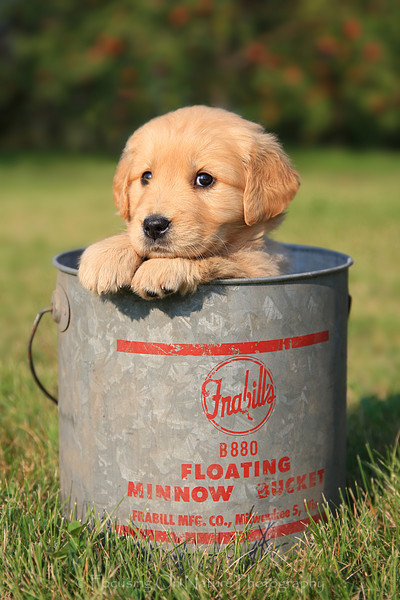
puppy.png
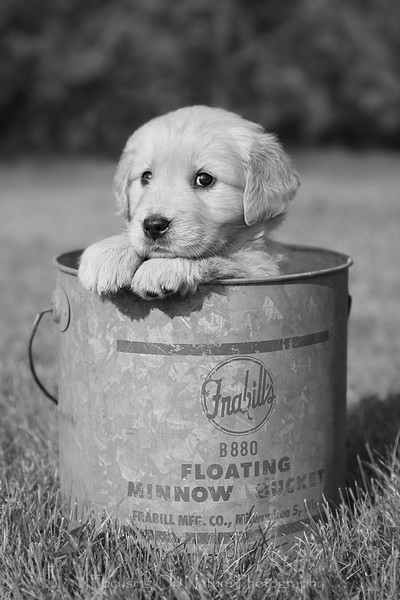
gray_puppy.png
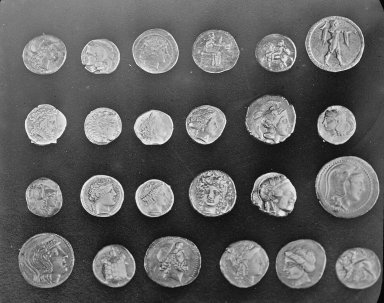
coins.png
Part 0
In this part of the assignment, you will write functions that do various image manipulations or compuations.
Part 0 Expectations
- For this part of the assignment, you may import and use the
numpy,imageio, andmatplotlib.pyplotpackages, but you may not use any other imports to solve this problem. - While we have talked about that it is generally best to avoid loops if possible when working with our data science libraries, this problem set may require using some loops. For each problem, we will specify the number of loops you may use when solving the problem. By "loop", we mean any python loop or comprehension in the code you write.
- Some of these problems will only work with gray-scale images (2-d
numpyarrays) while others will work with color images (3-dnumpyarrays). Each problem will specify which type of image your solution should handle and you do not need to handle the other for that problem. - All of these functions should be written in
hw6_main.py.
Problem 0: invert_colors
Input: A color image represented as a 3-d numpy array.
Write a function called invert_colors that takes a color image and returns a new color image with all the colors "inverted". An inverted image changes each color channel so that if there was a high value for a color at a pixel, the result will have a low value instead for that channel. The specifics of the inversion is, for each color channel, to subtract the pixel value from the number 255; if there was a high value (near 255), then it will become small after this computation and vice versa. The result of this function should be returned as a numpy array.
You may use no loops to solve this problem. Everything should be done using numpy computations. This method should NOT modify the input parameter, but rather should return a new numpy array.
For example, if we were to call this function passing in the array for images/puppy.png and plotting the result, we would see:
Problem 1: blur
Input: A gray-scale image represented as a 2-d numpy array and a number specifying the size of the "patch" (described below).
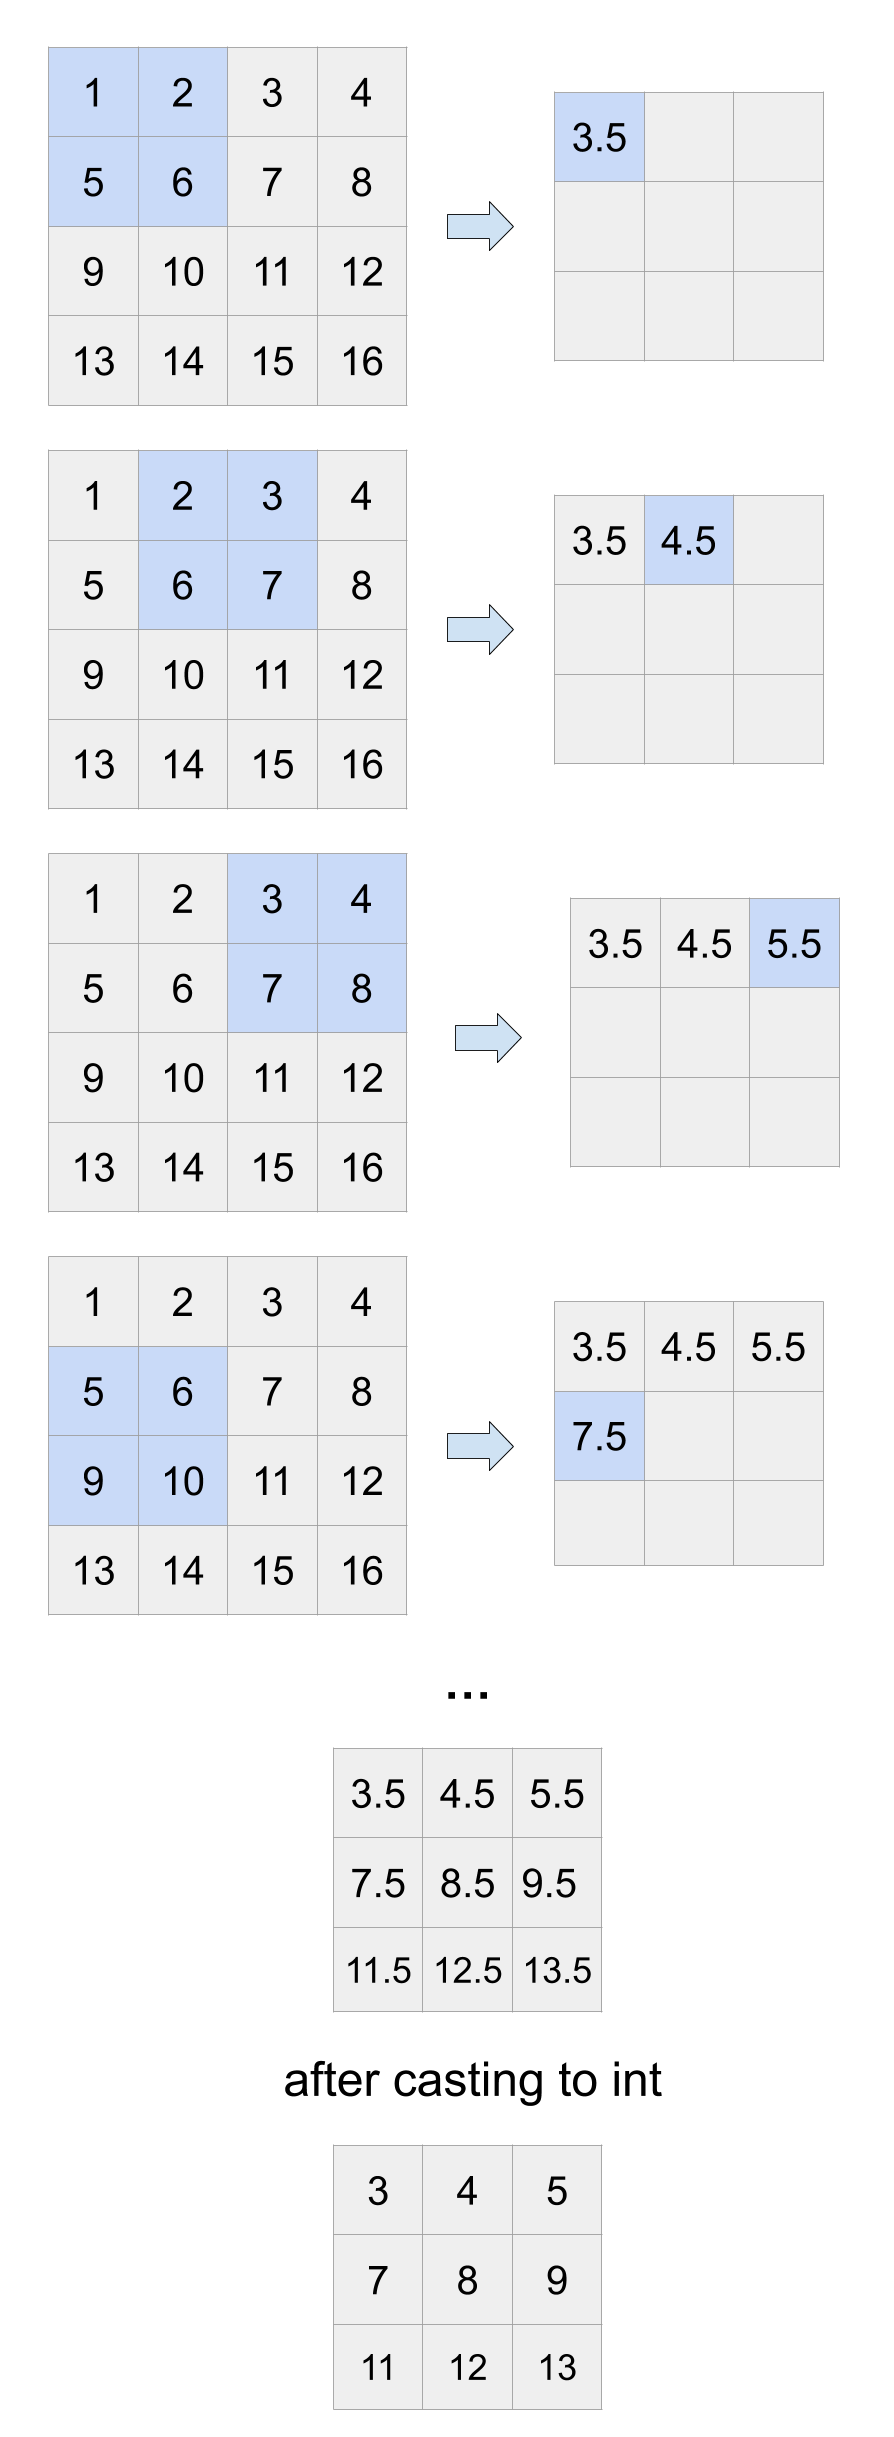
Write a function called blur that takes a gray-scale image and the patch size and returns a new image that has been blurred using the given patch size. This is essentially a convolution where we are using a kernel with width and height of the patch size, where we take the average of all the values that overlap with the kernel at each iteration. This is equivalent to doing a convolution with a kernel of this size, where all the values are \(\frac{1}{patch\_size^2}\). The return should be a new numpy array that stores the averages values from the convolution casted to ints. Below are two example calls, one that shows a very small example that can be done by hand and the second an actual image with different patch sizes.
You will need to convert the values in the resulting matrix to integers so it can be plotted properly. To do this, you can convert numpy array of floats to a numpy array of integers. Assuming you have a numpy array of floats stored in a variable called result, you can create a new array of ints with the line result.astype(np.uint8).
You may use two loops to solve this problem (to move the sliding window). Everything else should be done using numpy computations. This method should NOT modify the input parameters, but rather should return a new numpy array.
Example Blur on Small Image
This shows the steps of computation for blurring a 4x4 image using a patch size of 2. The 3x3 matrix at the bottom would be the returned value. Notice the blurred image is actually smaller because it's not able to keep all of the boundary pixels.
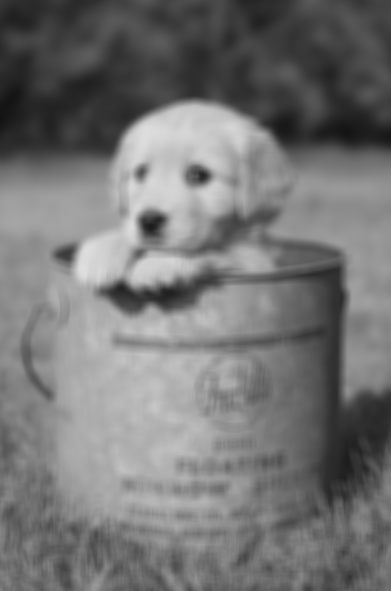
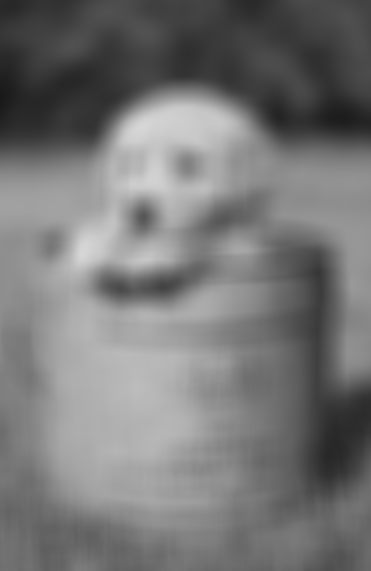
Example Blur on Puppy Image
Here is the result of blurring a real image of a puppy.
Using a patch size of 10.
Using a patch size of 30.
Development Strategy:
- Figure out the size of the result image based on the input image and patch size. Note that the image may not be square, but by our definition the patch must be square.
- Write the actual code to do the convolution traversal and computing the mean of the image subset at each step.
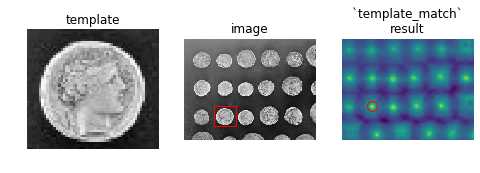
Problem 2: template_match
Input: A gray-scale image represented by a 2-d numpy array and a smaller gray-scale image represented by a 2-d numpy array.
For this problem, we will be implementing a common task of finding the instance of a small image in a larger image. For example, we might have an image of a specific coin (the template) and an image of many coins and we want to find where the coin appears in this larger image. At a high level, this algorithm works like a convolution over the image using the template as the kernel, where it computes a "similarity measure" between the template and the current portion of the image. The result returned should be the similarities at each possible point, which our provided code will use to find the most likely spot by finding the position with maximum similarity.
The similarity measure we will use is based on the idea of a "cross correlation". For each position of the template in the algorithm, we will compute the sum of element-wise product between the current section of the image and the template (much like a step of a convolution). However, we don't want to use the raw pixel values since high brightness can cause artificially high similarities. Instead, we have to "de-mean" both the template and the section of the image we are currently looking at by subtracting their average pixel values from all their respective pixels. At a pseudo-code level, this involves for each valid position of the template over the image:
- Compute the relevant section of the image we want to look at, we will call this "current" in the remaining steps.
- Subtract the mean pixel value in current from each pixel in current.
- Subtract the mean pixel value in the template from each pixel in the template.
- Compute the correlation by multiplying each pixel from the de-meaned current with its corresponding pixel in the de-meaned template. Add all these values up to compute the similarity.
This is shown as an example in the expandable box below with some concrete numbers to make it more clear.
This function should return a 2-d numpy array of floats that stores the similarity between the template at each valid point in the image. You should NOT round or cast the array to integers. You should see the last problem for an appropriate development strategy.
You may use two loops to solve this problem (to move the sliding window). Everything else should be done using numpy computations. This method should NOT modify the input parameters, but rather should return a new numpy array.
Example template_match on small image
Below shows the steps of computing the result for a small image with a small template. Some things to note about the example.
- Neither the image or the template will necessarily be a square. If the template was a different size, the result will be a different size too.
- For simplicity, all the pixel values are 0 or 1, but this will not be the case in general since a gray-scale image can have any value between 0 and 255.
- The output numbers in this example are between 1 and -1, but this is not true in general. To find the match, we would search for the highest number in the result.
- For this example, you should NOT round or cast the outputs. We just happened to get precise answers for this example.
Notice in the second step, the result is -0.5. This is because the mean pixel value of that section of the image is 0.25 while the mean pixel value for the template is 0.5 which leaves the similarity as: \[ (0 - 0.25) * (1 - 0.5) + (1 - 0.25) * (0 - 0.5) + (0 - 0.25) * (0 - 0.5) + (0 - 0.25) * (1 - 0.5) = -0.5\]

Example template_match on real images
Using coins.png and using a template coins[170:220, 75:130]
Using gray_puppy.png and using a template gray_puppy[150:200, 175:225]
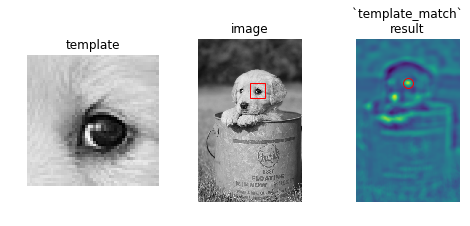
Using gray_puppy.png and using a template gray_puppy[355:435, 200:276]
You can create these plots by using the following method we defined that makes these plots for the given image, template, and result of template_match. You do not need to include these in your solution, but you may do so!
def find_xy(result):
    """
    Given the result of template_match, finds the position (x, y) with
    the highest similarity.
    """
    ij = np.unravel_index(np.argmax(result), result.shape)
    return ij[::-1]


def plot_result(image, template, result, output_file='match.png'):
    """
    Given an image, a template, and the result of
    template_match(image, template), makes a plot showing the result
    of the match.

    Saves result to given file path
    """
    x, y = find_xy(result)

    plt.figure(figsize=(8, 3))
    ax1 = plt.subplot(1, 3, 1)
    ax2 = plt.subplot(1, 3, 2)
    ax3 = plt.subplot(1, 3, 3, sharex=ax2, sharey=ax2)

    ax1.imshow(template, cmap=plt.cm.gray)
    ax1.set_axis_off()
    ax1.set_title('template')

    ax2.imshow(image, cmap=plt.cm.gray)
    ax2.set_axis_off()
    ax2.set_title('image')
    # highlight matched region
    template_height,  template_width = template.shape
    rect = plt.Rectangle((x, y), template_width, template_height,
                         edgecolor='r', facecolor='none')
    ax2.add_patch(rect)

    ax3.imshow(result)
    ax3.set_axis_off()
    ax3.set_title('`template_match`\nresult')
    # highlight matched region
    ax3.autoscale(False)
    ax3.plot(x, y, 'o', markeredgecolor='r', markerfacecolor='none',
             markersize=10)
    plt.savefig(output_file)
(Optional) Normalized Cross Correlation
The formula we use for similarity is very similar to what is used in practice, with a few details removed for simplicity. Mathematically, what we wrote in our problem computes the similarity between image \(I\) and template \(T\) at position \(x, y\) as:
\[ sim(I, T, x, y) = \sum_{(i, j) \in T.indices} \left( (I_{x,y,T}[i, j] - \overline{I_{x,y,T}})( T[i, j] - \overline{T}) \right)\]Where \(I_{x,y,T}\) is the subset of image \(I\) that lines up with \(T\) at position \(x, y\), \(T.indices\) is the set of all pixel indices in \(T\), and \(\overline{X}\) is the average of the pixels in \(X\).
One thing that is done is practice is normalizing the images in each step of the algorithm to account for variance of pixel values as well. Mathematically, this is written as
\[ sim(I, T, x, y) = \frac{\sum_{(i, j) \in T.indices} \left(( I_{x,y,T}[i, j] - \overline{I_{x,y,T}} )( T[i, j] - \overline{T}) \right)}{\sum_{(i, j) \in T.indices} \left( T[i,j] - \overline{T}\right)^2 \sum_{(i,j)\in T.indices}\left(I_{x,y,T}[i, j] - \overline{I_{x,y,T}}\right)^2 }\]Using this formula works much better in practice because it accounts for the variation in colors in the image too. This does not fix every problem though. For example, if we rotated the template image a bit this algorithm would fail since it assumes the template will be in the same orientation in the bigger image. You would have to use much more complicated techniques to make it work in that case as well.
Evaluation
Your submission will be evaluated on the following dimensions
- Your solution correctly implements the described behaviors. You will have access to some tests when you turn in your assignment, but not all behaviors in the spec will be tested in the public tests. All behavior we test is completely described by the problem specification or shown in an example.
- When we run your code, it should produce no errors or warnings.
- You should remove any debug print statements in your program. Some students report Ed crashing when they try to print the whole dataset; remove those extra print statements to prevent excessive output.
- Your code meets our style requirements:
- All code files submitted pass
flake8 - Your program should be written with good programming style. This means you should use the proper naming convention for methods, variables, and fields (
snake_case) and for classes (CapitalCase). Your code should not be overly redundant and should avoid unnecessary computations. - Every function written is commented, in your own words, using a doc-string format that describes its behavior, parameters, returns, and highlights any special cases.
- There is a doc-string at the top of each code file you write with your name, section, and a brief description of what that program does.
- Any expectations in the subsections listed above are met.
- All code files submitted pass
A note on allowed material
A lot of students have been asking questions like "Can I use this method or can I use this language feature in this class?". The general answer to this question is it depends on what you want to use, what the problem is asking you to do and if there are any restrictions that problem places on your solution.
There is no automatic deduction for using some advanced feature or using material that we have not covered in class yet, but if it violates the restrictions of the assignment, it is possible you will lose points. It's not possible for us to list out every possible thing you can't use on the assignment, but we can say for sure that you are safe to use anything we have covered in class so far as long as it meets what the specification asks and you are appropriately using it as we showed in class.
For example, some things that are probably okay to use even though we didn't cover them:
- Using the
updatemethod on thesetclass even though I didn't show it in lecture. It was clear we talked about sets and that you are allowed to use them on future assignments and if you found a method on them that does what you need, it's probably fine as long as it isn't violating some explicit restriction on that assignment. - Using something like a ternary operator in Python. This doesn't make a problem any easier, it's just syntax.
For example, some things that are probably not okay to use:
- Importing some random library that can solve the problem we ask you to solve in one line.
- If the problem says "don't use a loop" to solve it, it would not be appropriate to use some advanced programming concept like recursion to "get around" that restriction.
These are not allowed because they might make the problem trivially easy or violate what the learning objective of the problem is.
You should think about what the spec is asking you to do and as long as you are meeting those requirements, we will award credit. If you are concerned that an advanced feature you want to use falls in that second category above and might cost you points, then you should just not use it! These problems are designed to be solvable with the material we have learned so far so it's entirely not necessary to go look up a bunch of advanced material to solve them.
tl;dr; We will not be answering every question of "Can I use X" or "Will I lose points if I use Y" because the general answer is "You are not forbidden from using anything as long as it meets the spec requirements. If you're unsure if it violates a spec restriction, don't use it and just stick to what we learned before the assignment was released."
Submission
This assignment is due by Thursday, May 28 at 23:59 (PDT).
You should submit your finished
hw6_main.py
on Ed.