CSE 154
Section 12: Intro to Node.js
Section Agenda
Node.js Review
Hello World Program
Adding Routes with Express
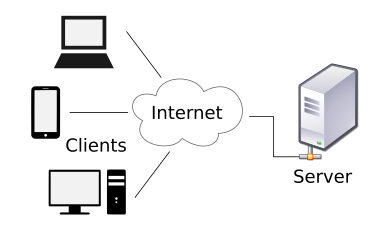
Serverside Programming
Previously, we have written code that is served to the user and run in the browser. Javscript listened for user behavior and executed code that manipulates the DOM as a result.
Serverside programs are never given to users. They run constantly on the server, waiting for requests the same way JS listens for events. They will then run code and provide a response back to the client.
Node.JS
We will be using Node to run Javascript as serverside code. Using modules like Express, we will be making forward-facing APIs like the ones you have been using with AJAX fetch.
We will define API endpoints, and then provide the code that should be run if someone requests from that endpoint. In doing so, we can read their query parameters and respond with relevant data.
It is now absolutely critical that you have node properly installed.
(Mac)
(Windows)
Setting up a Node server
The first thing we need to do is install the necessary packages in the directory where we will run the server, and get it running.
-
Download these starter files. Included is
an empty js file for implementing our API (no module pattern needed), a public folder
containing our html, css and js, and a
package.jsonfile. -
The
package.jsonfile defines the packages we need to run our serverside code. Open a terminal in the directory with the package file and run the commandnpm installto install the packages. -
Start
hello.jswithconst express = require('express');to import the express module. Then writeconst app = express();. We can now use theappvariable's methods to define aspects of our webservice. - At the end of your file, add the following:
app.use(express.static("public"));
const PORT = process.env.PORT || 8000;
app.listen(PORT);
JS
This will host the server on port 8000, and make the endpoints relative to the "public" folder so your public JS file can see it.Our first endpoint
app.get('/hello', function (req, res) {
  res.set("Content-Type", "text/plain");
  res.send('Hello World!');
});
Add this to hello.js. Here we have the simplest possible endpoint: A GET request endpoint that responds with "Hello World!".
-
app.getallows us to create a GET endpoint. It takes two arguments: The endpoint URL path, and a function that defines the behavior. reqis the request object, and holds items like the request parameters.resis the response object, and has methods to send data to the client.res.set(...)sets header data, like "content-type". Always set either "text/plain" or "application/json" with your response.res.send(response)returns the response as text to the client.res.json(response)Does the same, but with a JSON object.
Running the server
To start the server, open a terminal in the directory with the server and enter
nodemon hello.js. nodemon is a version of node that restarts
if you make changes to the JS code to reflect the changes.
To stop the server, enter ctrl+c in the terminal.
Try accessing your page in the browser! Since the server is being hosted locally
on your machine, use the URL localhost:8000/hello.
8000 is the port we
specified in hello.js.
Since we told the server to serve files in the "public" directory, we can access our
website with the url localhost:8000/hello.html.
You must open the page this way, or else it will not have access to the
server.
Using the webservice in client-side JS
To use the webservice in Javascript, simply fetch to the endpoint:
fetch("/hello")
This works because we are serving the files to the "public" directory with
app.use(express.static("public"));.
Edit the public hello.js to print the response from the /hello
webservice to the #hello-result element when the #hello-btn
is pressed. Most of the client-side JS is implemented for you. In this section, you
will only have to write the fetch requests.
Query Parameters
In Node.JS, we can access user supplied GET parameters as follows:
- Request:
localhost:8000/hello?key=value - In Node.JS:
let value = req.query["key"]
It is important, though, to make sure that the user actually supplied the parameter,
since we will get undefined otherwise.
Always check if parameters are undefined before accessing them
- In Node.JS:
if (req.query["key"]) { ... }
Error Codes
In the case that you encounter an error, such as a missing GET parameter from the
client, you may want to send a request with an error code. If you just send a
regular response, it will not cause checkStatus to fail, nor will it
communicate that it is an error. We can use the status method of the
response object to set the code.
- In Node.JS:
res.status(400).send("Error, Bad Request!")
Exercise: Hello You!
Add a new GET endpoint, /hello/name, which takes as query parameters
a first and last parameter. It should then respond in plain
text with "Hello firstName lastName"
If they fail to provide the necessary GET parameters, respond with a 400 status code, and the error message "Missing Required GET parameters: first, last". If they provide one, but not the other, your error message should only have the missing parameter listed.
After that, implement a fetch request on the client-side to send the values in
#firstname-in and #lastname-in and print the result from
the server into #name-result.
URL parameters
You may recognize this from the number trivia API we used at the beginning of AJAX. We
can accept parameters directly inside of the URL with node.JS by putting them in the
endpoint we pass into app.get:
- In Node.JS:
app.get("/hello/name/:first/:last", ...) - Request:
localhost:8000/hello/name/Mowgli/Hovik
The colon before the param name implies that it is a key, whose value is passed in by the user when they make the request. In your code, you can access these parameters in a similar way to query parameters:
- In Node.JS:
let firstName = req.params["first"];
You do not need to check that these are defined, because in order for them to use this endpoint, they must have the parameters.
Note: You can use GET parameters and URL parameters at the same time, if you feel so inclined.
Exercise: Splendid Circles
Add a new GET endpoint, /math/circle/:r, which takes a radius as a URL
parameter. It should then respond in JSON (see
earlier slides for how to do that) with
the area and circumference.
{"area": 3.14, "circumference": 6.28}
The r parameter will come in as a string, so
be sure to convert it into a float.
After that, implement a fetch request on the client-side to send the value in
#radius-in and print to #circle-result: "Area: area, Circumference: circumference"
The area of a circle is PI * r * r, and the circumference is
equal to PI * 2r. You can access PI with Math.PI.
Exercise: Radical Rectangles
Add a new GET endpoint, /math/rectangle/:width/:height.
It should then respond in JSON with
the area and perimeter.
{"area": 25, "perimeter": 20}
After that, implement a fetch request on the client-side to send the values in
#width-in and #height-in and print to #circle-result:
"Area: area, Perimeter: perimeter"
Exercise: Exquisite Exponents
Add a new GET endpoint, /math/power/:base/:exponent.
It should then respond in JSON with the result of putting the base to the
exponent power.
{"result": 16}
After that, implement a fetch request on the client-side to send the values in
#base-in and #exponent-in and print the result to
#power-result.