CSE 154
Section 5: Introduction to JavaScript
Today's Agenda
Experience common JavaScript bugs
Review helpful debugging strategies
Learn how to write a JavaScript function
Learn how to update page content/style with JavaScript
Section Goals
By the end of this section, you should be able to:
- Develop a basic JavaScript debugging strategy
- Identify and fix common JavaScript bugs with debugging strategies
- Be able to write a JavaScript file and link it to HTML
- Be able to write JavaScript functions which update a page's content/style
Reminder
The milestone for HW2 is due on Thursday, with no late days allowed. It's intended to be relatively short, just to make sure you are on track to finish the assignment.
Event-Driven Programming
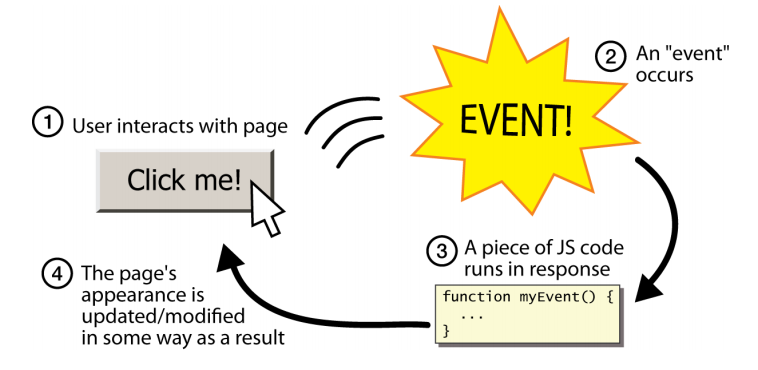
Unlike Java programs, JS programs have no main; they respond to user actions
called events
Event-Driven Programming: writing programs driven by user events
Mouse Event Demo
?
click
mouseenter
mouseleave
mouseover
mousedown
mouseup
dblclick
Event Demo
Subtle distinctions (non-testable material):
clickrequiresmouseupandmousedownto occur on the same element.mouseoverwill trigger again on child elements, unlikemouseenter
Accessing an Element: document.getElementById
let element = document.getElementById("id");
JS
document.getElementById returns the DOM object for an element with a given id (note that you omit the # when giving an id)
Refreshing our Selector Skills

What CSS selector would you use to select the unordered list on this page?
What CSS selector would you use to select the inputs in that list?
Using Selectors in JS
Methods in document and other DOM objects:
| Name | Description |
|---|---|
| querySelector(selector) | returns the first element that would be matched by the given CSS selector string |
| querySelectorAll(selector) | returns an array of all elements that would be matched by the given CSS selector string |
Summarize: How to get DOM elements in JS
- Ask for them by id:
document.getElementyById(...) - Query for them with CSS style selectors:
document.querySelector(...)document.querySelectorAll(...)
Common querySelectorAll issues
Many students forget to write . or # in front of a class or
id
// get all buttons with a class of "control"
let gameButtons = document.querySelectorAll("control");
let gameButtons = document.querySelectorAll(".control");
JS
querySelectorAll returns an array, not just a single element;
you must loop over the results
// set all buttons with a class of "control" to have red text
document.querySelectorAll(".gamebutton").classList.add("hidden");
let gameButtons = document.querySelectorAll(".gamebutton");
for (let i = 0; i < gameButtons.length; i++) {
  gameButtons[i].classList.add("hidden");
}
JS
Q: Can I still select a group of elements using querySelectorAll even if
my CSS file doesn't have any style rule for that same group?
(A: Yes!)
Getting the first element of a certain type
Use querySelector to highlight the first paragraph in the document:
<body>
  <p>This is the first paragraph</p>
  <p>This is the second paragraph</p>
  <p>You get the idea...</p>
</body>
HTML
// get all DOM objects that are <p>
let para = document.querySelector("p");
para.classList.add("highlighted");
JS
Handy Shortcut Functions
Two methods we will use a LOT are document.getElementById and
document.querySelectorAll. It's handy to
declare a shortcut to help us out. You may use the following in your JS
programs (these are exceptions to the rule of having description function
names):
function id(idName) {
  return document.getElementById(idName);
}

function qs(selector) { // less common, but you may find it helpful
  return document.querySelector(selector);
}

function qsa(selector) {
  return document.querySelectorAll(selector);
}
JS
We will be using these in examples! Here is the full template with documentation.
Handling Events
// attaching a named function
element.addEventListener("click", handleFunction);

function handleFunction() { // attaching onclick function
  // event handler code
}
JS (template)
JavaScript functions can be set as event handlers
When you interact with the element, the function will execute
click is just one of many event types we'll use
click Event Handler: an Example
<img id="pokeball" src="images/pokeball.jpg" alt="a pokeball" />
<button id="demo-btn">Click me!</button>
HTML
let demoButton = document.getElementById("demo-btn");
demoButton.addEventListener("click", changeImage);

function changeImage() {
  let pokeballImg = document.getElementById("pokeball");
  pokeballImg.src = "images/mystery.gif";
}
JS
output
Module Pattern Template
"use strict";
(function(){

  window.addEventListener("load", init);

  function init() {
    // This code is run when the page is loaded
  }

  // other functions you may define
})();
JS
Every JS file you write in this class will fit into this template. You do not have to memorize it, but make sure to always use it.
Debugging
JavaScript is notoriously difficult to debug due to its lack of error messages. We will go over some strategies in today's section, but more debugging strategies can be found below. We strongly recommend you read through these, for easier debugging in future assignments.
CSE154 JSLint
JSLint: an analyzer that checks your JS code, much like a compiler, and points out common errors.
Link to CSE154 JSLint: https://oxford.cs.washington.edu/cse154/jslint/
Much like HTML and CSS validation, always pass your code through CSE154 JSLint before turning in assignments.
JavaScript "strict" mode
                "use strict";

                your code...
Writing "use strict"; at the very top of your JS file turns on syntax checking:
- Shows an error if you try to assign an undeclared variable
- Stops you from overwriting key JS system libraries
- Forbids some unsafe or error-prone language features
You should always turn on strict mode for your code in this class
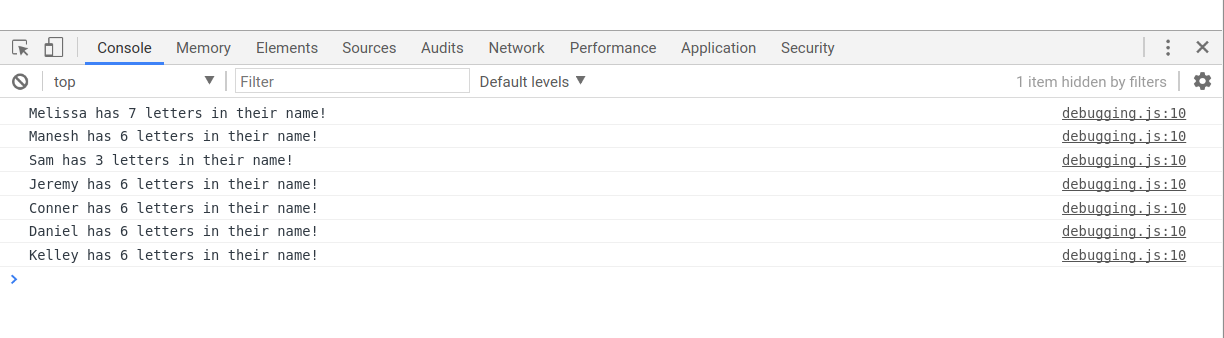
Debugging JS code in Chrome
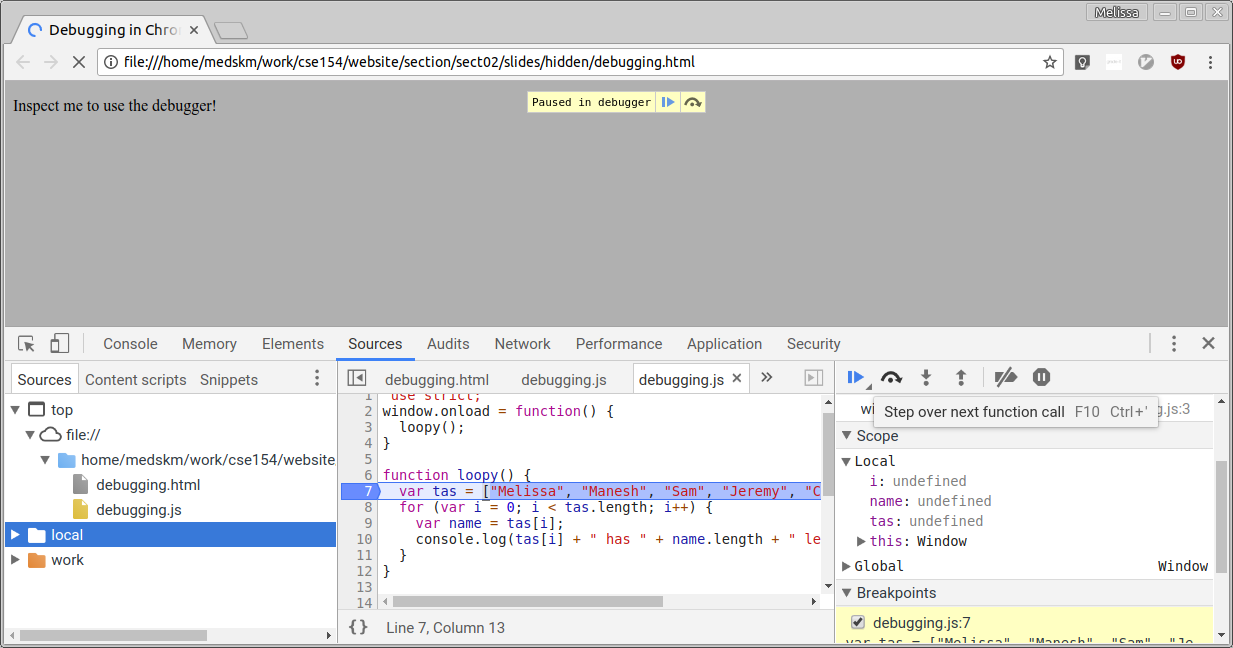
Chrome's Web Inspector debugger can set breakpoints, step through code, examine values (Sources tab)
The interaction pane for typing in arbitrary JS expressions (Console tab; Sources tab with code and variable views [see screenshot])
Try it on your own with this example (from the screenshots)!
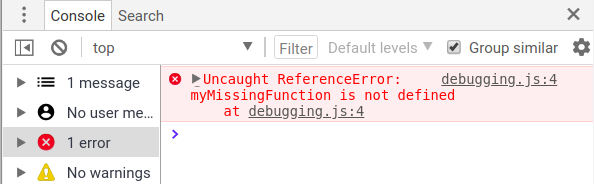
Debugging in Progress
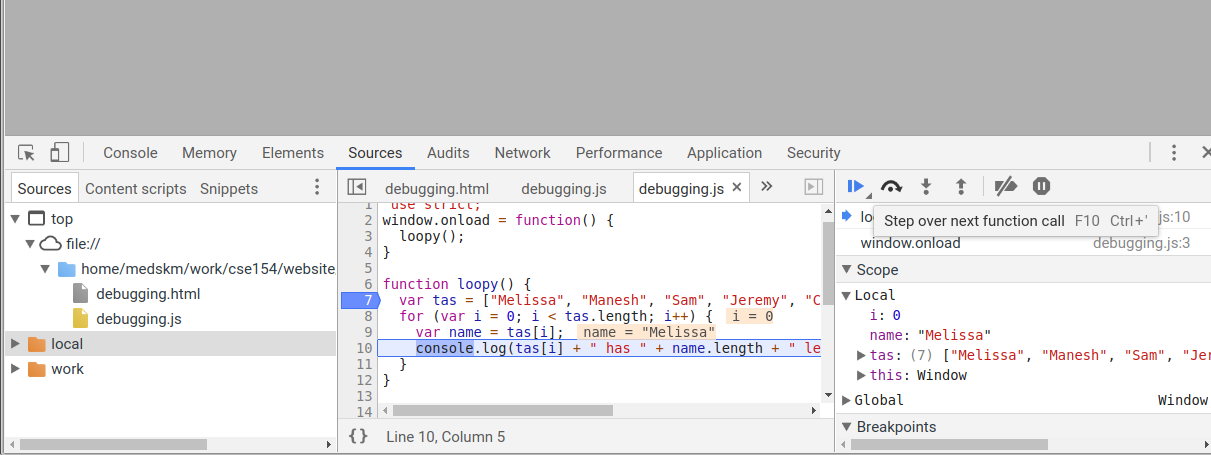
Debugging Finished
Other Debugging Strategies
alert() and console.log() are useful to include in functions that you are trying to debug, and are probably going to be most helpful when debugging JavaScript in this class.
A good strategy is to start with one of these functions in the top of your .js file as a sanity check that your script was correctly linked to the HTML page. Then, add it to the first function that is called to check that the function was called correctly, and continue the process until you reach the line(s) of code that are not working as expected.
You may find it useful to pass in variable values throughout this process so that
you can check whether your variables (e.g., text in an HTML tag or value
in a <input> tag have the correct values.
Debugging Checklist
-
Are you sure the browser is even loading your JS file at all?
Put analertat the top of it and make sure it appears. - When you change your code, do a full browser refresh (Shift-Ctrl-R)
-
 Check bottom-right corner of Chrome console panel for syntax errors
->
Check bottom-right corner of Chrome console panel for syntax errors
->
- Paste your code into our JSLint tool to find problems.
- Type some test code into Chrome's console or use a breakpoint.
General Good Coding Practices
ALWAYS code with Chrome console open (or Firefox)
Incremental development: code a little, test a little
Follow good general coding principles:
- Remove redundant code
- Make each line short and simple
Use lines and variables liberally:
- It's good to save parts of a complex computation as variables
- Helps to see what part of a long expression was bad/undefined/etc.
Don't fear the Chrome/Firefox debugger
DEMO - Fixing various bugs
Understanding how to fix different bugs, and how to use the inspector debugger, is crucial. Below are a few scenarios you might run into.
DEMO 1 - Code Doesn't Run
Buggy Page #1: HTML | JavaScript
If your page doesn't seem to be doing anything:
- Check the console. Are there any errors?
- Put a breakpoint at the code and see if it is triggered.
- Is your script tag proper? Refer to working examples to make sure yours matches.
Annotated Bug Fixes: HTML | JavaScript
DEMO 2 - Event isn't firing
Buggy Page #2: HTML | JavaScript
If an event isn't firing:
- Place a breakpoint in event response function. Does it run?
- Does the addEventListener code for the event run?
- Are you adding a listener with the correct event name and function?
- Are you selecting the right element? Use the debugger to step through and check.
Annotated Bug fixes: HTML | JavaScript
DEMO 3 - Code behaves incorrectly
The following code has a doubling and a quadrupling function that do not work propetly. There is no module pattern so that you can call the function in the inspector console!
Buggy Page #3: HTML | JavaScript
If your code is running, but doing the wrong thing:
- Check the console for errors, and try running JSLint.
- Put a breakpoint in the code behaving strangely and step through.
- If things work fine, move "up a level" and test the code that calls that code.
- Use console.log and alert to print values from the code as it runs.
Annotated Bug fixes: HTML | JavaScript
Exercise 1: Goofy Scripts
Let's write some toy scripts that we can use to mess with the internet!
- Write a function that selects all images on the webpage and sets their src attribute to https://i.giphy.com/media/IfuEfxTfeorNS/giphy.webp
-
Write a function that selects all paragraphs on the webpage and capitalizes their
text. DOM objects have a
textContentproperty that you can access to get the text in the element, or set to change the text.
Hint: Use document.querySelectorAll to get an array of DOM objects.
Hint: Strings have a toUpperCase function that returns the string in all caps.
To test your function, paste it into the console on a webpage (like this or this) and then call the function in the console. It can be fun to do stuff like this on random websites (and it is similar to what browser exentsions do).
Exercise 2: Whack-a-Bug!
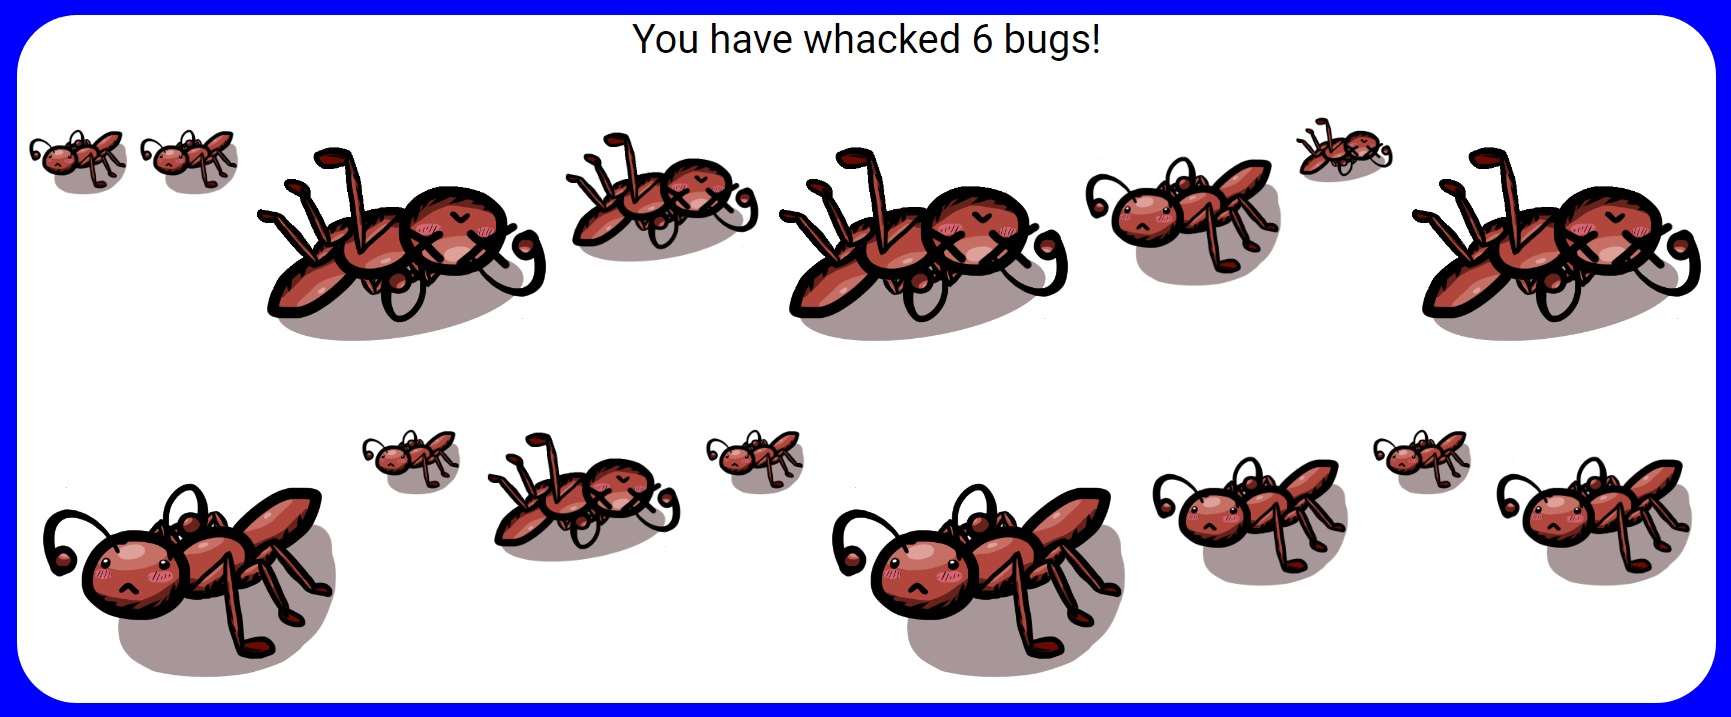
Intro
"Whack a bug" is a game that we will be developing over the course of two sections. In the game, the page will be populated with bugs, that the player must "whack". Today will be focused on starting the game and clicking to whack the bugs. Later we will add timing so that the game has challenge. Download this files here!
The HTML and CSS are already implemented for you. You will be adding to a JS skeleton file with empty functions that you have to implement.
There is a working version of the game here that you can use as a reference, but do not peek at the code until you are done!
Step 1: Event listeners
For each step, add code to the marked section in the code (and any other sections you need) to implement the given features. Test your code after each step. Developing websites incrementally like this helps to catch bugs when they arise, rather than when they pile up.
In the given init function, hook up the event listeners for the start
button and all of the bugs. The functions you hook up with the event listeners are
given, but not filled out. You can test if you hooked them up correctly by adding
alert messages to the empty functions, and unhiding the game view in the HTML so you
can click the bugs.
Hint: You can select all of the bugs with a CSS query, like in exercise 1.
Step 2: Reveal the game
If you removed the hidden class on the game, add it back. In the startGame
function, unhide the #game view. This can be done by manipulating the
classList of the element:
element.classList.add("class"): Adds the given class if not already present on the element.element.classList.remove("class"): Removes the given class if it is present on the element.element.classList.contains("class"): Returns whether the element has the given class.element.classList.toggle("class"): Toggles the class on or off.
Step 3: Randomly hide some bugs
We want the layout of the bugs to be somewhat random. The CSS already gives them uneven sizes, now we will randomly hide about 25% of them when the game starts to randomize the layout.
For each bug, there is a 25% chance that it should be given the hidden class. Some functions you may find useful:
Math.random(): Returns a random decimal number between 0 and 1Math.floor(num): Returns the given num rounded down to the nearest integer
Step 4: Implement whacking
When a bug is clicked, it should change its src attribute to
bug-whacked.png
and the #score should be incremented by one.
When incrementing the score, you will need to grab the old score from the DOM.
You may find the parseInt(string) function useful, which extracts a number
out of a given string containing a number.
Hint: Within a function triggered by an event, you can use the
this keyword to access the element that triggered the event.
Step 5: Fix a key exploit in the game
At the moment, a user can repeatedly click a whacked bug to increment the score forever. To prevent that, we need to disable the whacking code after the bug is whacked.
Two common ways to disable a function is to use removeEventListener to
remove the eventListener from the element that triggers it, or to only run the
code in the function given a certain boolean condition.
Either way, you may find it useful to add a class to the whacked bug to keep track
of the fact that it is whacked.
Step 6: Allow new games
Finally, the player should be able to start new games without refreshing the page. You will need to implement code in one or both functions so that the score is reset, the bug images are reset, a new set of random bugs are hidden, and any other things you need to do to make it so the game is back in the initial state.
Exercise 3: What's Your Color?
We've provided an HTML file colorifyme.html and a start to a
JavaScript file colorify.js that
it links to. Download both files and fill in the "TODO" comments of colorify.js so that when the
web page's "colorify" button
is clicked, it randomly decides the color of the page background. That is, it should
choose a random hex value for the background between #000000 and
#FFFFFF. In addition, it should replace any text in the heading tag that
has the ID "my-color" with the text, "Your color is RANDOMCOLOR!",
(where RANDOMCOLOR is the hex value randomly-generated for the background).
A runnable solution is located here (don't peek at the solution code!)
Exercise 3: Solution
"use strict";
(function() {
  const HEX_DIGITS = ["0", "1", "2", "3", "4", "5", "6", "7", "8", "9",
                      "A", "B", "C", "D", "E", "F"];
  const HEX_LENGTH = 6; // Number of hexidecimal digits in a color code
  window.addEventListener("load", init);

  function init() {
    let colorBtn = document.getElementById("colorify");
    colorBtn.addEventListener("click", changeBackgroundColor);
  }

  function changeBackgroundColor() {
    let randomColor = "#";
    for (let i = 0; i < HEX_LENGTH; i++) {
      randomColor += HEX_DIGITS[Math.floor(Math.random() * HEX_DIGITS.length)];
    }
    document.body.style.backgroundColor = randomColor;
    document.getElementById("my-color").textContent = "Your color is " + randomColor + "!";
  }
})();
JS
Bonus Exercise: cRaZyCaPs
Write a function named crazyCaps that accepts a string as a
parameter and returns a new string with its capitalization altered such that
the characters at even indexes are all in lowercase and odd indexes are all in uppercase.
For example, if a variable str stores "Hey!! THERE!",
the call of crazyCaps(str) should return "hEy!! tHeRe!".
Bonus Exercise: Solution
function crazyCaps(str) {
  let result = "";
  for (let i = 0; i < str.length; i++) {
    if (i % 2 == 0) {
      result += str[i].toLowerCase();
    } else {
      result += str[i].toUpperCase();
    }
  }
  return result;
}
JS