CSE 154
Lecture 8: DOM Manipulation with Skittles V1
Administrivia
HW2 Part A is due tomorrow (no late days), video is out!
HW2 Part B is out, due next Thursday. You can find a video here!
We have also provided a testing program for you to test your solution tester.zip
Handy JS cheatsheet here (more coming soon)
Pulling New Part B Files in HW2: Git Package
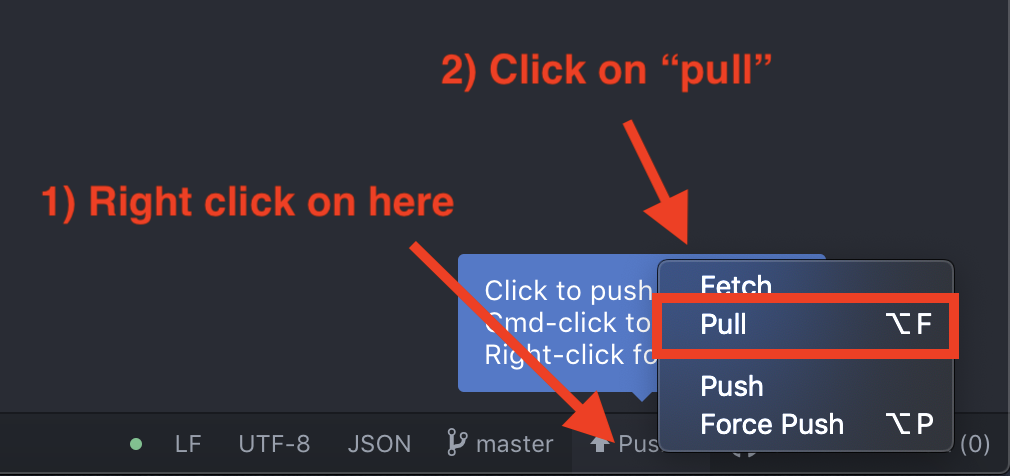
Make sure to continue your Part A work, but Accept HW2 Part B on the Homeworks page (see README-PART-B.md for more details). You will need to "pull" the new files from your current repo
for Part B. If you are using the Git Atom package, this process like:
Pulling Part B Files for HW2: Terminal
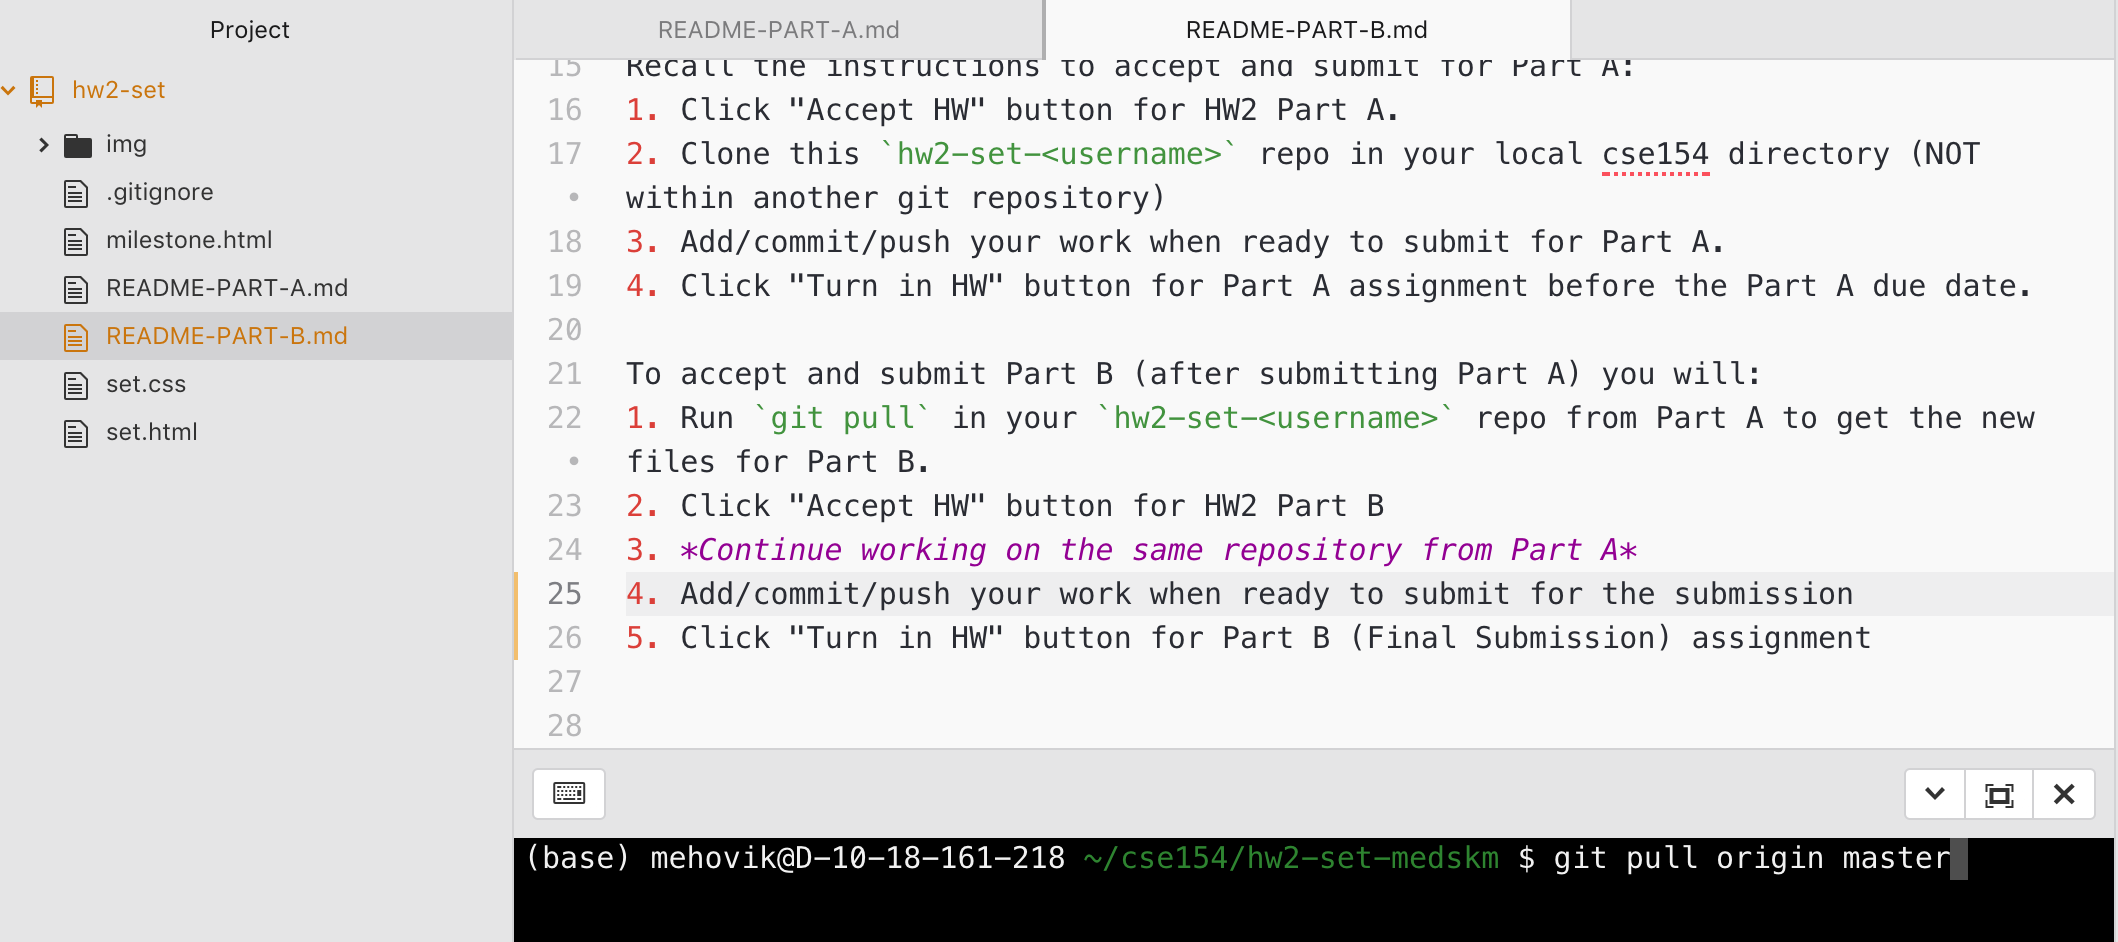
If you have Git with the platform-ide-terminal package for Atom (or on a
different terminal), you can pull
in your hw2-set-<username> repo you cloned from Part A:
Module 2 Learning Objectives
JS Basics (Strings, Numbers, Arrays, Functions, etc.)
Basic HTML UI Elements (buttons, text input, select dropdowns, etc.)
The DOM
- Node Acesss (getElementById, querySelector, querySelectorAll)
- Tree Manipulation (appendChild, removeChild, textContent, etc.)
- Style Manipulation (style vs. classList)
Events
- Common page/user events: load, click, change, mouseover, etc
- DOM/event connections:
addEventListenerandremoveEventListener - Delayed and repeated events:
setTimeoutandsetInterval(Friday)
Recall: Accessing DOM objects
- Ask for them by id:
document.getElementyById(...) - Query for them with CSS style selectors:
document.querySelector(...)document.querySelectorAll(...)
We will use the id, qs, and qsa shorthand functions often
More about document.querySelectorAll
Back to Lecture 4...
The Document Object Model
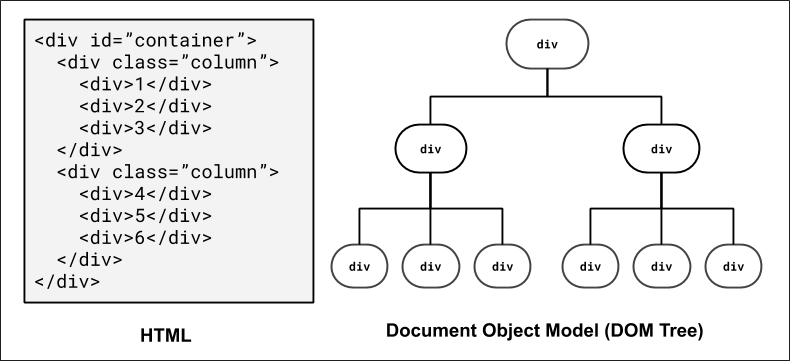
How the browser represents a page
Very useful when thinking about selectors!
We'll return to this when we introduce JavaScript, where we can dynamically access/modify of element "nodes" in the DOM tree.
DOM and Selectors: Q2
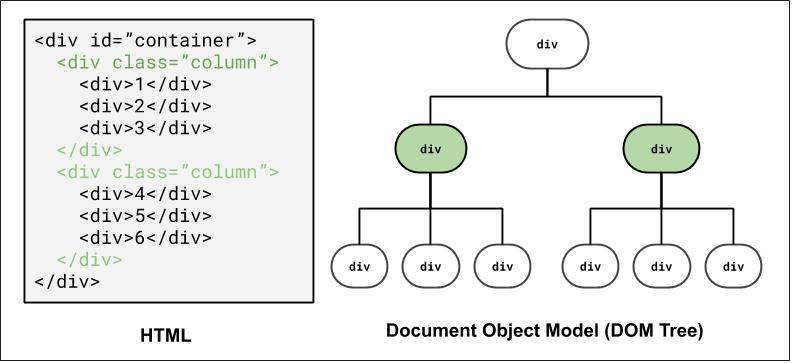
How to select the colored elements in CSS?
Using a class selector: .column
Using a combinator selector: #container > div
What about in JS?
document.querySelectorAll(".column") (or with qsa(".column")
qsa("#container > div")
Examples in our Current Skittles Page
let gameColor = document.getElementById("color");
let skittles = document.querySelectorAll(".skittle");
let greenSkittles = document.querySelectorAll(".green.skittle");
let greenSkittleCount = greenSkittles.length;

let firstSkittle = document.querySelector(".skittle");
JS
Try these commands in the Chrome Console on the linked HTML page!
Common querySelectorAll issues
Many students forget to write . or # in front of a class or
id
// get all elements with class of ".skittle"
let skittles = document.querySelectorAll("skittle");
let skittles = document.querySelectorAll(".skittle");
JS
querySelectorAll returns an array, not just a single element;
you must loop over the results
// hide all skittles
qsa(".skittle").classList.add("hidden");
let skittles = document.querySelectorAll(".skittle");
for (let i = 0; i < skittles.length; i++) {
  skittle.addEventListener("click", eatSkittle);
}
JS
Q: Can I still select a group of elements using querySelectorAll even if
my CSS file doesn't have any style rule for that same group?
(A: Yes!)
Handy Shortcut Functions
We will use document.getElementById and
document.querySelectorAll a LOT. It's handy to
declare a shortcut to help us out. You may use the following in your JS
functions (these are exceptions to the rule of having description function
names).
/**
 * Returns the element that has the ID attribute with the specified value.
 * @param {string} idName - element ID
 * @returns {object} DOM object associated with id.
 */
function id(idName) {
  return document.getElementById(idName);
}

/**
 * Returns the array of elements that match the given CSS selector.
 * @param {string} selector - CSS query selector
 * @returns {object[]} array of DOM objects matching the query.
 */
function qsa(selector) {
  return document.querySelectorAll(selector);
}

/**
 * Returns the first element that matches the given CSS selector.
 * @param {string} selector - CSS query selector.
 * @returns {object} The first DOM object matching the query.
 */
function qs(selector) { // less common, but you may find it helpful
  return document.querySelector(selector);
}
JS
We will start using these in examples (as well as gen for document.createElement which we'll see soon)!
A Provided JS Template
We have provided a template you can refer to for the standard JS program structure
here.
However, you are expected to replace the example functions and comment examples with your own (you may use
the same JSDoc comments for id, qs, and qsa as is though).
Modifying the classList
You can manipulate the DOM element's classList with the following methods:
| Name | Description |
|---|---|
| add(classname) | Adds the specified class(es) to the list of classes on this element. Any that are already in the classList are ignored. |
| remove(classname) | Removes the specified class(es) to the list of classes from this element. Any that are already not in the classList are ignored without an error |
| toggle(classname) | Removes a class that is in the list, adds a class that is not in the list. |
| contains(classname) | Returns true if the class is in the the DOM element's classList, false if not. |
| replace(oldclass, newclass) | Replaces the old class with the new class. |
Hiding/Showing Elements
How can we hide display an HTML element?
.hidden {
  display: none;
}
CSS
In JS, it's possible to modify the style properties of an element directly.
id("box-img").style.display = "none";JS
What's wrong with that?
How can we add/remove CSS classes with JS?
Skittles V1
Today, we'll review how to access DOM elements and introduce how to add new ones with V1 of the Skittles page
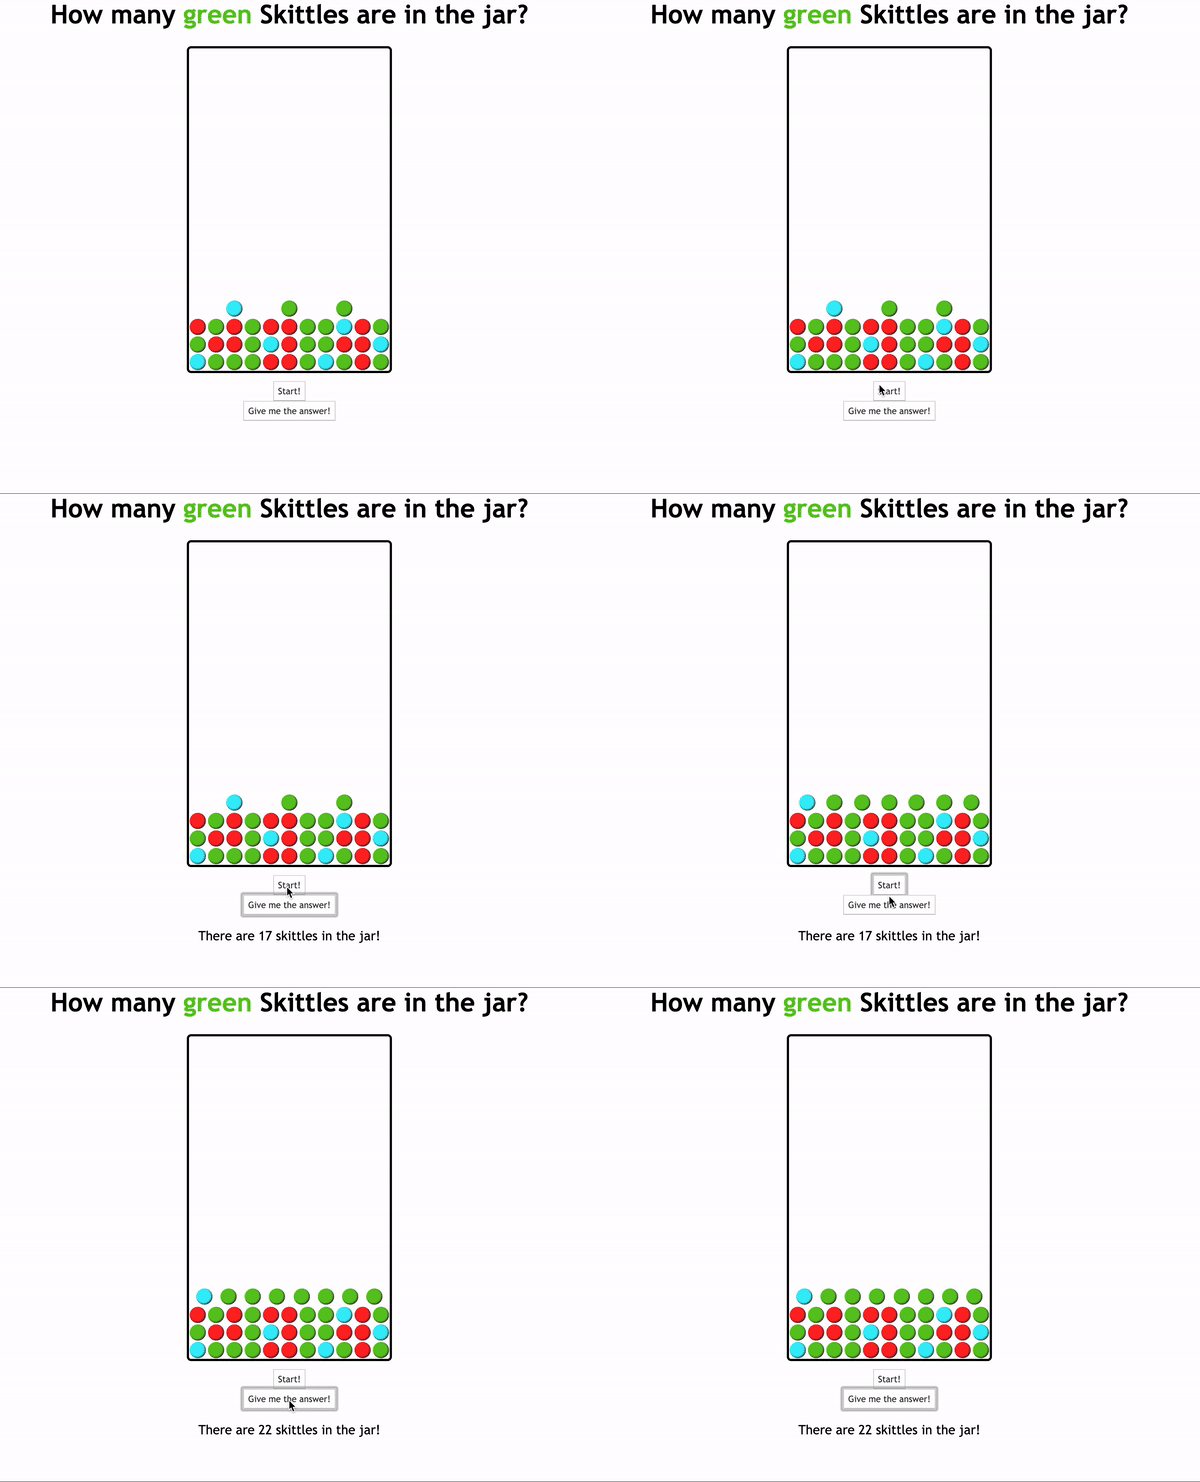
Starter JS from Pre-Check: skittles-starter.js (skittles-lec08-starter.zip)
You can find the running solution we left off with here, which is also the solution to the Pre-Check questions.
Part 1/2: Setting up the Page
"usee strict";
(function() {

  window.addEventListener("load", init);

  function init() {
    id("answer-btn").addEventListener("click", showAnswer);
    // 2.1. When #start-btn is clicked, fillJar should be called.
    id("start-btn", fillJar);
  }
  ...
})
JS
Part 3: Showing the Answer
When the #answer-btn is clicked, we want to populate the #count span with the number
of green skittles currently in the jar.
<article id="game-play">
  <button id="answer-btn">Give me the answer!</button>
  <p class="hidden">
    There are <span id="count"></span> skittles in the jar!
  </p>
</article>
skittles-jar.html
...
// Part 3: Called when #answer-btn is clicked (see init())
function showAnswer() {
  let greenSkittles = qsa(".green.skittle");
  id("count").textContent = greenSkittles.length; // e.g., 17
  // show the paragraph (remember that .hidden is implemented in CSS)
  qs("#game-play p").classList.remove("hidden");
}
skittles.js
When the Start Button is clicked, how would we hide/show views? How would we fill the jar with a "test skittle"? How do we create new DOM elements? How do add them to existing DOM elements? JS JS Note: Merely creating an element does not add it to the page You must add the new element as a child of an existing element on the page... One more alias function! When creating new DOM elements using JS, you may use We have added one more alias function, JS
When you have a parent DOM node, you can add or remove a child DOM node using
the following functions:
JS skittles.js What if instead of a green skittle, we want a randomly-colored skittle? skittles.js Get all of the DOM elements and remove them from the DOM JS Or ... Method 3: Set the Jar's JS Why not just code this way? JS Bad code quality (maintainability) on many levels JS Last week, we used a "Coffee Shop" page to discuss the DOM and different CSS layout strategies. What if we wanted to use JS to generate each product article? (for now, we'll hard-code a coffee card just for practice with the DOM) HTML Let's add some products with JS in a new coffee-shop.html
The following function is an attempt to create a generated HTML JSPart 4: Getting closer to "Starting" a Game
DOM Manipulation
Creating New Node Objects
Name
Description
document.createElement("tag")
creates and returns a new empty DOM node representing an element of that type
// create a new <h2> node
let newHeading = document.createElement("h2");
newHeading.textContent = "This is a new heading!";// create a new <div> node
let skittle = document.createElement("div");
skittle.classList.add("skittle");
skittle.classList.add("green");
// or, skittle.classList.add("skittle", "green");An Aside
document.createElement often.gen to include with id, qs, and qsa.function gen(tagName) {
return document.createElement(tagname);
}Adding/Removing Nodes to the DOM
Name
Description
parentNode.appendChild(node)
places the given node at end of this node's child list
parentNode.insertBefore(new, old)
places the given node in this node's child list just before old child
parentNode.removeChild(node)
removes the given node from this node's child list
node.remove()
removes the node from the page
parentNode.replaceChild(new, old)
replaces given child with new nodes
let li = document.createElement("li");
li.textContent = "A list item!";
id("my-list").appendChild(li);Part 4: Adding Skittles to the Jar
// ... called when #start-btn is clicked
function fillJar() {
  let skittle = document.createElement("div");
  skittle.classList.add("skittle");
  skittle.classList.add("green");
  id("jar").appendChild(skittle); // add the new skittle to the jar!
}Part 4 V2: Using our
randomColor function// ... called when #start-btn is clicked
function fillJar() {
// for now, we just add a "test" skittle
let skittle = document.createElement("div");
skittle.classList.add("skittle");
//skittle.classList.add("green");
skittle.classList.add(getRandomColor());
id("jar").appendChild(skittle);
}
// Implemented in Part 5
function getRandomColor() {
const COLORS = ["red", "green", "blue"];
let randomIndex = Math.floor(Math.random() * COLORS.length);
return COLORS[randomIndex];
}What if we wanted to clear the jar?
Three methods for removing elements
function clearJar() {
  let skittles = qsa(".skittle");
  for (let i = 0; i < skittles.length; i++) {
    // 1. Using node.remove();
    skittles[i].remove();
    // 2. Using parentNode.removeChild(node);
    // skittles[i].parentNode.removeChild(skittles[i]);
  }
}innerHTML to be empty!function clearJar() {
id("jar").innerHTML = "";
}Note: in general
innerHTML hacking is baddocument.getElementById("add").innerHTML = "<p>A result!</p>";
// Substitutes all children
id("add").innerHTML =  "<p>A result!</p>";
// adds a node to the front of the list of children.
id("add").innerHTML  = "<p>A result!</p>" + id("result").innerHTML;
// adds a node to the end of the list of children
id("add").innerHTML += "<p>A result!</p>";Extra DOM Manipulation Practice
Creating a Nested DOM element: Back to the Coffee Shop!
<!-- ... start of coffee-shop.html -->
  <main>
    <div id=”item-container”>
      <!-- “Classic Coffee” card -->
      <article class=”product”>...</article>
      <article class=”product”>...</article>
      <article class=”product”>...</article>
      <article class=”product”>...</article>
      <article class=”product”>...</article>
    </div>
  </main>
<!-- ... rest of coffee-shop.html -->Example
article for a coffee cup item on the cafe page and append it to the #item-container. Try to trace through the code to draw the DOM structure. What are we missing?
<div id=”item-container”>
  <article class=”product”>
    <h3>Classic Coffee</h3>
    <img src="img/coffee-4.png"
        alt="Classic Coffee" />
    <hr />
    <p>The classic.</p>
  </article>
</div>function addCoffeeItem() {
let product = document.createElement(“article”);
product.classList.add(“product”);
let h3 = document.createElement(“h3”);
h3.textContent = “Classic Coffee”;
let img = document.createElement(“img”);
img.src = “img/coffee-4.png”;
img.alt = “Classic Coffee”;
let hr = document.createElement(“hr”);
let p = document.createElement(“p”):
p.textContent = “The classic.”;
}