CSE 154
Lecture 6: Flexbox and Forms
.fireplace {
  border-right: 0;
}

.archway {
  display: flex;
  justify-content: flex-end;
  align-items: flex-end;
}
CSS IRL
From: reddit.com/r/css_irl/

Agenda
- Part 0: Notecards!
- Create groups of 2-4 people
- On the notecard write the first name/last initial of each person in the group
- Select a school appropriate team name and write it at the top of the card
- Give the card to a TA who is walking around
- Part 1: Complex Flex
- Part 2: Homework 2: Set!
- Part 3: HTML forms with input
Lecture Objectives
By the end of this lecture, you should be able to:
- Identify nested flex containers
- Understand the expectations for next assignment
- Develop a wire frame diagram for the design of a web site
- Know different types of HTML input tags and where to find them
Part 1: More complicated Flexbox solutions
Think...and Vote: Flexbox Review
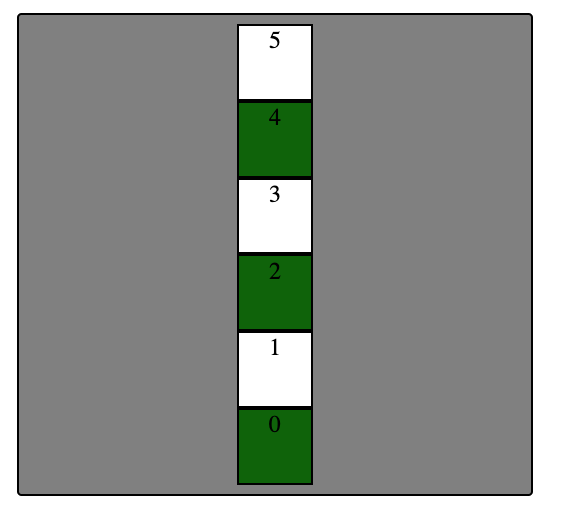
What would be the flexbox rules necessary to accomplish this with our boxes.html example? (Box 5 is at the top, 0 at the bottom)

Exercise 9: Flexing in Flex
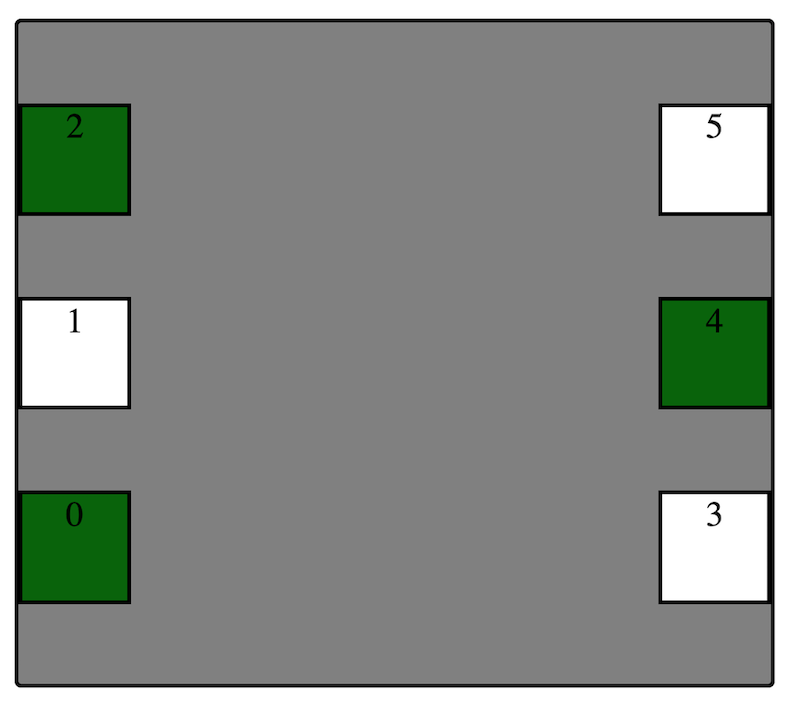
Layout boxes into two 3-box columns using flex.
First: How would you change the HTML slightly as well to get the columns grouped?

- Click on the image to start!
- From Exercise 8, change the HTML to group boxes into two 3-box columns.
- From Exercise 8, the
#boxes-containerwas changed to 500px - The column numbers should be in reverse order
- Distribute the two columns on both left/ends of the
#box-container. - Distribute the boxes spaced evenly in the columns
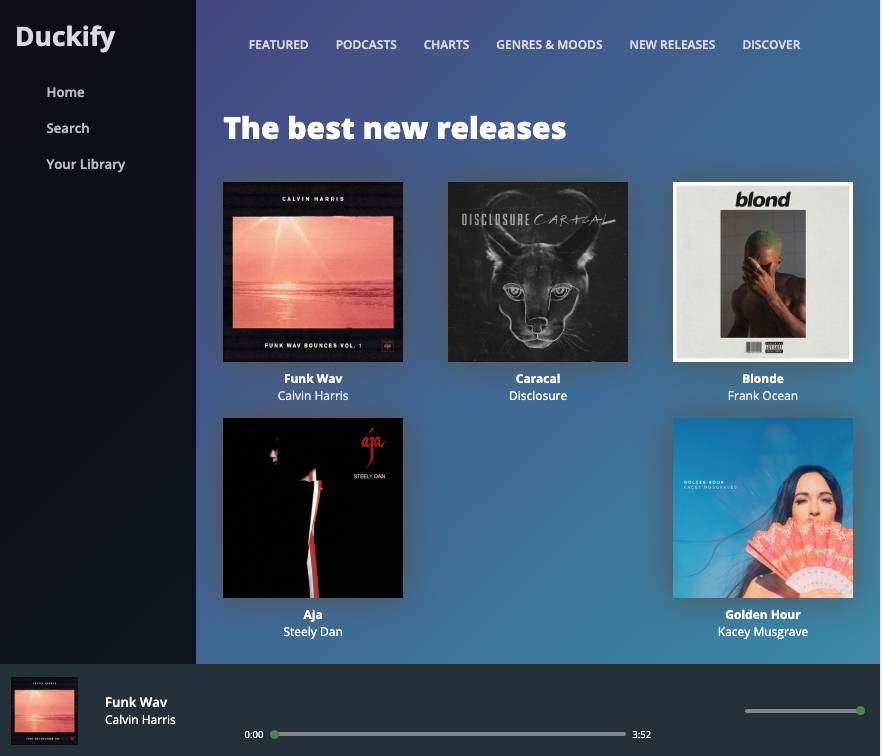
Flex in Flex in Flex...
How many flex containers do you think are on this example website?
Part 2: Set!
HW2 is out!
Description of the game
Demo of the website
Logistics
- Milestone 1 due Tuesday April 16, 11:00 pm (NO LATE DAYS)
- Completed project
- Due Wednesday April 24, 11:00 pm
- GitGrade lock Saturday April 27, 11:00 pm
GitGrade worflow for Set!
Important: To accept and submit for both submissions you will:
- Click "Accept" button for the Milestone assignment
- Clone this hw2-set-<username> repo
- Add/commit/push your work (NIGHTLY!!!) until ready to submit for Milestone checkpoint
- Click "Turnin" button for Milestone assignment before due date (Remember, no late days! No exceptions!)
- Click "Accept" button for Set assignment
- Continue working on the same repository as you have from the Milestone
- Add/commit/push your work (NIGHTLY!) until ready to submit for Final submission
- Click "Turnin" button for Final submission of Set assignment
Part 3: HTML Forms and Input
Randomizer Case Study
Case study motivation
Background
- Active learning increases student performance in science, engineering, and mathematics
- Group Random Call Can Positively Affect Student In-Class Clicker Discussions
Last term we collected student names and groups on note cards like we did earlier
We were afraid of losing the cards so we wrote the Randomizer (demo).
A student mentioned after the class was over that the group they sat with on Day 2 never sat together again, so random group call ... wasn't effective
Question: How can we create a site where we can dynamically collect group information that can then be used in the Randomizer in lecture?
Step 1: Wireframing
A Wireframe* diagram of your site is a very low fidelty sketch of what you think your website will look like
The idea is not to worry about colors or even filling in any text, you want to get a feel for what the site will look like overall (proportions and locations of key elements) and how it will function.
Recall: Students must be able to enter a group name and some number of students
What key pieces might you want on a wireframe for this site?
(Take 2 minutes to draw it out)
Step 2: learn about HTML <form>
<form>s are a way to group objects that allow users to
input information into a web page to add interactivity.
<form>
  <input type="text" size="10" maxlength="8" /> Your name <br />
  <input type="text" size="16" /> Your favorite color <br />
  <input type="number" size="4" min=0 /> The airspeed wing velocity of a swallow
  <button type="submit" value="submit" />Submit<button>
</form>
HTML
output
Table of HTML Form Elements
The following is a (partial) list of HTML form elements (with examples in the slides below). For more information on form elements, make sure to check MDN.
<button>
Performs an action, usually submitting data or resetting a form to the original values.
<button id="my-btn">Click me!</button>HTML
output
Button's text appears inside tag; can also contain images
We will learn how to make a button responsive in Module 2
<input>
              <!-- 'q' happens to be the
              name of Google's required parameter -->
<input type="text" name="q" value="Colbert Report" />
<input type="submit" value="Booyah!" />
HTML
Input element is used to create many UI controls (an inline element that must be self-closed
name attribute specifies name of query parameter to pass to server
type can be button, checkbox, file, hidden, password, radio, reset, submit, text, ...
value attribute specifies control's initial text
<input> Text Fields
<input type="text" size="10" maxlength="8" /> NetID <br />
<input type="password" size="16" /> Password
<input type="submit" value="Log In!" />
HTML
Password
output
input attributes: disabled, maxLength, readonly, size, value
size attribute controls onscreen width of text field
maxlength limits how many characters the user is able to type into the field
Text boxes: <textarea>
<textarea rows="4" cols="20">
  Type your comments here.
</textarea>
HTML
output
Initial text is placed inside textarea tag (optional)
Required rows and cols attributes specify height/width in characters
optional readonly attribute means text cannot be modified
Checkboxes: <input>
yes/no choices that can be checked and unchecked (inline)
<input type="checkbox" name="lettuce" /> Lettuce
<input type="checkbox" name="tomato" checked="checked" /> Tomato
<input type="checkbox" name="pickles" checked="checked" /> Pickles
HTML
output
None, 1, or many checkboxes can be checked at same time
Use checked="checked" attribute in HTML to initially check the box
Radio
buttons: <input>
sets of mutually exclusive choices (inline)
<input type="radio" name="cc" value="visa" checked="checked" /> Visa
<input type="radio" name="cc" value="mastercard"/> MasterCard
<input type="radio" name="cc" value="amex"/> American Express
HTML
output
Grouped by name attribute (only one can be checked at a time)
Must specify a value for each one or else it will be sent as value on
Text labels: <label>
<label>
  <input type="radio" name="cc" value="visa" checked="checked" /> Visa
</label>
<label>
  <input type="radio" name="cc" value="mastercard"/> MasterCard
<label>
  <input type="radio" name="cc" value="amex"/> American Express
</label>
HTML
Grouped by name attribute (only one can be checked at a time)
Must specify a value for each one or else it will be sent as value on
Drop-down list: <select>,
<option>
menus of choices that collapse and expand (inline)
<select name="favorite-character">
  <option>Rob</option>
  <option>John</option>
  <option selected="selected">Ayra</option>
  <option>Sansa</option>
</select>
HTML
output
Option element represents each choice
Select optional attributes: disabled, multiple, size
Optional selected attribute sets which one is initially chosen
Used <select> For Lists
<select name="favorite-character[]" size="3" multiple="multiple">
  <option>Rob</option>
  <option>John</option>
  <option selected="selected">Ayra</option>
  <option>Sansa</option>
</select>
HTML
output
Optional multiple attribute allows selecting multiple items with shift- or ctrl-click
Must declare parameter's name with [] if you allow multiple selections
Option tags can be set to be initially selected
Review Option Groups<optgroup>
<select name="favorite-character">
  <optgroup label="Major Characters">
    <option>John</option>
    <option selected="selected">Ayra</option>
  </optgroup>
  <optgroup label="Minor Characters">
    <option>Rob</option>
    <option>Sansa</option>
  </optgroup>
</select>
HTML
output
What should we do if we don't like the bold appearance of the optgroups?
Step 3: Building the HTML form
Starting with
groupizer.html
(and the given groupizer.css)
and the form elements on the previous slides, let's build the form.
