CSE 154
Lab 1: "About Me" Page
Today's Lab Exercises
Today you will create a basic "About Me" HTML page and style it with a bit of CSS:
- "About Me" Page
- Style Your Page with CSS
- Advanced Style Techniques
- Definition Lists for Your Favorite Movie
-
Decrementing
ol
First Things First: Setting Up Your Development Environment
To develop a web page, you need the following:
- A text editor to write your HTML and CSS files (we recommend Sublime or Notepad++)
- Your lab computer should have both Sublime and Notepad++ already installed. For work at home, follow the instructions on the editor's website. Once installed, open and start writing your HTML!
- A browser (we recommend Chrome or FireFox, which both have useful web development features)
- When browsing the web, you need Internet access. But when writing HTML and CSS webpages, you don't!
Setting Up Your Development Environment: Using an Editor for writing HTML and CSS
Writing HTML and CSS with an editor is similar to writing Java in an IDE like jGrasp, Eclipse, or BlueJ. Conveniently, we don't need to compile HTML/CSS, and to "run" the code, we just open the HTML page on the browser.
On the slides below, we'll use Sublime as the example text editor (since it is supported by all OS), but Notepad++ is similar. If you prefer another text editor like Atom, Vim, or Emacs, these all work as well (but we won't go into the details for each). The slides below go into more details on how to use Sublime (most editors will be similar).
Using Sublime
Sublime has a simple interface, but has a lot of customization that you may find useful as a web developer. We recommend you first get used to writing HTML and CSS, then explore some of the different features in the Edit, Selection, Find/Replace, etc. menus.
You may, for example, want to change your spacing settings (default is 4-space indentation, but some developers prefer 2-space identation) or your background color (deault is black, but some developers prefer a light background). A few features you may find most useful right now are the autocomplete of HTML tags, auto-indentation of CSS selectors, and reindentation feature. On the slides below, we've provided screenshots of HTML and CSS templates written in Sublime. Again, Notepad++ and other editors should have a similar layout. In Exercise 1, you will also find directions on how to view your webpages locally in the browser.
Example HTML and CSS code in Sublime


Sublime's Reindentation Feature
In this course (and in industry), people who read/work on your code will care about consitency and readability when reviewing your code. Indentation is especially important, and can also help you find missing/extra closing HTML tags when your indentation doesn't match up.
Remember that every opening HTML tag should be on
the same indentation level as its corresponding closing tag (unless it's a self-closing tag like
<img />) and child tags should be nested inside of the parent tags (refer to the example
HTML on the previous slide). Sublime offers a helpful auto-reindentation feature, which you can find under
"Edit":

A Note about Sublime
Sublime is open-source, which means it's free for anyone to install and use. You may see a pop-up occassionally appear though, asking whether you want to purchase it. If you see this, just click on "Cancel". Sublime doesn't actually enforce a time limit on how long you can use it before you have to start paying.

Why is this prompt there? ̄\_(ツ)_/ ̄
Setting up Your Development Environment: Handy Debugging Tools
There are various debugging tools available to help you learn web development. We will introduce two of the most common: Firefox's Developer Tools web inspector and Chrome's DevTool web inspector. You will likely only use one of these, depending on what browser you use. Microsoft Edge has a similar suite of developer tools.
You can find more information on how to use FireFox and/or Chrome Web Inspector on the slides below.
How to Use FireFox or Chrome Web Inspectors
FireFox Developer Tools is a Firefox add-on that lets you dynamically examine or modify the content and styling of web pages. It comes pre-installed with the FireFox browser. To open it, right-click an element and choose Inspect Element. The Chrome Web Inspector tool behaves the same way, and comes conveniently built-in with Chrome. You can launch both by hitting F12 while in your browser. The slides below show a few different views that you'll see in the Chrome DevTools browser add-on (you may see extra features, but can close out of any you don't see on the following slides for now).
Chrome DevTools Source Tab
On both Chrome and FireFox, you'll see a tab that shows all of your source files in the current directory,
relative to the file path you have in your browser's file path (where URL's are). Below is a screenshot
that is similar to what you would see when clicking on the aboutme.html file from the
previous slides.

Modifying the HTML in the Browser (Elements Tab)
One handy way to quickly test the effects of changing HTML tags is to edit the HTML directorly in the browser. When clicking on the "Elements" Tab in Chrome, you can do so by right-clicking on the HTML you're looking at and choosing the option to edit HTML (this may be worded differently between Chrome, FireFox, and other browsers). Then the HTML will be editable - after making any changes (new tags, changing tags, etc.) you should see the effects on your page immediately!

Modifying the CSS in the Browser (Elements Tab)
In addition to being able to view/modify HTML in the browser, you can also edit styles on the page. This is especially helpful when testing different color combinations, fonts, layout methods, etc. You will likely find the styles pane especially useful in this class! In Chrome and many other browsers, the "Styles" pane offers auto-complete features so you can learn more about different style attributes without referring to Google so often.

Final Words on Using Your Browser Development Tools
As you may find, there are many features offered by browser development tookits. Don't worry about understanding all of them - many you won't need to use in this class, and we'll introduce the ones that are helpful when we learn how to integrate JavaScript to add behavior to our webpages. For now, focus on getting familiar with the Elements and Styles panes, and play around a bit! You may find some neat CSS styles along the way which can be particularly useful for debugging homework assignments or finding inspiration for you creative project pages. Ask on Piazza if you run into any questions, but don't forget to first refer to your browser's official documentation of the dev tools as your primary resource!
Exercise 1: "About Me" Page
(See example screenshot on the next slide)
Create a page aboutme.html that describes you. Include
information such as:
- Your name
- A brief description of you in 1-2 sentences
- A list of classes you are taking right now at UW
- Your 4 favorite movies, books, games, and TV shows. Make at least one link to an interesting site about that favorite movie/book/game/show, such as its IMDB page
- Two images that represent when you're happy and sad (consider Google Image Search)
- Something about one of your neighbors (students sitting next to you)
Exercise 1 (Continued): Example
This example page describes textbook co-author Victoria Kirst. Look at the lecture slides about HTML to see examples of the right tags to use.
Exercise 1 Tips: Unordered List
<ul>,
<li>
ul represents a bulleted list of items (block)
li represents a single item within the list (block)
- No shoes
- No shirt
- No problem
HTML
- No shoes
- No shirt
- No problem
output
Exercise 1 Tips: Ordered list (<ol>)
ol represents a numbered list of items (block)
How 2 b a PRO web dev:
- Live HTML
- Breath CSS
- Sleep JavaScript
HTML
How 2 b a PRO web dev:
- Live HTML
- Breath CSS
- Sleep JavaScript
output
Exercise 1 Tips: Nested Lists
A list can contain other lists:
- Big Dogs:
- Boxer
- Great Dane
- Staffordshire
- Little Dogs:
- French Bulldog
- Mini Greyhound
HTML
- Big Dogs:
- Boxer
- Great Dane
- Staffordshire
- Little Dogs:
- French Bulldog
- Mini Greyhound
output
Exercise 1 Tips: Viewing your Webpage on the Browser
Once you've written some HTML, you can view it on the browser of your choice. Two ways to open an HTML page are:
1. Go into your file directory and right-click the HTML file, opening with
your browser (e.g. Chrome)

2. Right-click in Sublime and select "Open in Browser"

Following either of these methods with the example template HTML should result in the webpage seen in the screenshot on the next slide.
Seeing your HTML Page in the Browser (Locally)
Remember, you don't need Internet access to see your local HTML webpages!

Exercise 2: CSS Styles (~15 min)
(See example screenshot on slide below)
Create a CSS style sheet named styleme.css to improve the
appearance of your About Me page. You can find some CSS properties
in the lecture slides or online.
Use a <link> tag to reference your CSS file in your
HTML:
            <head>
              ...
              <link type="text/css" href="styleme.css" rel="stylesheet" />
              ...
            </head>
Exercise 2 (Continued): Adding CSS Styles
- Change the color of at least two elements
- Change the font properties (family, size, weight, or style) of at least two elements. Some standard fonts include Arial, Arial Black, Verdana, Trebuchet MS, Georgia, Tahoma, Courier New, and Times New Roman
- Change at least one other thing (e.g. background color, text alginment, etc.)
Exercise 2 (Continued): Example
Exercise 3: Advanced Styles (~10 min)
(See example screenshot on slide below)
If you complete the previous exercises, great job! You can add any extra content to your page that you like. Or, if you want a challenge, try to figure out how to add the following styles:
- Make your hyperlinks not underlined by default. However, when a user hovers over the link, the underline should appear (Hint: Look for information about CSS "pseudo-classes")
- Make every paragraph start with a "drop-caps"; that is, a large initial letter that is 1.5 times the normal paragraph font size (Hint: Look for information about CSS "pseudo-elements")
- Make text for each list item alternate between two different colors (Hint: Look for information about CSS "pseudo-classes")
These are tricks not covered yet in class. Use Google or A CSS reference such as W3Schools.
Exercise 3: Example
These are snippets of Victoria's updated page, showing links and drop-caps:
Links: (hover is not shown)

Drop-caps:

Exercise 4: Favorite Movie
(See example screenshot on slide below)
Look up one of the favorite movies/shows from your About Me Page on imdb.com
In your page, reproduce some of the film's IMDB info in a nested list under that movie's bullet. You'll want to read through the slides below to learn how to represent this information as a HTML definition list
Consider applying styles to your definition list to make it look snazzy
Exercise 4: Example
These are snippets of Victoria's updated page, showing a favorite movie:
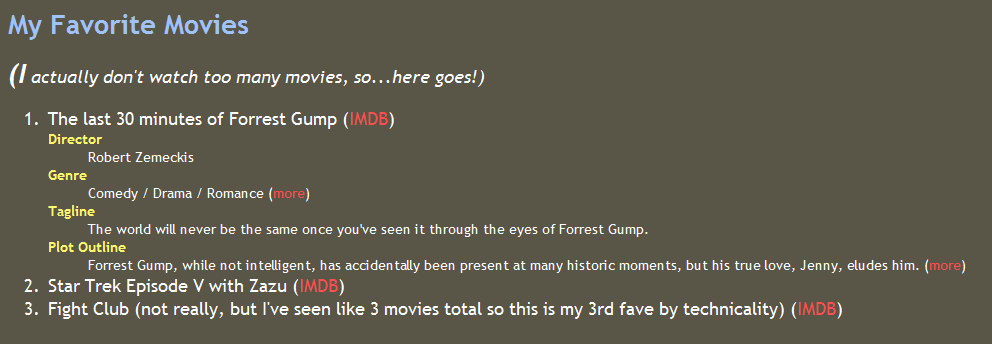
Definition list: <dl>, <dt>, <dd>
dl represents a list of terms (block)
dt represents each term, and dd its
definition
- Coffee
- A beverage served cold or hot, reinvigorating
thousands of Seattlites each day.
- Espresso
- A caffeinated beverage that brings
happiness at the first sip and helps students survive their
exams.
HTML
- Coffee
- A beverage served cold or hot, fueling thousands of Seattlites each day.
- Espresso
- A caffeinated beverage that brings happiness at the first sip and helps students survive their exams.
output
Exercise 5: Decrementing ol
(See example screenshot on slide below)
- Modify your page's Top 3 movies/shows list to be in decreasing order, from 3 down to 1
- The list must look the same as the default ordered list format, but in reverse order
- The only change you may make to your HTML is to switch the order of your list items, but otherwise all work should be done by CSS
- You won't find out how to do this in the slides; you will need to figure it out on your own by searching the web for the appropriate CSS documentation!
Exercise 5: Example
These are snippets of Victoria's updated page with decremeting ol:

If You Finish Them All...
If you finish all the exercises, you can add any other content or styles you like to your page.
If the lab is over or almost over, check with a TA and you may be able to be dismissed.
Once the lab time is up, you may stop working. You don't need to complete the remaining exercies unless you want to for fun.
Great work!