Week 9 Section: PHP & SQL Connection
Bricker and Morter Store
Bricker and Morter Store
Overview
In this section, we will get practice integrating what we've been learning in Module 5 (SQL) to build onto what we've learned with PHP web services. How do we make that connection? The PDO object!
Motivating PHP & SQL (Refresher)
A full stack website consists of three layers.
- Web Browser (client): HTML, CSS, JS
- Web Server: PHP
- Database Server: SQL
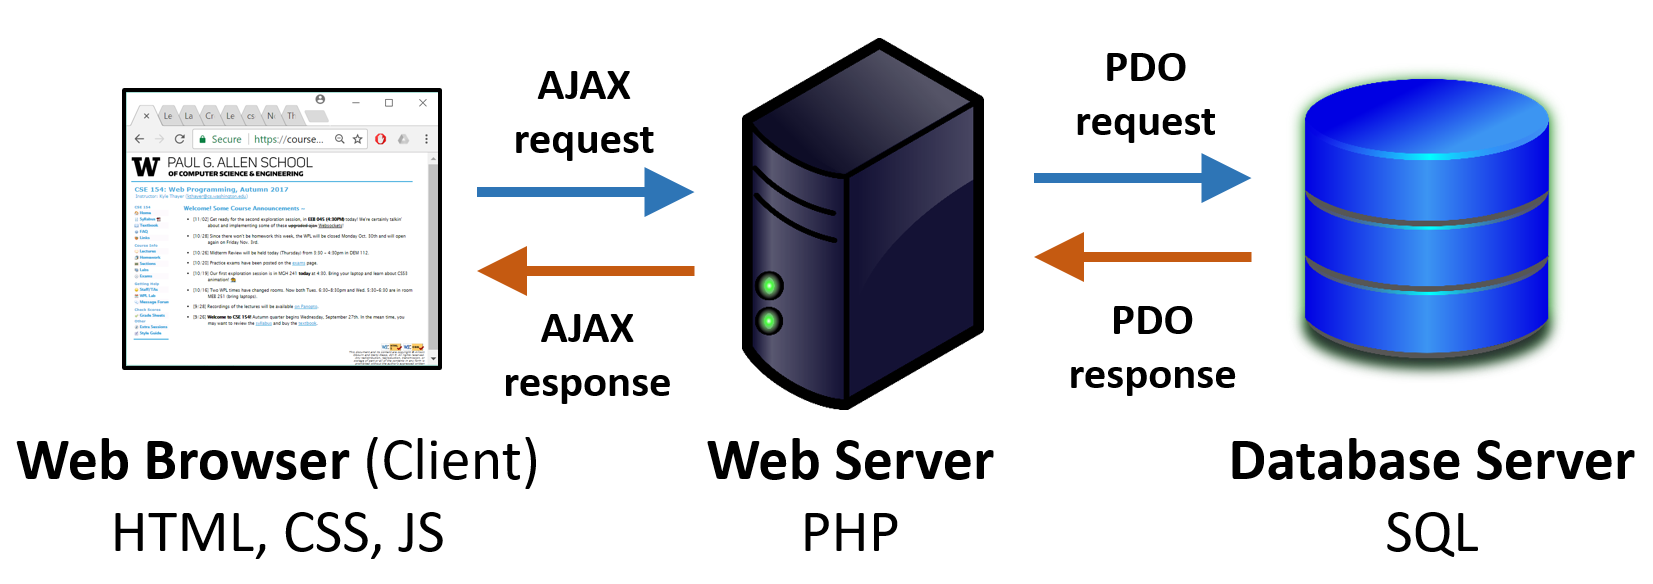
PDO: The "Link" Between PHP and SQL
Recall that the PDO object allows us to connect to a MySQL database from our PHP web services (as you saw in the QuickCheck) and query tables in that database.
$host =  "localhost";
$port = "8888"; # Make sure this matches your server (e.g. MAMP) port
$user = "root";
$password = "root";
$dbname = "bmstore";

# Make a data source string that will be used in creating the PDO object
$ds = "mysql:host={$host}:{$port};dbname={$dbname};charset=utf8";

try {
  $db = new PDO($ds, $user, $password);
  $db->setAttribute(PDO::ATTR_ERRMODE, PDO::ERRMODE_EXCEPTION);
  return $db;
} catch (PDOException $ex) {
  handle_error("Error connecting to the database", $ex);
}
PHP
Executing SQL Queries with PDO: query vs. prepare/execute
We've seen we can get SQL rows from a SQL query using
$db->query(querystring). But whenever you are using
variables taken from client input in
your query string, you should instead use the prepare and
execute functions, which add an extra layer of security to avoid
SQL injection.
$qry = "INSERT INTO Potluck (name, dish, serves, temperature, comment)
        VALUES (:name, :dish, :serves, :temp, :comment );";
$stmt = $db->prepare($qry);
$params = array("name" => $_POST["name"],
                "dish" => $_POST["dish"],
                "serves" => $_POST["serves"],
                "temp" => $_POST["temperature"],
                "comment" => $_POST["comment"]);
$stmt->execute($params);
$rows = $stmt->fetchAll(); # we can now do a foreach loop over $rows!
PHP (example from lecture)
Monday's reading on PDO is a fantastic resource for how/when to use PDO functions!
Section Agenda
We will get practice working with both SQL and PHP today to build a web service for a fictional e-commerce store, reviewing the general process that will help wrap up CP5/start HW5.
- Exercise 1: Create a new SQL database for our store and importing an provided setup.sql to create a single table called Inventory.
- Exercise 2: Implement a few PHP GET requests using this table data and SQL SELECT queries with the PDO object, returning plain text and JSON response types.
- Exercise 3:
Design and CREATE a new SQL table called MyCart in a new
.sqlsetup file. - Exercise 4: INSERT products in MyCart based on products found from the Inventory table to create a "cart" for a customer of the Bricker and Morter e-commerce store.
- Exercise 5: Add PHP POST parameter endpoints to make a functioning PHP web service with our SQL database!
Exercise 1: Creating/Importing Data
We have provided a starting .sql file of products for our fictional e-commerce store.
- Create a new database called
bmstorein phpMyAdmin. - Download setup-inventory.sql and import it in this new database. You should see a number of "Query OK" messages appear.
Using phpMyAdmin, what are two ways in we can check whether the Inventory table was successfully populated in our bmstore database? Hint: You should see 119 rows in the result table upon success.
Exercise 1: Finishing common.php
As discussed in lecture, it's good practice to have a PHP
file to factor out shared settings for your database connection from PHP (and
any other shared code across multiple PHP files). We
have provided a common.phps (save as
a .php file, not .phps) to get started.
This one is very similar to the one from lecture, but factors out the PDO construction with a function you can call to get a connected PDO object, and also includes a helper function for handling errors. Recall that in order to work properly, we need the port number to match that of our local server (you can see the port number for MAMP on the home page when you start a MAMP server session).
You can link to a common.php file using
include("common.php") in each PHP file you write (in the same directory) that uses it.
Exercise 2: Writing SQL SELECT Queries in PHP with PDO
In this task, we will start our PHP web service to use our SQL data for the Bricker and Morter store and display data about the items in our Inventory table.
-
Write a new PHP file called bmstore.php.
At the top of the file, include your common.php and create a new PDO object
with the provided
get_PDO()function. Note: Why don't we need to set error_handling again in this PHP file?
Exercise 2: SQL Query for Item Data
Once you have a PHP file started with your common.php included, it's a good time to use our PDO with a SQL query (and make sure we have successfully connected with the PDO object settings).
First, write the SQL query to find the name and price of all items in the Inventory table. Test your query in the phpMyAdmin SQL console (you should get 119 rows in the response).
Exercise 2: SQL Query for Item Data (Continued)
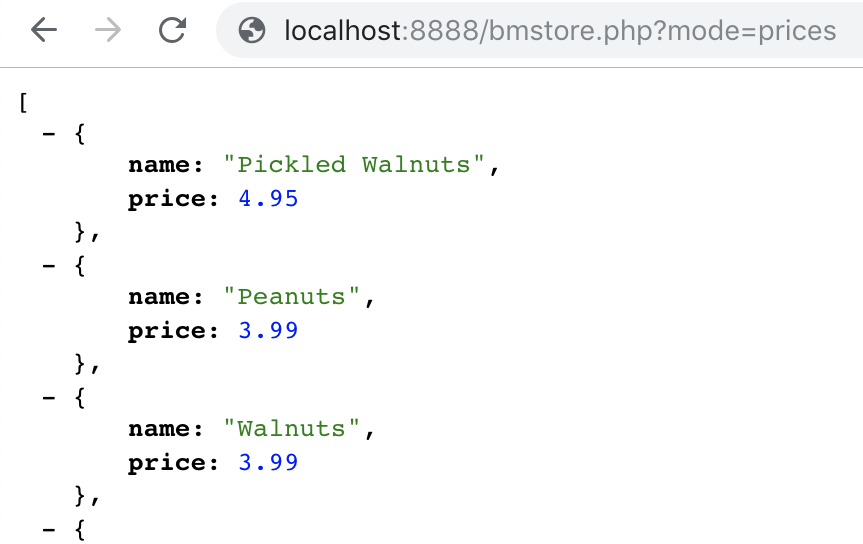
Once we have our SQL query working in the console, we'll use our PDO object in PHP to handle a GET request for price data.
-
Whenever a GET parameter called mode is
passed with the value prices, a function called
get_item_pricesshould be called to accept a PDO object as a parameter and use our SQL query to print out a plain text response of all of the items and their prices in the Inventory table.
More details about this function are in the slide below.
Exercise 2: SQL Query for Item Data (continued)
-
If the query is successful, your function should print
data (as plain text) for each row on a new line in the format "ITEM_NAME ($ITEM_PRICE)"
where ITEM_PRICE is the $US decimal format for the price of the item.
You can use
number_format($str, 2)to print a PHP variable with a precision of 2 decimals. -
Once you have the response printed out correctly when visiting
bmstore.php?mode=prices, use the provided
handle_errorfunction available from common.php to catch any PDO exceptions with an error message "Cannot query from the database." Note that you can pass in a second optional parameter to this function to pass in the $ex variable in the "catch" statement, which is helpful to print more details about the PDOException.
Exercise 2: SQL Query for Item Data (Solution)
<?php
  include ("common.php");
  $db = get_PDO();
  if (isset($_GET["mode"]) && $_GET["mode"] === "prices") {
    get_price_data($db);
  } else {
    handle_error("Missing required mode=prices GET parameter.");
  }

  function get_item_prices($db) {
    try {
      $rows = $db->query("SELECT name, price FROM Inventory");
      header("Content-type: text/plain");
      foreach ($rows as $row) {
        $price = number_format($row['price'], 2);
        echo "{$row['name']} ({$price})\n";
      }
    } catch (PDOException $ex) {
      handle_error("Cannot query from database", $ex);
    }
  }
?>
PHP
Exercise 2: Improving Response Format
Once we've successfully printed each item and its price on a new line as plain text, let's change the function to print a JSON-encoded version of the data:
[
  {
    name : ITEM_NAME,
    price : ITEM_PRICE
  },
  {
    name : ITEM_NAME,
    price : ITEM_PRICE
  },
  ...
]
JSON (schema)
You can convert a
string to a decimal using doubleval in PHP, which you may find helpful
since the query results will return string values for each row.
Exercise 2: JSON Solution for get_item_prices
function get_item_prices($db) {
  try {
    $rows = $db->query("SELECT name, price FROM Inventory;");

    $output = array();
    foreach($rows as $row) {
      $item_data = array();
      $item_data["name"] = $row["name"];
      $item_data["price"] = doubleval($row["price"]);
      array_push($output, $item_data);
    }
    header("Content-Type: application/json");
    print(json_encode($output));
  } catch (PDOException $ex) {
    handle_error("Cannot query the database", $ex);
  }
}
PHP
Exercise 2: Adding a Second (Filtered) SQL Query
Add another function named get_category_data similar to
get_item_prices but which takes a second parameter
$category and returns more information for each product sharing
that catogory (case in-sensitive) in the
following format:
              [
                { name : ITEM_NAME, category : CATEGORY, subcategory : SUBCATEGORY,
                  price : ITEM_PRICE, cost : ITEM_COST,
                  description : ITEM_DESCRIPTION},
                { name : ITEM_NAME, category : CATEGORY, subcategory : SUBCATEGORY,
                  price : ITEM_PRICE, cost : ITEM_COST,
                  description : ITEM_DESCRIPTION},
                   ...
              ]
JSON (schema)
Some products do not have descriptions (they are NULL in the SQL table). Omit any description key/values for such items in your result. Call this function when the required mode parameter is passed as alldata and a second category parameter is passed with a category name.
Exercise 3: Creating a New MyCart Table
Next, we will get practice creating our own SQL table to store data bout a user's "shopping cart". In your CP5, you have been asked to create your own table(s), and it's important (and fun!) to think about how to design/structure each in a database.
- What type of columns do you think we might want to define in this table?
- What datatypes do you think each column should have?
- What might the primary key be?
Exercise 3: Creating setup-mycart.sql
There are usually various design decisions you'll make depending on the amount of data you are going to end up storing, relations with other tables, etc. On HW5 we'll be very clear on the table schema you are to implement, and for today, we will also give you a recommended schema to get started.
Write a sql file called
setup-mycart.sql that creates a SQL table in the bmstore database called
MyCart. This table should have as its PRIMARY KEY
an integer attribute called cid (for 'cart item id'), pid (for 'product id'),
qty (integer) and lastupdated
(DATETIME type) representing the
time the item was most recently added or updated.
Exercise 3: Creating a New MyCart Table
You may find it helpful to refer to the provided setup-inventory.sql file
for using
AUTO INCREMENT and
PRIMARY KEY to set these constraints on the
cid key for your table. Note that pid will correspond to the id attribute for each
item in Inventory.
You can use the FOREIGN KEY constraint to link the pid from Inventory to your MyCart table. This constraint makes it so that only items that exist in the Inventory table can be added to MyCart, which is an appropriate constraint to set for the purposes of an e-commerce website limited to one set of products available for customers to choose from.
Exercise 3: Creating a New MyCart Table
You should not insert any rows in this file, just write the statements to create the
table. When you have finished, import setup-mycart.sql from the
bmstore database panel in phpMyAdmin.
In the SQL console, test your new table by inserting your first row into the table with a product id and quantity of your choice (use an id from the Inventory table). You can then SELECT from the MyCart table to check that you have exactly one row. If this is successful, delete the row to empty the MyCart table again.
Exercise 4: Adding Items to MyCart Using PHP
Now we'll add a new PHP file to handle inserting items into the MyCart table. Write a
new file called update-mycart.php. Remember to include
common.php in this file so you have the get_PDO() function
available.
In this PHP file, write a function named add_product_to_cart that takes as
parameters $pid and $qty and gets the
corresponding row from Inventory based on $pid.
Remember that the pid corresponds to the unique id in the Inventory table.
If a row is found with the pid, insert the pid and qty
into the MyCart table with lastupdated assigned to
NOW() - add a new row if there is not yet a product with
the pid in the MyCart table, otherwise
update the qty value to add the
passed $qty to the current qty for that row in the table.
You should also update the lastupdated value to be NOW() to
reflect the recent quantity change for the product in the cart.
Exercise 4: Inserting Items to MyCart
Upon success, output the following JSON message:
{ "success" : "X of Y added to your shopping cart!" }
JSON
replacing "X" with $qty and "Y" with the name of the product added. Note
that since you don't have the name as an attribute in MyCart, you'll need to get this
information from a query the Inventory table - you will need to have already written a
query on Inventory to determine whether the pid was valid, so try to find a way to use
information from that query here.
Test your function by calling it with a pid and
qty of your choice so that when you open
update-mycart.php on your browser (with a local server running), your function is called
with those values and you see the JSON result printed.
Check the contents of your MyCart table to confirm that it is no longer empty.
Exercise 5: Adding POST parameters to update-mycart.php
Next, modify update-mycart.php to check for three (required) POST parameters:
mode, pid, and qty. If these are all passed to
your web service and mode is passed as add
call the corresponding function you wrote in Exercise 4 with these values.
If MyCart was successfully updated with these values, return
a JSON "success" response as specified in Exercise 4. If any of the required POST
parameters are missing or an unrecognized mode value is passed, output a
400 error with a user-friendly plain text message.
Extra Features to Try on Your Own
-
Add a "delete" option for the mode POST parameter in
update-mycart.phpto remove a specified product rather than adding it (if the product exists in the table). -
Add an optional POST parameter to
update-mycart.phpthat takes anameinstead ofpidand adds the product with the given name only if their is a product in Inventory with that name. -
Write a front-end (HTML/CSS/JS) that calls your
bmstore.phpweb service to populate a product list page for the website. Consider using a bulleted list or a table for displaying a products list. -
Add filtering UI elements to let a user filter products by the categories they want to see and use your
categoryparameter to return filtered results when a call is made tobmstore.php. - Add a view to the front-end to show a list of all of the products in MyCart. Consider using a bulleted list or a table for displaying a shopping cart.
Section Solutions
setup-mycart.sql (source)
bmstore.php (source)
update-mycart.php (source)