Lab 3: Encrypt-It!
Overview
In this lab, you will be practicing using different UI elements in HTML with a JavaScript program to perform some operations on user input. Specifically, you will finish a cryptogram generator, which takes any message as input and outputs a cipher message in a few different possible outputs.
We have provided encrypt-it.html
as a starting HTML for you to use and build upon. You don't need to write any CSS in this lab, although you're free to add styling on your own!
Refer to the past few lecture slides for any needed JavaScript review!
Helpful Table of HTML Form Elements (More Tomorrow)
The following is a (partial) list of HTML form elements. For more information on form elements, make sure to check W3Schools.
-
<input type="text">(text input boxes) -
<textarea>(can use for user input of large amounts of text) -
<input type="checkbox">(checkboxes can be used for multiple choice input) -
<input type="radio">(radio buttons can be used for requiring exactly one choice) -
<label>(descriptive text labels) -
Drop-down lists:
<select>containing<option>elements, optionally grouped together with<optgroup>
For an example of using textarea and input, you can refer to a complete example Melissa introduced yesterday in class (a simple word counter webpage).
Two Handy Shortcut Functions
Two methods we will use a LOT are document.getElementById and
document.querySelectorAll. It's handy to
declare a shortcut to help us out. You may use the following in your JS
programs (these are exceptions to the rule of having description function
names):
function $(id) {
  return document.getElementById(id);
}

function qsa(query) {
  return document.querySelectorAll(query);
}
JS
Example:
<button id="encrypt-it">Encrypt-It!<button>
HTML
	let button  = document.getElementById("encrypt-it");
	let button2 = $("encrypt-it");               // returns the same as above.
JS
Part I: Create the UI Elements
The first task is to extend encrypt-it.html by
adding UI controls. This starter HTML introduces two new elements that are
useful for grouping UI controls:
<fieldset>: A container to group UI elements<legend>: A legend for afieldsetwhich appears by default as the text within the top-left border
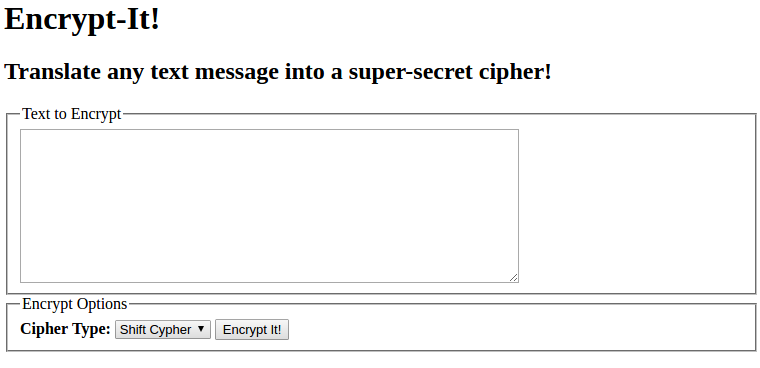
When you open the HTML file, you should see two empty bordered fieldsets, each with a legend.
Move through the slides below to finish the starter HTML and add UI elements to these two fieldsets.
Adding UI Elements: Details
In the first <fieldset> add:
- A field for users to enter large (multi-line) amounts of text - the
HTML tag for this element is the
<textarea>. It should be 10 rows by 60 columns.
The second <fieldset> represents options for the cipher your program will
generate from the input text. In this <fieldset>, add:
- A button labeled: "Encrypt-It!"
- A dropdown
menu with the options, "Shift Cipher" and "Randomized", preceded by the
boldly-emphasized
<label>: "Cipher Type:"
Expected output is provided on the slide below.
Part I: Expected Output
Part II: Write the start of encrypt-it.js
Now you'll write a bit of JavaScript testing code that pops up an alert box. This is just a test to make sure that your browser is running your JavaScript file, before we move on to the main execises.
- Start with this template JS file using the module-pattern introduced in lecture, and save it as
encrypt-it.js - Put the following line of code into the file:
alert("Hello world!");such that the alert is called when the page is loaded - Link your
HTMLpage to your JavaScript file using ascripttag - Refresh your page in the browser. Do you see the
alertmessage? If so, move on. Otherwise, double-check yourscripttag syntax or ask a TA for help
Part III: Hello World Button
Now let's set up a very basic JS event handler. Modify your JS code and
HTML so that the "Hello, world!" alert message won't
pop up until the user clicks the "Encrypt-It!" button.
Strategy:
- First, make sure you understand why the event listener for
window'sloadevent is needed (remeber we don't have access to the DOM until the page is loaded). -
Move your
alertstatement inside a new functionhandleClick. - Add an event listener to the the "Encrypt-It!" button such that when
clicked, your
handleClickfunction is called. - Refresh your page in the browser. Click the button. Do you see the
alert? If so, move on. Otherwise, double-check the syntax and for both of your event listeners (window load and button click), or ask a TA for help
Part IV: Implement a Basic Shift-Cipher
Modify your JS code so that when the user clicks "Encrypt-It!", the text in
the input text area will be encrypted using a basic shift-cipher, and output
into the page's paragraph element with the id of output.
Details:
- To get text from the textarea, you'll need to make sure you can access
it from JS. Remember you can use
document.getElementByIdordocument.querySelectorto access a DOM element in JS. - Referring to this example, what attribute do you see used to access the text input from a textarea DOM element?
- Modify (and appropriately rename) your
handleClickfunction so that when called, it now retrieves the textarea's text value and generates a shift cipher (algorithm strategy discussed on the slide below; a solution for this cipher function is provided at the very bottom if you'd like to skip the algorithm part). This generated cipher will be output as text in the#outputparagraph.
Part IV: The Shift-Cipher Algorithm
The rules of a shift cipher are fairly straightforward. Let the English alphabet we all know and love(?) be called A. Let the shift-encrypted alphabet be called C. For simplicity, we will shift letters in our encryption function by 1 letter. Then C is defined as mapping each letters in A to the letter alphabetically next. For example, 'a' is mapped to 'b', 'b' is mapped to 'c', ... and 'z' is mapped to 'a' (creating a cycle of 26 letters). In this exercise, we will consider uppercase letters and lowercase letters equivalent to one another (ie, 'a' is considered equal to 'A').
Visually, the cipher can be represented as the following:
input letter     a b c d e f g h i j k l m n o p q r s t u v w x y z
                 | | | | | | | | | | | | | | | | | | | | | | | | | |
                 v v v v v v v v v v v v v v v v v v v v v v v v v v
output letter    b c d e f g h i j k l m n o p q r s t u v w x y z a
Your task in this part is to convert the text in the input text area from alphabet A to alphabet C. This is all you need to know to implement the cipher in this lab, but if you would like additional hints, there are some provided in the slide below.
Part IV: Hints
Note that the value you get from the text area is just a long string. So your goal is to build up a new string that is the result of applying the cipher to each letter in the input text, in order, and adding it to your result string.
There are a few ways to go about this, but note that one of the most
intuitive approaches would be to use a for loop through the input string and add 1 to each letter (letters are actually represented by numerical values, so this is a natural operation). To handle the z -> a shift, you can add a special case for each letter, or use mod arithmetic to avoid this extra case.
You may find charCodeAt(index) and fromCharCode(asciiNum) helpful for this problem.
If you get stuck on this function, you may refer to a sample solution on the slide below. But it's strongly recommended you implement it on your own!
Part IV: Algorithm Solution
One function solution is given below (you can also solve this with arrays):
/**
 * Returns an encrypted version of the given text, where
 * each letter is shifted alphabetically ahead by 1 letter,
 * and 'z' is shifted to 'a' (creating an alphabetical cycle).
 */
function shiftCipher(text) {
  text = text.toLowerCase();
  let result = "";
  for (let i = 0; i < text.length; i++) {
    if (text[i] < 'a' || text[i] > 'z') {
      result += text[i];
    } else if (text[i] == 'z') {
      result += 'a';
    } else { // letter is between 'a' and 'y'
      let letter = text.charCodeAt(i);
      let resultLetter = String.fromCharCode(letter + 1);
      result += resultLetter;
    }
  }
  return result;
}
JS
Part V: Implement UI Functionality
Now that you have a cool encryption feature implemented, let's add some features for the user to decorate their encrypted message.
We have broken this part into are a few smaller exercises - move down the slides to work through them!
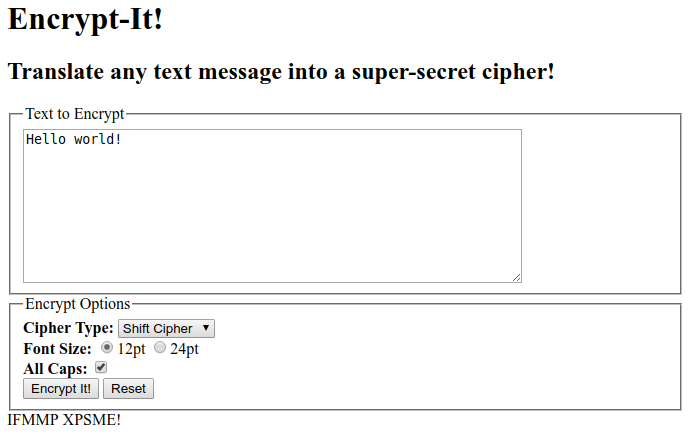
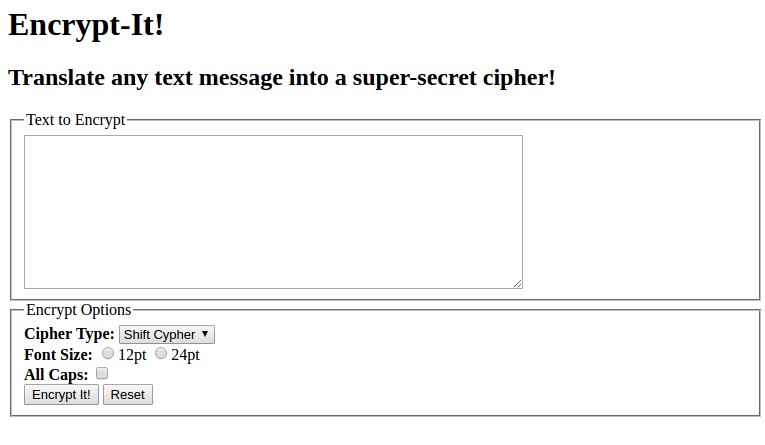
Part V: Expected Output
Below is the expected output after all of the UI elements in this Part have been added:
Part V: Dropdown UI
First, we want to restrict the shift cipher functionality to only work when "Shift Cipher" is selected in the drop down menu. Only when this is the currently-selected option and then the "Encrypt-It" button is clicked should the input text be encrypted.
For dropdown menus, you can get the value of the current option
using el.value, where el is the DOM element for
the <select> dropdown.
Part V: Reset Functionality
Add a "Reset" button to your HTML with an id of reset.
When the button is clicked, the text area and the output paragraph should
both be cleared using innerText.
Part V: Checkbox Elements
Add a checkbox element following the boldy-emphasized label
"All Caps:" that when checked, makes all of the text in the output
paragraph appear only in
uppercase.
To do so, add a CSS file with a class ".uppercase" that
uses text-transform: "uppercase"; to make an element all-uppercase. When
the "All Caps" option is checked, the output paragraph should have this
class. When unchecked, it should not have this class so that it uses
whatever casing was used in the original input text.
Hint 1: The event corresponding to changing the state of a checkbox input as
checked/unchecked is change.
Hint 2: To update the class list of a DOM element, you can use
el.classList.add("classname") and
el.classList.remove("classname").
Part VI: Radio Button Elements
Add a radio
button element to the second
fieldset with two font size options: 12pt and 24pt. The text in
the output paragraph should have the font size of whatever is currently selected in
the radio button group. The radio buttons should follow a
boldly-emphasized label, "Font Size:".
To minimize changing styles in JavaScript, you can add CSS classes to accomplish font size changes.
Part VI: Implementing the Randomized Cipher
Note: This part is a more challenging feature we have provided if you'd like to explore a more advanced cipher algorithm and and add a few more UI features. We have also suggested other features to try on the next slide!
In this part, you will implement the "Randomized" cipher option. This is similar to the Shift Cipher, only "result alphabet" C is randomly-generated. In otherwords, each letter in the English alphabet is mapped to one of the 25 other letters, but no two letters may have the same mapping (e.g., "a" and "c" can not both map to "d").
Part VI: Details
First, you should modify your button event handler to determine whether the "Shift Cipher" or "Randomized Cipher" option is selected in the dropdown menu. If the "Randomized Cipher" option is selected, it should call a new function which outputs a randomized encrypted version of the input text area to the output div.
If you would like some hints for writing this algorithm, there are some in the slides below.
Part VI: Hints
Because we aren't simply adding 1 to each letter (or mapping 'a' to 'z'), you might find an array helpful when creating a random cipher alphabet. One way to randomly-generate the cipher is to keep track of unchosen letters in the English alphabet using a string or array. Then, randomly choose one of the unchosen letters (you may find Math.floor() and Math.random() useful here).
Next, push this randomly-chosen letter to the end of the cipher array. Continue this process until you have removed all letters from your English alphabet and have 26 letters in your cipher array (where the first index is the letter randomly-chosen first, and the last index is the letter that was chosen last).
If you get stuck on this function, you may refer to a sample solution on the slide below. But it's strongly recommended you implement it on your own.
Part VI: Algorithm Solution
One possible solution is given below:
function generateCipher(text) {
  let alphabet = "abcdefghijklmnopqrstuvwxyz".split("");
  let cipher = [];
  // it's poor style to hardcode a magic number like 26
  let alphabetLength = alphabet.length;
  for (let i = 0; i < alphabetLength; i++) {
    let randomIndex = Math.floor(Math.random() * alphabet.length);
    cipher.push(alphabet.splice(
      [Math.floor(Math.random() * alphabet.length)], 1));
  }
  document.getElementById("output").innerText = cipher;
  let result = "";
  for (let i = 0; i < outputText.length; i++) {
    if (text[i] >= 'a' && text[i] <= 'z') {
      let letterCode = text.charCodeAt(i) - 'a'.charCodeAt(0);
      result += cipher[letterCode];
    } else {
      result += text[i];
    }
  }
  document.getElementById("output").innerText = result.replace(",", "");
}
JS
Challenge Problems
Did you enjoy making your own encrypted messages? Here are a few other ideas to add to your file:
- Add a dropdown menu to select a value to shift by in the Shift Cipher
- Adjust your ciphers so that digits 0-9 can be encrypted as well as letters
- Explore other cipher types
- Change your cipher to output something other than letters): For example, you could output using emojis, gifs, colored boxes, etc.
- Write a "Decryption" tool! This goes beyond the scope of this lab, but with a
.txtfile of dictionary words, you can try to write a tool that takes input (probably from a Shift or Randomized cipher) and tries to decode it, matching sequences of characters to words in the dictionary.