University of Washington CSE 154
Section 8: DOM
Except where otherwise noted, the contents of this document are Copyright © Marty Stepp, Jessica Miller, and Victoria Kirst. All rights reserved. Any redistribution, reproduction, transmission, or storage of part or all of the contents in any form is prohibited without the author's expressed written permission.
IMPORTANT NOTES FOR ASCIIMATION AND BEYOND
- Your code should be elegant in handling changes from the HTML inputs
- Don't use
window.idto fetch DOM elements! Stick withdocument.getElementById() - Don't store DOM elements as global variables
"use strict";isn't just for testing! It must be in your submitted code!- Carefully study the module pattern. This paradigm will be required in Assignment 8. See slides from 5/14 for an example
Exercise : Bouncing Ball
Create a page which contains an animated bouncing ball. You are given
ball.html and
ball.css, and you will write
ball.js.
(sample solution)
- The bounce area is 600px by 400px, and the ball is a 40px square.
- Every frame of animation (every 20ms), apply a "gravity" to the ball and increase its downward speed by 1.
- If the ball hits the ground, make it "bounce" up at 3/4 the velocity it previously had.
- Center the ball within the
ballareaand use that element's width/height as boundaries. - Optional- Make the code generic enough to work with any size ball and any size bounce area (ie don't hard code those numbers)
Exercise Solution
var ballY = 0;
var ballVelocity = 0;

window.onload = function() {
	var ball = document.getElementById("ball");
	ball.style.top = ballY + "px";
	ball.style.left = 600/2 - 40/2 + "px";
	setInterval(update, 20);
};

function update() {
	var ball = document.getElementById("ball");
	ball.style.top = ballY + "px";
	ballY = Math.min(ballY + ballVelocity, 360);
	ballVelocity += 1;

	if (ballY >= 360) {
		ballVelocity = parseInt(-3 * ballVelocity / 4);
	}
}
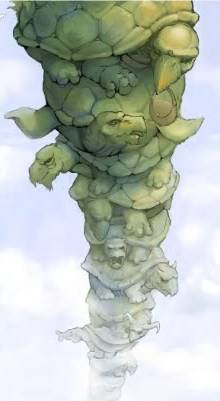
Exercise : Turtles All the Way Down
A well-known scientist (some say it was Bertrand Russell) once gave a public lecture on astronomy. He described how the earth orbits around the sun and how the sun, in turn, orbits around the center of a vast collection of stars called our galaxy. At the end of the lecture, a little old lady at the back of the room got up and said:
What you have told us is rubbish. The world is really a flat plate supported on the back of a giant tortoise.The scientist gave a superior smile before replying,What is the tortoise standing on?You're very clever, young man, very clever,said the old lady.But it's turtles all the way down!— Stephen Hawking, A Brief History of Time
(see also: Turtles all the way down on Wikipedia)
Exercise : Turtles All the Way Down
- We will implement a version of "turtles all the way down" in which the earth rests on the back of an elephant, which in turn rests on the back of infinite tortoises.
- The provided turtles.html contains the earth, elephant, and a single tortoise.
-
Write the JavaScript code
turtles.jsto give the page infinitely-scrolling turtles. (sample solution) -
You will need to add a new turtle to the bottom of the page every time the user scrolls to the bottom.
To add a turtle, append to
document.bodya newdivwith the class ofturtle. (See next slide for more implementation details.)
Exercise : Implementation Details / Hints
Use these events and properties to help you implement your solution:
document.onscroll- An event that occurs when the user moves the scrollbar.
document.body.scrollHeight- The height of the entire web page.
window.scrollY- The number of pixels that we have currently scrolled down from the top of the page.
window.innerHeight- The height of the visible area of the page currently on-screen.
Exercise Solution
window.onload = function() {
	document.onscroll = turtles;
	turtles(); // in case window height is initially taller than animals
};

function turtles() {
	while (window.scrollY + window.innerHeight >= document.body.scrollHeight) {
		var div = document.createElement("div");
		div.className = "turtle";
		document.body.appendChild(div);
	}
}
Exercise : Cheerleader
Given cheerleader.html, write the
JavaScript code cheerleader.js to display a large character when the user moves the mouse over one of the letters at the bottom.
(sample solution)
- The letters to observe are
spans in theletterinputarea. - Create and inject a new
spanwith classcheerinto thecheeroutputarea. Each character should be in upper case, followed by an exclamation point and a space. - For added challenge, make it so that 2 seconds after the letter appears, that letter will remove itself from the page.
- If you want to try out a new kind of event, make it so that the letter will appear when the user moves the mouse on top of the letter (
onmouseover), rather than clicking it (onclick).
Exercise Solution
window.onload = function() {
	var letters = document.querySelectorAll("#letterinput span");
	for (var i = 0; i < letters.length; i++) {
		letters[i].onmouseover = letterMouseOver;
	}
};

function letterMouseOver() {
	var span = document.createElement("span");
	span.className = "cheer";
	span.innerHTML = this.innerHTML.toUpperCase() + "! ";
	document.getElementById("cheeroutput").appendChild(span);
	setTimeout(removeCheer, 2000);
}

function removeCheer() {
	var letters = document.querySelectorAll("#cheeroutput span.cheer");
	if (letters.length > 0) {
		letters[0].parentNode.removeChild(letters[0]);
	}
}
Exercise , Part B: Key Presses
- Add a feature so that if the user types a key, that letter will appear as a cheer letter, the same as if the user had moved the mouse over that letter on the page.
- See the lecture slides on key events.
Some things you'll need to know:
- how to listen to key presses on the overall page (
document.onkeydown) - how to find out which key was pressed (
event.charCode) - how to convert a character code into a String (
String.fromCharCode)
- how to listen to key presses on the overall page (
Exercise Solution
window.onload = function() {
	...
	document.onkeypress = documentKeyPress;
};

function letterMouseOver() {
	makeCheer(this.innerHTML);
}

function documentKeyPress(event) {
	makeCheer(String.fromCharCode(event.charCode));
}

function makeCheer(letter) {
	var span = document.createElement("span");
	span.className = "cheer";
	span.innerHTML = letter.toUpperCase() + "! ";
	document.getElementById("cheeroutput").appendChild(span);
	setTimeout(removeCheer, 2000);
}
Exercise : Raptor
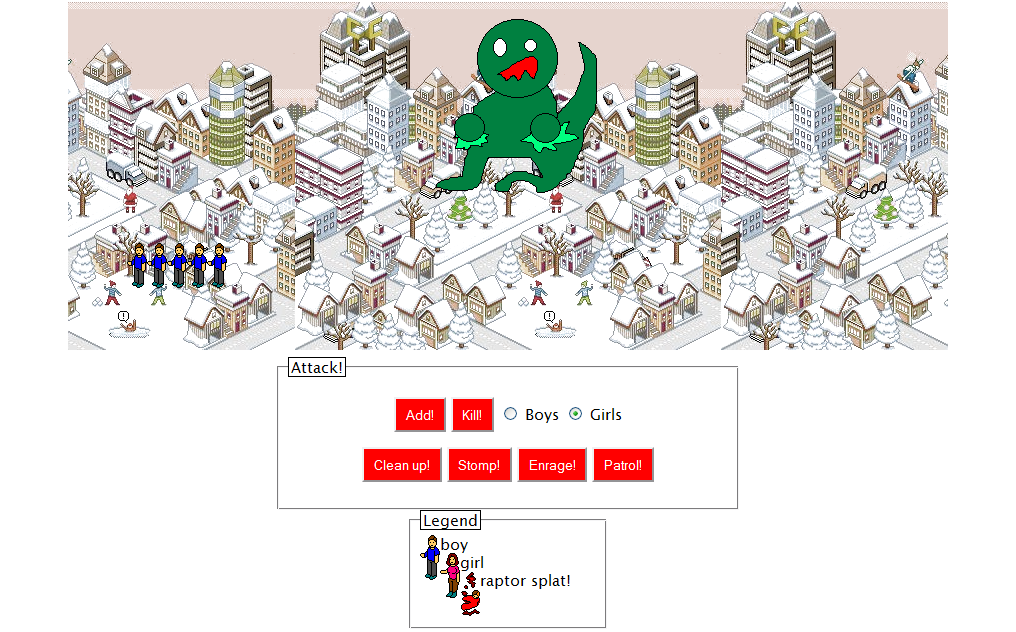
A raptor is on the loose. Rawr! He wants to stomp the townspeople. Write JavaScript code to allow the raptor to eat them. The HTML and CSS are already written; start from this skeleton of attack.html. (sample solution)
Exercise , Part A: Raptor
Make it so that when the page first appears, 5 boys are visible in the town. There are already 5 persons in the HTML, but they have no gender. These are stored in the div with id of people as divs with the class of person. Assign them the additional class boy when the page loads (while retaining the class person).
<div id="people">
	<!-- give these 5 divs the class 'boy' -->
  <div class="person"></div>
  <div class="person"></div>
  <div class="person"></div>
  <div class="person"></div>
  <div class="person"></div>
</div>
- HINT 1 (hover): You can access all of the 'person' divs using the document.querySelectorAll function.
- HINT 2 (hover): Code to run when the page first appears should be put into a window.onload handler.
-
HINT 3 (hover): Add/remove CSS classes from an element with the
classListproperty.
Exercise Solution
window.onload = function() {
    prepopulate();
};
function prepopulate() {
	var people = document.querySelectorAll("#people .person");
    for (var i = 0; i < people.length; i++) {
        people[i].classList.add("boy");
    }
}
Exercise : Raptor - Add
Add! Adds 5 more boys to the page (Later we will make it so that you can add girls too!). A person is a div with the classes of person and a class of either boy or girl.
<button id="add">Add!</button>
- HINT 1 (hover): Create a new element using the document.createElement function.
- HINT 2 (hover): Add a new element to the page using an existing DOM object's appendChild function.
Exercise Solution
window.onload = function() {
    prepopulate();
    document.getElementById("add").onclick = populate;
};

// Add! button event handler; adds 5 people of current gender
function populate() {
    for (var i = 0; i < 5; i++) {
        var newPerson = document.createElement("div");
        newPerson.classList.add("person");
        newPerson.classList.add("boy");
        document.getElementById("people").appendChild(newPerson);
    }
}
Exercise : Raptor - Kill
Kill! Randomly "kills" 1/5 of the boys on the page. Kill them by giving them a class of splat (in addition to their existing person class, but in place of their gender class such as boy or girl).
<button id="kill">Kill!</button>
Exercise Solution
window.onload = function() {
    prepopulate();
    document.getElementById("kill").onclick = kill;
};
// Get all guys or girls and splat one fifth of them
function kill() {
    var peeps = document.querySelectorAll("#people .boy");
    for (var i = 0; i < peeps.length / 5; i++) {
        var randomIndex = Math.floor(Math.random() * peeps.length);
        peeps[randomIndex].classList.remove("boy");
        peeps[randomIndex].classList.add("splat");
    }
}
Exercise : Raptor - Boys & Girls
Boys / Girls: Add a function that returns which gender is currently selected. Modify the code from your previous two exercises so that you can choose which gender to add or kill.
<label><input id="boys" type="radio"
		name="gender" /> Boys</label>

<label><input id="girls" type="radio"
		name="gender" checked="checked" /> Girls</label>
Exercise Solution
// Helper function to get which gender is currently selected.
// Use the return from this to parameterize populate() and kill().
function getGender() {
    if (document.getElementById("boys").checked) {
        return "boy";
    } else {
        return "girl";
    }
}
Exercise : Raptor - Clean Up
Clean Up! Removes any dead splatted people from the page (any
divs with class splat).
<button id="cleanup">Clean up!</button>
-
HINT (hover): You can remove an element from the page by calling its parent node DOM object's
removeChildmethod.
Exercise Solution
window.onload = function() {
    prepopulate();
    document.getElementById("cleanup").onclick = clearDead;
};

// Clean up the dead! button event handler
function clearDead() {
    var dead = document.querySelectorAll("#people .splat");
    for (var i = 0; i < dead.length; i++) {
        dead[i].parentNode.removeChild(dead[i]);
    }
}
Exercise : Raptor - Stomp
Stomp! Makes the raptor move up or down by 75px and also kills 1/5 of both genders. The raptor is an img tag with an id of raptor.
<button id="stomp">Stomp!</button>
-
HINT 1 (hover): Move the raptor by setting his
topstyle attribute to be either10pxor85px. -
HINT 2 (hover): Get an object's existing style properties with
window.getComputedStyle(element).propertyName. - HINT 3 (hover): Stomp should kill 1/5 of both genders - make sure to use the functions you have already written!
Exercise Solution
window.onload = function() {
    prepopulate();
    document.getElementById("stomp").onclick = stomp;
};

// Stomp! button event handler
function stomp() {
    var raptor = document.getElementById("raptor");
    var pxtop = parseInt(window.getComputedStyle(raptor).top);
    raptor.style.top = ((pxtop + 75) % 150) + "px";
    splat("boy");
    splat("girl");
}
Exercise : Raptor - Enrage
Enrage! Applies the CSS class of enrage to the raptor and the page's top h1 heading. In addition, the raptor should be made to be 50px wider than his current width. Clicking the button again removes the class from both elements and returns the width to its previous value. The h1 has an existing CSS class that should not be removed. You are guaranteed that there is exactly one h1 element on the page.
<button id="enrage">Enrage!</button>
Exercise Solution
function enrageRaptor() {
    var raptor = document.getElementById("raptor");
    var width = parseInt(window.getComputedStyle(raptor).width);
    var h1 = document.querySelector("h1");

    // If enraged -- go back to normal, else get ENRAGED
    if (raptor.classList.contains("enrage")) {
        raptor.classList.remove("enrage");
        h1.classList.remove("enrage");
        raptor.style.width = width - 50 + "px";
    } else {
        raptor.classList.add("enrage");
        h1.classList.add("enrage");
        raptor.style.width = width + 50 + "px";
    }
}
Exercise : Raptor - Patrol
Patrol! (advanced) Makes the raptor animate. He should move right by 4px every 20ms until his left position style is at least 300px, he should change directions and start patrolling to the left until his left position is 10px or less, at which point he stops patrolling.
<button id="patrol">Patrol!</button>
-
HINT: Set a timer with the
setIntervalmethod.
Exercise Solution
// Patrol! event handler code (advanced)
var timer;

function patrol() {
    clearInterval(timer);
    timer = setInterval(patrolRight, 20);
}

function patrolRight() {
    var raptor = document.getElementById("raptor");
    var pxleft = parseInt(window.getComputedStyle(raptor).left);
    pxleft += 4;
    raptor.style.left = pxleft + "px";
    if (pxleft >= 300) {
        clearInterval(timer);
        timer = setInterval(patrolLeft, 20);
    }
}
Exercise Solution
function patrolLeft() {
    var raptor = document.getElementById("raptor");
    var pxleft = parseInt(window.getComputedStyle(raptor).left);
    pxleft -= 4;
    raptor.style.left = pxleft + "px";
    if (pxleft <= 10) {
        clearInterval(timer);
        raptor.style.top = "5px";  // Reset the Raptor
        raptor.style.left = "10px";
    }
}


