
|
CSE 142 Summer 2001
Homework #2
Due: Electronic turnin by 11:00 am, Monday, July 2, 2001
|
Purpose
The purpose of this assignment is to compile and modify your first Java program,
and to get comfortable with the BlueJ development environment that we will be
using. Another goal is to give you practice working with the following
concepts:
- Creating objects, sending messages (calling methods)
- Types and expressions
- Writing new methods
Problem Statement
Write a program that will draw a simple scene containing a house, trees, and
at least one new kind of item that you add. We suggest that you start with
the third Scene class that was demonstrated in lecture (www.cs.washington.edu/education/courses/142/01su/dist/scene3/Scene.java).
The minimal requirements for this assignment are the following:
- Add windows and doors to the picture of the house. (An easy way to
do this is to add some additional rectangles in method drawHouse.)
- Add at least one new kind of item to the scene by adding an appropriate
method to draw it. The method must have at least two
integer parameters to specify the location in the scene where the new item
should be drawn; it may have additional parameters to specify things like
the size and other properties of the image.
- Add code to drawScene to call your new method at least twice to draw the
new item in at least two different places in the scene.
- The method(s) you add should include appropriate documentation comment(s)
to describe the operation and parameters of the new method(s). Use the
existing comments in class Scene as a model. If you change any of the
existing methods by adding or deleting parameters, or make them do something
different, be sure to update the comments.
Your assignment will be evaluated both for whether it works properly
(requirements 1-3) and whether the code is neat, indented reasonably, and
contains appropriate documentation comments for the methods in it (requirement
4). Both of these count equally, since it is important that a program both
communicate instructions to the machine and communicate understanding to a
person reading the code. We won't be picky about the details; aim at the
kinds of comments and layout that are already in the starter code.
This assignment is open-ended. Feel free to use your imagination - you
can add additional kinds of vegetation, buildings, people, animals, vehicles,
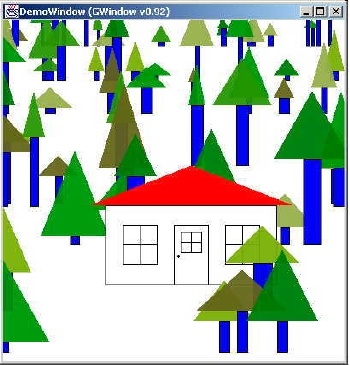
UFOs, or whatever you want. Below is a sample of a scene you might draw
(if you have way too much free time on your hands). [This scene only
contains the house and trees, but the trees are new, not the ones from the
starter program. That's fine.]
Instructions
- Download file Scene.java (the
Scene class demonstrated in lecture). Place this file in an
appropriately named folder on your disk (homework2 or something like that).
- Start BlueJ. If you installed the files as suggested on our working
at home page, start by opening the folder c:\CSE142Support\tools.
Open the BlueJ folder and double click the bluej.bat
file. A BlueJ window should open.
- Inside BlueJ, open the homework project by selecting "Open
Non-BlueJ" from the Project menu. Navigate to the folder on your
disk where you placed file Scene.java in step 1, highlight the folder, then
click Open. [If you have worked with the homework project before, you
should select "Open BlueJ" from the project menu instead of
"Open Non-Bluej".]
- You should see a blob called Scene. This is BlueJ's way of showing
you the class Scene. Try right-clicking it. You should see a
menu: one of the options is to compile the program. Try compiling
it. (You can also click the Compile button on the upper-left side of
the BlueJ window to do the same thing.)
[If you get an error message saying something like "cannot resolve
symbol; symbol: class GWindow" (or Rectangle or Oval), you missed a
step in the installation instructions to
add the cse142.jar file to the libraries that BlueJ knows
about. Look at the end of those instructions for details of how to set
this in BlueJ's preferences window.]
- Try right-clicking the Scene blob again. You should find a new
option labeled "new Scene()". Select this with the
mouse. After you enter a name for your Scene, a new blob should appear
in the object tray at the bottom of BlueJ's window with your Scene's name.
- Right click on this new object blob. One of the options should be
"drawScene()". Select this, and the crude scene that was
demonstrated in lecture should appear.
- Now you can start developing your program. You can double click the
Scene blob (or right-click and select Open Editor) to open an editor window
containing the Scene class source code. Start slowly and develop your
program in small steps. Sketching your new additions to the scene on
paper and doing a little calculation before you write code can help you save
time. Use Jeva to experiment if you like. Try out individual
messages (method calls) by right clicking on a Scene object and selecting a
method.
- Check your documentation comments. In the upper-left corner of the
BlueJ editor window, there's a pop-up menu that should say
"implementation". Use the mouse to change this to
"interface". After a bit of disk thrashing, you should see a
web page with the formatted documentation extracted from your Java
file. [If something goes wrong, check to be sure that your Java file,
and all the folders that contain it, have no spaces in their names.
Javadoc, the tool that generates the web pages, is particularly sensitive
about this.]
- Experiment a bit with the debugger. In the editor, place a stop sign
next to some statement by clicking in the bar at the left edge of the
window. Right click on a Scene object blob at the bottom of the BlueJ
main window and draw the scene. Execution should pause next to the
statement you selected with the stop sign. Try executing statements
one at a time by clicking on the arrow buttons. Watch what happens.
What to Turn In
Hand in your work by filling out the turnin form
and selecting the file containing your Java class (program). When you
submit your file, it will be compiled on the turnin server and you will see a
receipt indicating whether the program compiled successfully. If any
errors were detected, please fix them and turn your program in again. If
no errors were found, you are done, however, we suggest that you print or save a
copy of the electronic receipt for future reference.