The goal of this lab is to introduce you to the forms features of HTML. Using forms, it is possible to create buttons and text boxes, and other features that make Web pages interactive. Since this lab is an exercise, we will be showing simple interactions.
Check out the textbook on page 554 to see the forms we will be using in this assignment. READ THE PAGE BEFORE PROCEEDING.
For more information about the various input tags, see the W3Schools documentation for the <input> tag.
The HTML <form> tag is used to create input/output features like text fields, buttons and other controls. Within the <form> tag you include various tags that represent the different kinds of form controls. Of course, the form ends with the </form> tag.
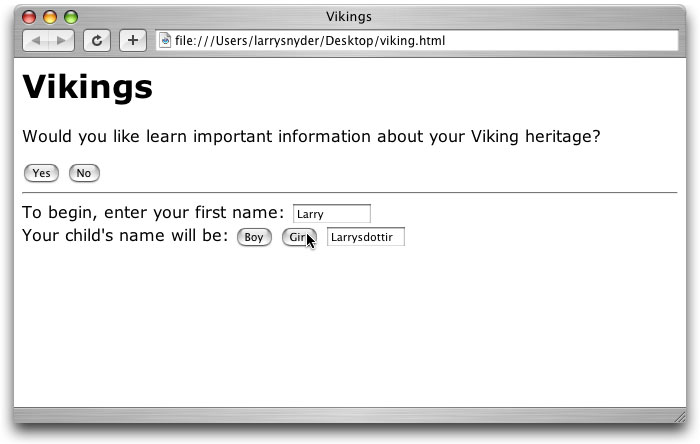
Begin by writing a simple HTML Web page and save it to your desktop. The page should have a pair of form tags in the body and the text shown here. Check that the page loads.
<html>
<head>
<title>Vikings</title>
</head>
<body>
<h1> Vikings </h1>
<p> Would you like learn important information about
your Viking heritage? <br>
<form>
</form>
</body>
</html>
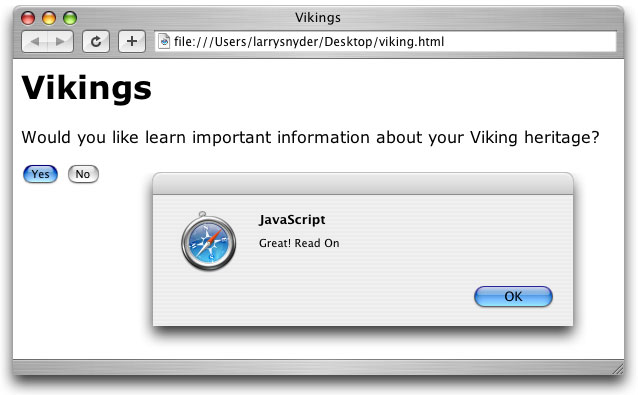
Next, we will add a button so that the user can answer the question. The button will have a “Yes” on it. (We’ll do “No” in a moment.)
Buttons are inputs, and so use the <input> tag. (<input> doesn’t have a matching end tag.) As indicated in the text the button has several attributes, giving its type and what is to be printed on it. We begin creating our button with the text
<input type=button value="Yes" onClick="alert('Great! Read On')">
Enter this text between the forms and try it out. What does it do?
When we click buttons, we cause a “click event” to happen in the browser. This tells the browser to wake up and do what the button click commands. In order for us to tell the browser what we want done, we include with the <input> tag an onClick event handler. It does what its name implies: It handles click events.
The first thing to notice about event handlers is that they are followed by an equal sign and then IN DOUBLE QUOTES the activity that is supposed to be done when the event is clicked. It is a common mistake to forget the quotes, so watch for them.
The alert() function notifies us in a small window and prints in the window the text inside the parentheses. For the text to be printed out, it must also be in quotes, but for this we will use single quotes. The browser allows us to use single quotes inside of double quotes and vice versa. Clever!
The “Yes” button looks a little lonely, so let’s include a “No” button. Type in an input tag for the “No” button – it will be just like the “Yes” button, but with “No” as its value attribute and it will have different text in its event handler. Let’s use
onClick="alert('OK, perhaps another time')"
Now, a brief interlude regarding Viking names...
In northern Europe some thousand years ago people that called themselves nordbor (Swedish for "people who live in the North") went out on trips to "convince" other people to give them gold and other valuables. This behavior was given the term "gå i viking" ("Go on a long trip") which later made these people known as Vikings.
Today you can find Vikings and their descendants everywhere, and in many cases, they can be found by looking at their last name. For a long time, it was very common among Vikings to get their last names by combining their father's or their mother's first name with the word "son" or "dotter" (for daughter). It was more common for the Western Vikings (from Iceland) to follow the tradition for their daughters than for the other Scandinavian Vikings and, therefore, it is more common to see the Icelandic version of "dottir" than "dotter".
This useless fact will the be basis for the next part of our exercise.
The next input type to consider is the text box. Text boxes are mostly self explanatory. Here we have a text box, which we specify by the type attribute. Its size (10) is the character width. And it has a name. The name is used to retrieve the value in the window, as we’ll see in a moment.
<input type=text name=first size=10 onChange="alert('Thanks')">
The most important event handler for text boxes is onChange, which happens when data has been entered into the text box and then the cursor moves out of the box. Ours will simply thank the person for entering the data. Like the onClick, onChange requires single quotes around the handler.
So, to apply these ideas, let’s insert a horizontal line on our page, and the text “To begin, enter your first name:” followed by the input tag just discussed.
Save the page and try it. Enter your name.
To give the user the Viking names that their children will have, we need two more buttons. So below the text box you just created in the previous step, add
The event handlers for the two will be discussed next.
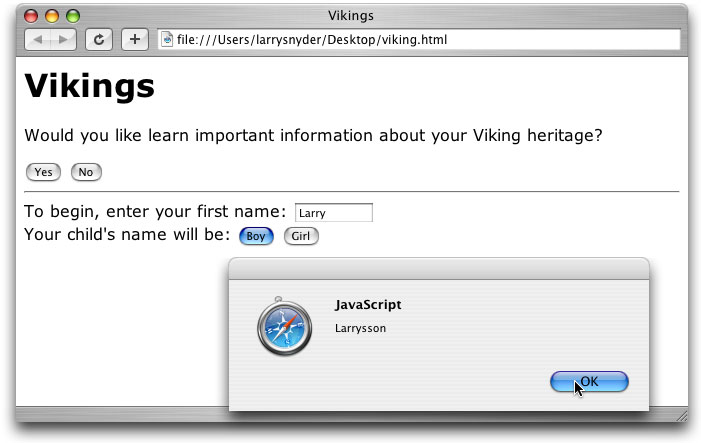
The operation of joining to letter strings together is called concatenation. We usually don’t think about it much because if we want two letter sequences together, we simply write them that way. But, for a computer to help us, we need some way to say that two strings must be put together. For that, we use concatenation.
Curiously, concatenation is written like addition. So, to have the string "abc" followed by "def", we write "abc"+"def". It becomes one string. This means that writing "2"+"2' produces "22" because they are joined as letters, not added! We can use concatenation to join "sson" to the end of the person’s name in the “Boy” event handler using the text
onClick="alert(first.value + 'sson')"
and for the “Girl” we can write
onClick="alert(first.value + 'sdottir')"
Recall that in the text box specification first is the specified name; it names the contents of the window, or the window’s value. When a first name like “Larry” is input, first will have the value Larry. (We will learn more about values in the next lab.) So, to create the Viking name, we need the value that the user entered in the window to concatenate onto "sson" or "sdottir", and the way we refer to first’s value is first.value. See the figure for the result.
Try your page and see how handy it is to use forms for input.
We complete the discussion of forms by showing an example of using the text window for output. The tag will still be <input …>, but we will put text in it with our own commands. To illustrate, we will write the child’s name into the text box.
Add the following input tag just before the </form> in your file.
<input type=text name=out size=10>
No event handler is required, because this is simply an output window. Save the file and check it.
In order to display the output in the window, we must change the event handlers for the “Boy” and “Girl” buttons, so that they put the answer into the window. We do this by changing the value of the window, and to do that we must refer to it by name, that is out.value. This matches the way we referred to the contents of the first name window, first.value. Change the “Boy” event handler to
onClick="out.value=first.value + 'sson' "
and the “Girl” event handler to
onClick="out.value=first.value + 'sdottir' "
The equal sign makes the transfer into the window, producing this result.