Key Words: database, database
management system, DBMS, relational database management system, RDBMS,
entities, relations, attributes, queries, standardized query language,
SQL, Microsoft Access, forms, reports, rows, tuples, table, columns,
fields, data type, Text, Number,
identifier,
inconsistent, table design, table data, primary key, foreign key,
normalize, AutoNumber, One-To-Many
See Wikipedia (http://www.wikipedia.org/) for a
detailed description of the key words.
You must read Chapter 13 ("Getting to First Base") before starting this Lab. Also skim through Chapter 14 (part about "Queries: Creating Views").
Refer to Chapter 13 in the book and Wikipedia for more detailed explanations of the database terminology.
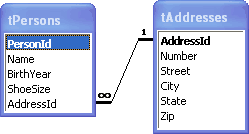
A database management system, or DBMS, stores and helps users manipulate and find/view structured data called entities. A relational database management system, or RDBMS, stores different entities separately and creates relations between the related entities. Entities are "things" or "stuff" with certain attributes. For example an entity would be a person and the attributes would be the person's name, birth year, and shoe size. If a person has an attribute which is more complex, such as an address, then that attribute should be considered its own entity.
In a RDBMS, a person and the person's address would be a relationship between a person entity and an address entity. Once a database is created, you can enter data, modify the data, and view the data by combining different entities. This is done by sending queries to the RDBMS. Many databases are managed by using a standardized query language, SQL, but it is also common to have a graphical program that hides the SQL.
Microsoft Access is a RDBMS that lets you manage your database using a graphical user interface (GUI). You can also create graphical forms to manipulate your data and create reports to show results from a search/query.
In a RDBMS, entities of the same type are stored as rows (aka tuples) in a table. The columns (aka fields) of the table correspond to the entity's attributes, and each field is designed to hold a certain type of data, or data type, such as text or a number.
Example: Persons can be stored in a table called
tPersons (where the "t" helps you remember
that it is a table). The table may have the fields Name
(data type: text), BirthYear (data type: number), and
ShoeSize (data type: number) that will store a person's
name, birth year, and shoe size, respectively. To uniquely identify a
person it is good practice to add another field: PersonId
(normally data type: number). The table tAddresses is
set up in a similiar manner, but with its own fields. To add the
relationship that a person has an address, tPersons is
extended with the field: AddressId, which is the unique
identifier for an address in the table tAddresses.


There are several good reasons to split up the persons and the
addresses into two tables. One is that the number of columns in
tPersons is greatly reduced and easier to manage.
Another is that we might have several persons living at the same
address. By putting the persons and the addresses in separate tables,
the address only need to be stored once in the table
tAddresses instead of in several places in the table
tPersons. If the same address was to be stored in
several places, one could easily enter a slightly different address by
mistake, which would cause the database to become
inconsistent.
lab8 directory on dante, go
to the
new directory and create a text file called notes.txt
with Pico or Emacs. Add all of
your
comments, questions and answers, definitions and examples in this
file! lab8.mdb.
Do not forget to copy this file to your lab8 directory on
dante when you are
done
with the lab! 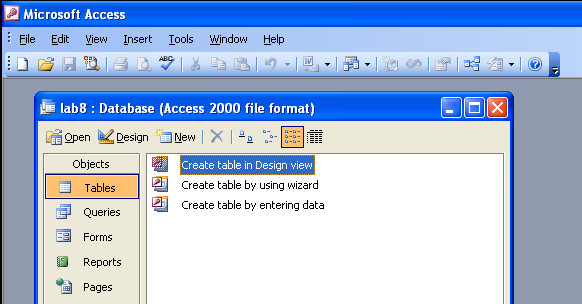
Become familiar with this window! You will use it often. If you lose it, you can get it back by selecting View>Database Objects>Tables.
You can right click almost anywhere in MS Access to get a popup menu. Sometimes you need to select an item before right clicking.
CDId with the data type AutoNumber,
CDName, ArtistName
and StyleName all with the data type Text.
StyleName is for
the style of music, e.g., Jazz, Rock, Classical, etc. If you like, you
may put a description for each one, but since this table is (currently)
pretty simple, you don't have to.

CDId
field.
Right click and select Primary Key (or click directly on the
primary key icon CDId.
tDraftCDs. After the table is saved you
can close the table design window. Under Tables in your
database dialog window you should now see your tDraftCDs
table. tDraftCDs by right
clicking
on the table and selecting Design View. Do not change
anything. It should like before when you added attributes/fields to
the table. Close the design view when you are done. tDraftCDs to enter data by right clicking
on the
table and selecting Open. A window with your table data will
appear. Each row corresponds to one CD. Notice that you do not
need to explicitly fill in the CDId field. Since it is an AutoNumber
field, it will be
filled in automatically.
The
other columns represent the name, artist and musical style for the CD.
The table should currently be empty. Add the following CDs:
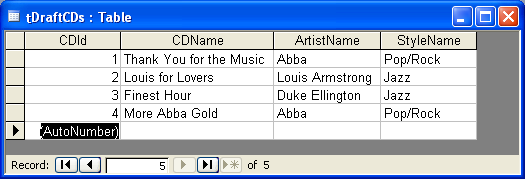
Data that is entered into a database table is saved directly after you leave the field. So there is no need (or possibility) to save it manually, like you must do in the design view. However, if you modify the style of the table, such as the width of the columns, Access will ask if you want to save the layout (which you probably want to do).
Normalizing a database means to remove
redundant data, that is, to remove multiple occurrencies of the same
information. Instead of writing the same information several times in
one table, the table is redesigned to have a relation to another table
in which the information is stored only once. This is what we
ultimately want:

To relate each CD in a CD table to an artist in an artist table, each CD must have a field with the identifier (aka foreign key) corresponding to a particular artist in the artist table. In the artist table, an artist is identified by its value in the primary key field.
In this section you will create a better designed CD table, move
the artists and styles into their own tables, and setup relationships
between the three tables. All of the data in the old CD table
(tDraftCDs) will be used. By using some features of a
RDBMS,
you will not have to type in the data again!
tDraftCDs, but the artist and musical style should
have
slightly different names and use different data types. It is also
nice to have a comment that explains what the IDs will be used for:

Do not forget to specify the primary key and to save your new
table!
Save the new table as tCDs.
tArtists. It should have two fields: ArtistId
(data type AutoNumber) and ArtistName (data
type: Text). The primary key should be ArtistId.
Do not
forget to save the table! tStyles. It should be very similiar to tArtists,
but use slightly different names for the
fields: StyleId (data type: AutoNumber) and
StyleName
(data type Text). The primary key should be StyleId.
Do not forget to save the table! tArtists,
tCDs and tStyles.
Do not
include the old CD table. To select multiple items in a list, you can
press and hold the Ctrl key while you click on the items
you
would like to select. End with clicking on Add. You should
see the relationships window with three tables and their fields. Bold
fields indicate primary keys. It is also possible to rearrange the
tables if you do not like the automaticaly generated order. Example:
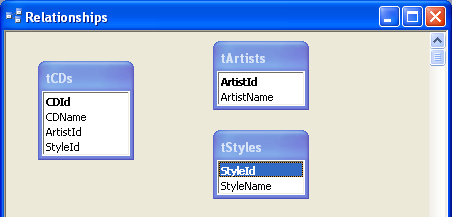
If you forgot a table or picked the wrong table, you can add more tables by right clicking on background and selecting Show Table...
Create one relationship at a time by dragging the primary key
from
one table and dropping it on a foreign key in another table, for
example drag the ArtistId from the table tArtists
to the ArtistId in the table tCDs. The
following relationship
window will appear:
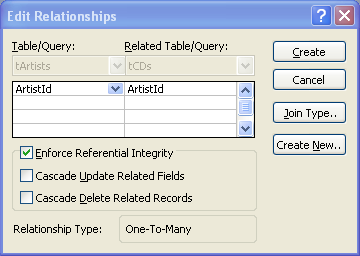
Make sure "Enforce Referential Integrity" is checked. This is to enforce the relationship to always exist. Also note the Relationship Type at the bottom of the pop-up window: One-To-Many. Click on Create when you are ready to add the relationship.
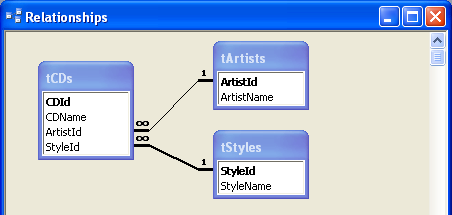
You have now successfully designed a relational database! The
next step is to extract the data from the old CD table tDraftCDs
and put it into the three new tables tArtists, tStyles
and tCDs! Close the
relationships window
(answer yes on the "save layout" question).
In your old table you had only four CDs. In reality, the number of rows would be many more. It would be a painstaking experience to retype the information. In this section you will extract and transfer the data without any unnecessary typing!
The key is to use a query to view (or extract) certain columns from a table, and to paste the results into the new tables.
tDraftCDs,
since that is where all data is located. ArtistName from
the
table tDraftCDs. In the first column, select the desired
field.
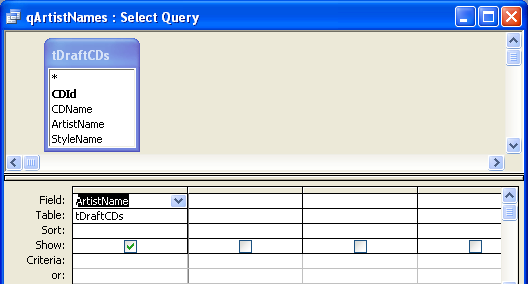
Save the query and close the query design window (or close the
query design window and save the query upon request). Give this query
the name qArtistNames. The "q" is a reminder that it is a
query.
Your query should give you the names of all of the artists in
your
database. When you open the query you should see the rows and columns
that you requested in the query. A query is just another way of
viewing your table data and is, therefore, sometimes simply called a view.
If you change any information in the query result,
the
original table (tDraftCDs) will be updated.
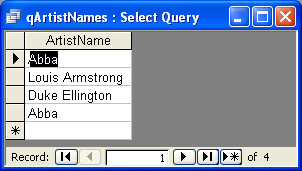
These names will be used later in the table tArtists.
Before you can use them, you need to get rid of unwanted duplicates.
This means you must modify the query.
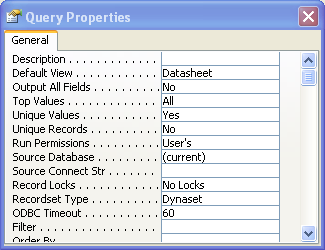
Change the settings for Unique Values (a few lines down from the top) from No to Yes. This will give you only the unique values in the table. When you are done, close the property window, close the query design window (save changes to the query) and open your query to see the results. It should now have no duplicate names.
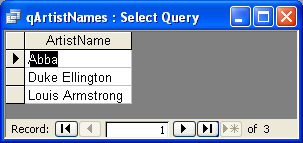
ArtistName).
All rows should be selected (dark or black colored). Copy by pressing Ctrl-c
or by using Edit>Copy. tArtists
table. Open tArtists to enter
data. The table
should be empty. The first column corresponds to the ArtistId
and will get values automatically. In the second column you should add
all of the rows from the query!
Select the second column by clicking on the column title ArtistName.
Paste the previously copied rows by
pressing Ctrl-v or use Edit>Paste. Answer Yes
to
the question if you want to paste the rows. After a successful paste,
you can close both the table tArtists and the query
result window.
StyleName field
and the tStyles table! Save the query as qStyleNames.
The
result should only be two rows, since there are only two styles of
music in the old table (i.e., Jazz and Pop/Rock). tArtists and tStyles. You
need a query
that takes all of the rows in the tDraftCDs, finds the
row in tArtists that has a matching ArtistName,
finds the row
in tStyles that has a matching StyleName,
combines these
rows, and gives the fields CDName, ArtistId
and StyleId as a result.
Open a new query in design view. Add the tables tDraftCDs,
tArtists and tStyles. Connect the fields
that should
match. That is, drag ArtistName in the tArtists
to ArtistName in tDraftCDs. Do the
equivalent for StyleName. Then make sure the query shows
the three
fields CDName, ArtistId and StyleId
in the bottom half
of the query window. Make sure the order is correct. Save the query
design as qDraftCDs.
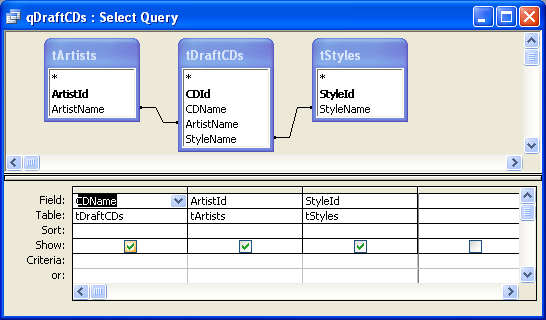
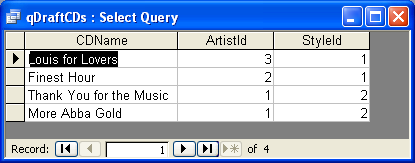
Select all rows and all columns. The easiest way is to click
and
drag over the column titles. Copy the data with Ctrl-c or
Edit>Copy. Open tCDs to enter data and
select the
three columns CDName, ArtistId and StyleId.
Paste in the data with Ctrl-v or Edit>Paste.
Accept
to insert the four rows. Close tCDs.
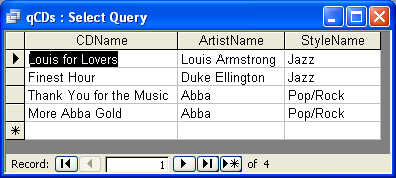
tCDs, tArtists and tStyles
tables.
Note that you do not need to specify any relationships or matching
requirements between the tables. They are already set up in the
design. Have the query show the fields CDName, ArtistName
and StyleName. Save the query
as qCDs
and open it to see the query result. It should contain the following
four rows:
lab8.mdb.
This will remove unneeded space in your
database file, which otherwise can become very large! lab8.mdb
to your lab8 directory on dante.
Select Tools>Database Utilities>Compact and Repair Database... before you close your database, after you have worked with the database for a while. This will decrease the size of your database file. Also close your database file and Access before copying your database file to your dante account, otherwise you may end up with an empty file!
Ensure that all of your files are accessible from a web browser.
|
|
I understand the key words for this lab and can give examples of what they mean. |
|
|
I know how to design tables and how to set up relationships between them. |
|
|
I know how to add data to a table. |
|
|
I know how to create a query. |
|
|
I know how to view the results from a query. |