INFO 100
LAB 6: Seeing is believing--Or is it?
Adobe Photoshop and Image
Alteration
Spring 2001
Introduction:
In Lab 3 you learned the basics of creating a
HTML document to post on your web page and Labs 4 and 5 helped you establish
criteria for evaluating the credibility of web sites.
Today we will focus on issues of
authentication by learning the basics of Adobe Photoshop in order to alter an
image and make the alteration look authentic.
The images given to you to work with are used under the condition of
fair use. This means that you are
allowed to use them for the educational purpose of this lab only.
Adobe has a great deal of functionality in
the area of graphics and image creation and manipulation. However, today’s lab will focus on using certain
tools to eliminate and alter areas of an image.
Objectives:
·
Use
Adobe Photoshop to select and manipulate areas of an image
·
Remove
and add selections to an image
·
Through
the manipulation of photos, create awareness about issues of authenticity and misinformation
in visual representation of information.
To Do:
Adobe provides a work area for images that includes a Selection Tools Box, hover over each tool with your mouse for the name:
Marquis Tools:
The marquee tools let you select rectangular or elliptical areas in
an image. Crop Tool: A subset of the Marquis tools, this
tool allows you to select an area of an image and crop it. Move Tool: Lets you drag a selection or layer to
a new location in the image. Lasso Tools: The lasso and polygon lasso tools
let you draw both straight-edged and freehand segments of a selection
border. Magic Wand Tool: The magic wand tool lets you
select a consistently colored area (for example, green grass) without
having to trace its outline. Rubber Stamp Tool: Takes a sample of the image,
which you can then apply over another image or part of the same image. Each
stroke of the tool paints on more of the sampled image. Eyedropper Tool:
Sample color from an image to indicate a new foreground or background
color. Paint Bucket Tool: Fills adjacent pixels that are
similar in color value to the pixels you click.
Tool Descriptions for this Lab

You will be using the Crop, Lasso, Move, Eyedropper, Stamping and Magic Wand Tools for this lab.
The first thing to do is get a copy of the images we’ll work with and save them to a disk or a local drive. When we finish the lab, use FTP to send the finished images to your Dante account for access later on.
Getting Started:
- Go to http://students.washington.edu/gbwhit23/100Labs/images
- Click on the link to the StHelens.jpg image
- Right click on the StHelens.jpg image and select Save Picture As…
- Save it to your disk or a folder on the C:\Documents
- Do the same with the second image, redsquare011301.jpg
- Open Adobe Photoshop
- Start>Programs>Adobe
Photoshop
- Whenever you want to indicate that you are dealing with one image versus another, make sure the image is “selected”. That is, click somewhere on the image you want to work with to select it.
- Open the images in Adobe Photoshop
-
- File>Open… open up both of the images you just saved by navigating to the Documents folder on C.
- You don’t want to work on the original, so create a copy of each:
i. File>Save As… and give them each a different name.(ex. StHelensCopy.jpg)
ii. Close the originals.
iii. Open up the copies you just created.
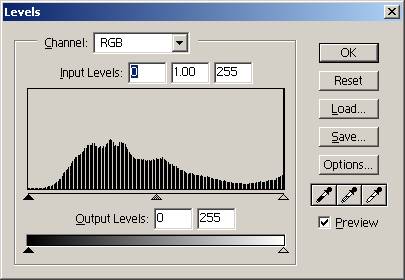
- Notice the color in the Red Square image is a little dark on the right side. To lighten the image up, adjust the color levels:
- Image>Adjust>Levels….

 Using
the slider bar on the right and left sides of the Input Levels, decrease the
amount of darkness in the image, without making it too bright. When you are satisfied, click OK and go
back to your image.

7. Save your changes
a. File>Save
Cropping an image:
- Now look at the second image of Mt. St. Helen’s. We need to crop it to get rid of the USGS fonts and make it a size we can use later. Select the crop tool from the Marquis tools options:
![]()
- Select the upper 2/3 of the image with the crop tool. The image will be the same width when you crop it, but not include the fonts and part of the lake at the bottom.
- Right click on the area you have cropped and click on Crop to finish the action.
- Save your work:
- File>Save
Removing objects from an image:
- Remove the one lone pedestrian from the Red Square image.
- Select the Rubber Stamping Tool
- While holding down the ALT key, use the mouse to click on an area near the pedestrian (in order to match the color of the brick nearest him).
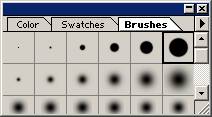
- Look at the size of the size of the pedestrian. Select the proper brush size to paint over the pedestrian.
i. If the Options box is not showing for Brushes, go up to the menu bar:
a.
Window>Show Brushes

ii. Select a brush that will cover the area. You will decide whether to use soft or hard edges
iii. Move your mouse over the pedestrian and click. They are replaced with the stamped area.
***NOTE: Any time to
make a move or take an action that you don’t want to keep,
you can use the Edit>Undo button to remove the
last step taken.***
Selecting an area of an image by color:
- Using the Magic Wand Tool, you can select whole areas by their similarity in color.
- Select the Magic Wand and click in the area of the Red Square image where there is sky. Not all of the sky area may be selected at one time. To add to the area, hold down the shift key as you click on other areas of sky. (Use the ALT key if you want to subtract selected areas one at a time)
- Once you have selected the entire sky area, go onto the next step.
Replacing colors:
- In a few moments you’re going to put the image of St. Helen’s into the backdrop of Red Square. To make sure there is color continuity in the photo of Red Square, let’s fill the area you just selected in Red Square with the blue in the Mt. St. Helen’s image.
- Click the Eyedropper tool to select it.
- Click on the upper left corner of the Mt. St. Helen’s image. Notice the color palette on the Tools box is now that shade of blue.
- Select the Paint Bucket Tool and click inside the selected area of the Red Square image. It should turn blue.
**When
you are finished, select one of the Marquee tools so you don’t paint
everything you click on!**
Inserting an image into a layer:
- Go back and click on the cropped image of Mt. St. Helen’s. The tools are now focused on this image. You’re going to copy the cropped image so that you can insert it into the background of the Red Square picture.
- Select>All The whole image should be selected.
- Edit>Copy You now have a copy of the image
on the clipboard.
c. File>Close Close the St. Helen’s image.
- Go to your Red Square image, the sky area should still be selected. You are now ready to insert the copied image into this one.
- Edit>Paste
Into Notice a new layer has
been created to hold the pasted image.

- With
the new layer selected, use the Move Tool and adjust the mountain
image so it looks “normal”!
- Flattening your image
- In order to save our new image as a jpg or a gif, we need to flatten in image. That is, combine the two layers that currently make up the image into one. This reduces the size of the file. Once an image is flattened, the layers can no longer be modified.
- Go to Layer>Flatten Image on the menu bar across the top.
- You image is now a single layer, instead of two different layers.
- Save your image.
- FTP your image to Dante. Add it to your web page from Lab 3 (Lab3.html),
just to keep those web skills current!
Bonus Practice:
The obvious choice for a picture in the background to replace Mt. Rainier would have been something like the Mt. St. Helen’s explosion. On your own, for more practice, go find a photo of a volcano, or a famous city skyline, and insert it into the image the way you inserted Mt. St. Helen’s.
Images and Copyright:
Now is the obvious time to give a little background and advice about the use of images on the web. Most of you don’t have any intention of using the images created for your project or here in lab for anything other than completion of a homework assignment. Regardless of your intentions for the use of this material, it is your responsibility to understand the laws surrounding copyright and the ethics of photo manipulation.
More Tutorials:
This lab is focused on the use of Adobe Photoshop for photo manipulation. There is a great deal of functionality of the software that we are not covering. Adobe provides tutorials to help you learn more about the various selection and manipulation tools. For more practice, go through the Adobe tutorials, which should be placed at the following location:
C:\Program
Files\Photoshop 5.5\Training\Photoshop 5.0\Tutorial
Image information through Catalyst:
http://depts.washington.edu/ctltstaf/gw/
Information on images (including copyright):
http://depts.washington.edu/catalyst/webbeats/graphic_tips.html