Lab #8 Event-Driven Programming |
| (due Tuesday, 2/24, 11:59 PM) |
Strategy
1. Add the radio buttons and the additional text field. Your UI should look something like:
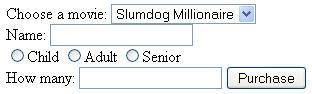
Make sure that you can only click on one radio button at a time. Add <label> like in the
slides, so that you can click on the words next to the radio button, instead of having to click
exactly on the circle.
Remember: Build things in pieces!
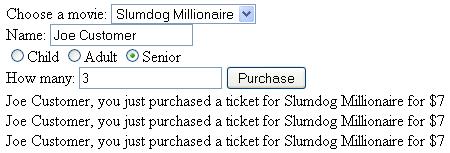
2. The prices are as follows: child ($5), adult ($10), senior ($7). When the "Purchase" button
is clicked, the price will be shown to the user. See below:
Start out by having the Purchase button pop up a box saying which radio button was pressed.
There are two ways to solve this: (a) you can use 3 different if statements to check which
radio button is activated (use the "checked" attribute) or (b) you can use a for loop that
loops through the radio buttons trying to find which one is checked. See slides (slide #13 - #16).
3. Now use the fact that you know which radio button is activated to set the price. If you
decided to do method (b), you should store the price in the value attribute of the radio buttons,
that way, when you find that a radio button is checked, then you know the price is in
document.getElementById("...").value
4. Now make it so that the Purchase button event handler will also take into account the number in the "How many" box. See the sentence generator example in the slides (slide #11 and slide #12). You'll have to save your message in a variable and then continually add it to another variable.
That's it! The code to the event handler should be around 15 - 20 lines long. If you do not do the if statement in the for loop for checking the radio buttons, your solution will be around 25 - 30 lines long. As always, think before you type!
Grading criteria
In addition to accomplishing the tasks specified, your HTML file must validate!
Submissions instructions
Turn in lab8.html and lab8.js here.
| previous page |
|
|
|
|