CSE466-03au Lab Assignment 7 - Sensor data and Ad-Hoc networks
Revised 11/18/03
This is a
3 part lab.  In it, you will:

    1.   Work through a tutorial on using a PC to display sensor network data
    2.   Build, install, and run an app for visualizing an ad-hoc sensor network
    3.   Write a program to parse a broadcast message

In this lab, you will learn the following:
Steps
Part 1

   1. Tutorial 6: Displaying data on a PC  (http://webs.cs.berkeley.edu/tos/tinyos-1.x/doc/tutorial/lesson6.html)
Hints:
To use tools like the serial forwarder, you will have to cd (from /cygdrive/z/apps/) to /cygdrive/c/tinyos/cygwin/opt/tinyos-1.x/tools/java
This tutorial does not require a sensor board.  Leave the default "SENSORBOARD=basicsb" alone. Don't do the Extra Credit portion.
Aliases are handy. "cdjava" takes you to the java directory. "testosc" will run the oscilloscope application.
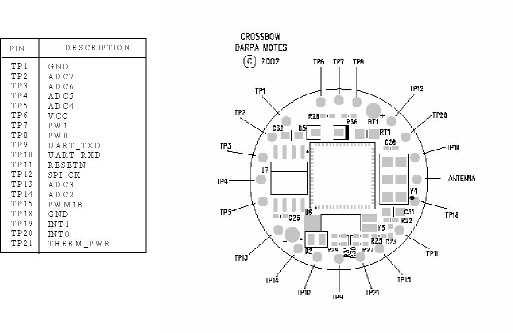
When you get the java oscilloscope or othe programs running, try touching TP3, which is ADC6 on your mote.
oscilloscope may need you to hit Reset, Clear Dataset, or Zoom out y to get something to display.  Experiment.
The light sensor is connected between TP3 and TP6 (VCC), with a 10K resistor between TP3 and ground (TP1). See the sample we've made. Only one wire should plug into the TP connectors.

   mote pinout
End of Part 1


Part 2

   In this part of the lab, you will be using a java app called Surge.


What is Surge?

    A common application of sensor networks is to sample a sensor periodically (e.g., light or temperature) and report readings to a base station, which is typically a node with a wired network connection and power source. Surge is a simple application that performs periodic sensor sampling and uses ad-hoc multi-hop routing over the wireless network to deliver samples to the base station.

    Surge motes organize themselves into a spanning tree rooted at the base station. Each mote maintains the address of its parent and its depth in the tree, advertising its depth in each radio message (either sensor sample or forwarded message) that it transmits. A node selects an initial parent by listening to messages and choosing the node with the smallest depth; to seed the creation of the spanning tree, the base station periodically broadcasts beacon messages with depth 0. Nodes estimate parent link quality; when the link quality falls below some threshold, nodes select a new parent from their neighbor set based on link-quality estimates and depth. Once a second, each mote samples its light sensor and sends the sample to its parent. Parents acknowledge received packets. Surge uses the acknowledgments to provide a reliable transport layer; parent link quality is calculated as the fraction of transmitted messages that are acknowledged. When a node receives a message from another node, it forwards the message to its parent. Sensor samples are collected at the base station where they can be analyzed or visualized

   So in short, Surge is a java program for displaying multihop routing topology in sensor networks.


Build, Install, and Run Surge

    To properly setup the Surge application, you have to build and run software both for the motes and on your PC. You'll need to work with another lab group so that you have more than two motes.

You can run through the process as follows:

1. Program your motes with  the Surge application ( in /cygdrive/z/apps/surge).  Be sure to use a single unique group ID during the installation, but each mote needs a unique node ID. The base must be node 0.  Leave the node 0 mote on the programmer.
Node IDs are programmed by the command "make install.N mica2dot" where N is the node ID.

2. Open another cygwin and cd to the same directory, run surge with the command:

'java net.tinyos.surge.MainClass <GroupId>'  where GroupId is the AM group id used when compiling the mote application.

   Once surge has loaded, press "Start Root Beacon" button to get things started.
   Continue with a larger network by finding more lab groups to merge with.

You may need to bend the antenna to limit strength to get multi-hopping to work. See if you can discover how to lower your transmit power to need more hops.

For help on Surge, see:
http://webs.cs.berkeley.edu/tos/tinyos-1.x/doc/multihop/multihop_routing.html

End of Part 2


Part 3: Decoding a Message for Output


    In this part of the lab you will modify the Blink program to parse a broadcast message on AM #100 with group number #95. (NOTE: you may want to copy Blink to a different directory to maintain the original Blink as a reference) From the message payload you will generate a pattern on your LED. The message payload will contain a variable amount of the following ASCII characters '0', 'L', 'S'.

'0' LED off for 1 sec. (Note this is a zero)
'L' LED on for 1 sec then off for 250 ms.
'S' LED on for 500 ms then off for 250 ms.

               Once a message is received you should ignore all other messages until the output sequence is complete.  Note: You may want to copy the message out of the radio buffer. Refer to the Radio Lecture and the tutorials to determine packet length, active message handling, payload locations, etc. You will need to program one mote to send a test message.
 

End of Part 3
 
Deliverables

Part 1:

Demonstrate the completed tutorial to a TA.


Part 2:

Show working a working instance of a multi-hop network on your PC.


Part 3:

Demonstrate that you can correctly decode a message sent by Waylon. Turn in a print-out of your tinyOS module.


End