|
CSE 456 - Story for Digital Animation |
||
To open the program navigate to this location on the network and click the executable: O:\unix\projects\instr\capstone3\cinematic_sandbox\cs-0.1.0.5b.exe You must be going through your O: drive for the program to open correctly. The version number may change, but the latest iteration will always reside in this folder as the only .exe file. To begin, set the screen resolution to your current monitor resolution and the graphics quality to "simple." Saving As soon as you open the program, type in yourlastname_yourfirstname in the "Name:" box and then click the "Create Project" button on the top left. This will save a first iteration of your file into the lab3 turnin folder on the network. Once you have done this initial save the "Create Project" button will turn into an iterations counter. Every time you want to save your file, hit the + button next to the version number. If you want to go to a previous saved version, use the arrow keys to either side of the iteration counter. If you open Cinematic Sandbox and you want to load a pre-existing file, put the name of the file in the "Name:" box and the program will recognize that a file by that name exists already and will load that file when you hit the "Load File" button. The "Clean Sandbox" button will set the file back to the default settings (erases all your placed props, gets rid of the shots and sequences, and puts the camera back to the starting position). Help Box The help box is located on the right side above the playback buttons. When you hover over a tool in the Cinematic Sandbox text will appear in the help box to describe the appropriate keystrokes to use for that given tool and what it does. Disable it with F1. Viewport The viewport consists of two camera angles. On the left is the Cinematic or Render Camera. This is the shot you want in your film. On the right is the Perspective Camera and allows you to move around the scene as necessary to set up props and movement without having to modify the Cinematic Camera. In order to zoom into a particular camera's view, hover over the desired view and hit the spacebar. Hit the spacebar again to return to the original split-screen view. Camera Controls Alt-left-drag: rotate the camera Alt-middle-drag: pan the camera Alt-right-drag: push the camera in and out Tool Panel In the upper right corner above the help box are the tool buttons. From left to right they are the select, move, rotate, scale, waypoint, prop placement, and prop craft buttons. In parenthesis are the hotkeys used to activate the tool. Select (q) - Use a left-mouse click on an object to select it, and left click at a location with no objects to deselect. Only one object can be selected at a time. When an object is selected, it will be a solid turquoise color. Move (w) - left-click-drag the yellow disk to move the object along the ground plane and the green arrow to move it up and down. Rotate (e) - left-mouse click on the axis guides to rotate the object in the indicated direction. Scale (r) - left-click and drag left or right to scale the prop down or up. Only uniform scaling is currently available. Teapot (p) - select a prop by name from the list and then click and hold in the viewport to place and rotate the prop. Release your mouse when done with the initial placement. Select an object and press the "delete" key to delete a prop. When you have a prop selected the right panel will display its current position and scale properties. To change any of these values use the tool buttons listed above, or left click in the coordinate boxes and move your mouse left and right to scroll through values. Alternatively, you can click in the boxes and type in a value. Waypoint (t) - this tool is the method of animating props within the program. Select the desired prop to animate, and then left click on the ground plane to set a waypoint at the current location in the timeline. The right panel has an option for adding pause time on a waypoint. To do this ctrl+click the time shaded part to adjust the length of the pause time. The right panel also has options for poses while a character is moving and poses while not moving with a virtual slider to go between the options. Prop Craft (F8) - this tool allows you to create your own simple props using 3D blocks. Left click the starting block to add more, shift left click to remove blocks, and right click to paint blocks in the color selected in the right panel. Hit the "Add Color" button to create different colors for use on your prop using the 0-255 RGB scaled sliders. Click the "Add" button at the top left of the right panel to add your finished prop to the place prop list. Timeline The timeline is divided into frame numbers on top, shots in the middle, sequences on bottom, and playback controls under the help box on the right. The + and - buttons to the right of the timeline bars create and delete a new shot or sequence. The circular arrow next to the + of the timeline is a loop button. Ctrl+click on a shot to add frames and double click the timeline to divide shots. To combine shots double click the seam, it always takes the left shot's camera. The time currently appearing in the viewport is indicated by a vertical red line. To change the time, just click on the desired spot on the frame number strip of the timeline. Audio Click on the camera in the Perspective View. Check the "Toggle Audio" button Undo To undo a previous action, press ctrl+z. BASIC TUTORIAL First, set up three shots. Click the + button to the right of the shot strip of the timeline twice. Left click and drag the seam between shot 100 and shot 200 to 6s/145f. Ctrl+click on shot 100 and drag to the right if you need to add more frames to achieve this. Drag the seam between shot 200 and shot 300 to 4s/97f and the end shot to a length of 8s/192f. The second and frame values will appear on a shot when you ctrl+click and hold on it. Zoom in and out of the timeline by using the scroll button on your mouse.
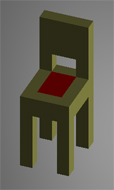
Use the placement tool to put a chair in the approximate middle of the ground plane. Your chair will probably be huge at this point and turquoise in color because it is currently selected. Use the scale and move tools to make the chair smaller and have its feet just touching the ground. Click away from the chair to see its true colors. Use the prop placement tool to add the character called Annie into the scene standing behind the chair. You may have to scale them again to make them look like they belong together. Next we are going to animate Annie walking around the chair. Select Annie and hit the waypoint tool button. You will notice a cyan bar appear near the start of the timeline which is the initial keyed position for Annie. The current key is cyan, a selected key is pastel yellow and regular keys are green. You can move keys at any time on the timeline by left-clicking on them and dragging them to the new location. Do that now to put the cyan bar at the 3 second mark if it is not already there. Now put the red time indicator bar at the 5 second mark. Left click on the ground plane to the left of the chair. Annie should move to the new position and leave a green marker at the old location with a line connecting the two. She will automatically re-orient herself to face in the direction she is walking. Next, move the red time slider to the 8 second mark and click in front of the chair. Let's have her pause there for 2 seconds. So scroll down in the right panel to find the pause time box. Our film is currently set at 24f/s so put in the number 48 into the box to get 2 seconds worth of pause. The timeline should now show a faded blue rectangle from the 8-10 second marks. Add two more waypoints, one at the right side of the chair at the 13 second mark and a final one back behind the chair at the 17 second mark. Your chair should be surrounded with a green diamond representing Annie's path. If you want to adjust the position of a waypoint (say Annie doesn't end up perfectly to the right of the chair like you wanted) you can left-click on the waypoint marker in the viewport and then drag it to the new location. Click-drag left and right on the frame number strip of the timeline to quickly move/scrub through your film and make sure Annie moves as expected. As a final step, let's change the camera so that the shots have different angles to them. Put the red time indicator within shot 100. Hover your mouse over the screen on the left of the viewport in order to change the Cinematic Camera. Use alt-left-drag, alt-middle-drag, and alt-right-drag with the mouse to move the camera angle so it is looking at the front of the chair from approximately Annie eye-level. Move the red marker again into shot 200 and move the camera so that it is directly above the chair and green diamond path Annie makes. Finally, move the marker into shot 300 and position the camera so that it is viewing the left side of the chair. Now when you scrub through the camera should change per shot. Use the selection tool and click on the ground plane away from Annie and her waypoint trail to hide all the tool attributes in the viewport. You should now understand the basics of creating a film using the Cinematic Sandbox. 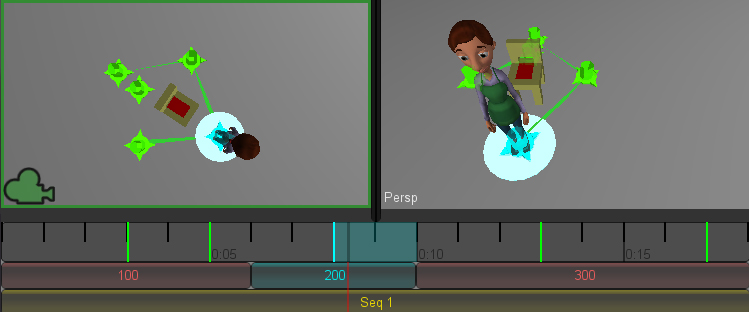 YOUR ASSIGNMENT FOR NEXT WEEK Please do the above tutorial on your own. Before turning it in, create a second sequence by hitting the + button to the right of the sequence slider. You should notice as you scrub through the film that in the second sequence the camera will move back to the default position and all the props will be automatically removed. You may do what you want in the second sequence, but it must include at least three new shots, a new prop of your own creation, and at least one character that has more than three waypoints. Remember that the definition of a new shot (besides a new number on the timeline) is that it has a different camera angle! Please make sure your final version of the film is placed in the turnin lab3 folder on the network before next Thursday's demo. Remember to periodically save your film as you go. We will look at, and evaluate, the iteration with the highest version number. |
||