CSE 370 Introductory Laboratory Assignment
Introduction to Finite State Machines
Assigned: Monday, November 12, 2007
Due: End of Lab Section
Objectives
This laboratory assignment will introduce you to the creation and
implementation of finite state machines. We will begin with a simple 4 bit
binary up counter which you will modify to an 8 bit binary up counter. In
the second part of the lab we will begin with a simple tug of war game
involving the buttons and you will add additional states to modify the game
to allow multiple plays in a row, and count the score of each player at the
same time.
Before You Begin
Before we begin, for this lab you will be using the FPGA for everything,
this means that you won’t need to wire anything. Make sure that the switch
on the left side of your board is switched to the RUN position otherwise
your programs won’t run properly. You can refer to the FPGA tutorial in lab
5 if you’ve forgotten how to implement designs from Active-HDL onto the
FPGA.
4-Bit Up Counter
Tasks:
-
We will begin by building a 4-bit binary up counter than can be loaded
and cleared with count enable. This component is very similar to the 163
counter, whose pins and internal logic diagram are shown below. Take a
little time to look over them.
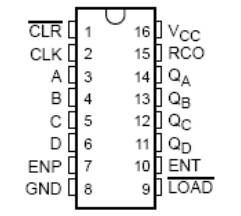
Pin diagram for '163 counter with
synchronous reset
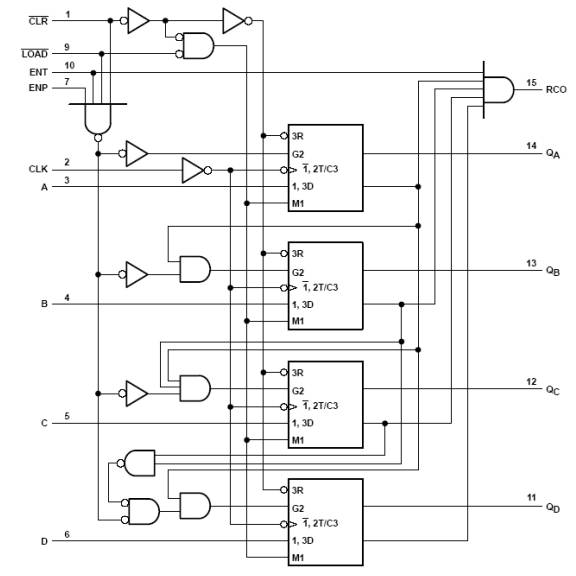
Internal logic diagram for the '163 (the
G2 input of the flip-flops is an enable signal, the 3R input is the
synchronous reset signal, and the M1 input is the load signal).
-
Create a new design in your workspace for your 4-Bit Up Counter, then
download and add the following file:
counting_student.v to your design. You will have to change the
comments to the correct lines of Verilog code to make the 4-Bit Counter
work. If you decide to change the name of the file, you will have to
change the name of the module as well, because module names must match
the file name. Do not change any of the inputs or outputs, do not add
any inputs or outputs. This is because will be providing the Quartus
Specifications File (.qsf) file for you.
-
Now you should implement your 4-Bit Up Counter using the following file:
counting.qsf when you synthesize. After
you have synthesized and implemented your design onto the FPGA, (look at
the FPGA Tutorial in Lab 5 if you’ve forgotten how to), try out your 4-
Bit Up Counter. You can use SW0-SW3 to set the values you want to load
into your counter and then press KEY1 to load the values in. You can use
KEY2 to clear your counter. Finally you need to toggle SW8 and SW9 for
the count enables before you can use KEY0 to count. Try loading a value,
toggling ENP and ENT and pressing KEY0 a few times. What happens? Get a
TA to check you off once you feel your 4-Bit Up Counter is working
correctly.
-
Finally you will put your verilog design skills to use by upgrading our
4-Bit Up Counter to an 8-Bit Up Counter. Create a new design and add an
existing file (your 4-Bit Up Counter) to the design. You should modify
this file to get your 8-Bit Up Counter. The logic should be relatively
straight forward and there should not be very much that you need to
change. If you can create your 8-Bit Up counter just by increasing the
size of value_in and value_out from 4 bits to 8 bits you can use the
provided counting8.qsf file when you
implement, otherwise you will need to write your own. If you do need to
write your own (.qsf) file you can look at the pin-outs here. Get your TA to check you off once you get it
working.
Tug-of-War Game
We will now construct a simple game that can be expressed simply in a
finite state machine. This game uses 17 LEDs (both the green and red
ones), two push buttons, and a switch for the reset. The objective is to
push your button as fast as you can to get the LED all the way to your
side. When you reach the end the score will be marked on the HEX display
and your side’s LEDs will light up.
Tasks:
-
Create a new design for a simpler version of the tug-of-war game that we
will be providing for you. Download and save the these files: tug_simple.v and
tug_simple.qsf into the SRC folder of your new design. Compile,
synthesize and program it onto your FPGA. You can begin a new game by
flipping SW9 up and then back down. KEY0 is for the right player and
KEY3 is for the left player. Play around with the game and familiarize
yourself with how it works.
-
Now that you understand how the game works, improve the tug-of-war game
to allow the players to play until one player has 5 points. You need to
do the following things when improving your game:
A. Count both players score on the HEX display. HEX3 should display the
left player’s score and HEX0 should display the right player’s score.
B. When a player wins the game should automatically reset the light
back to the middle at RED LED0, this allows the players to play
continuously until one player reaches 5 points.
C. When a player reaches 5 points you should light up all the LEDs on
their side like in the simple version provided for you.
D. Make sure the buttons don’t cause the LEDs to change after a player
wins.
Tips and Hints:
A. The 7 Segment HEX displays light up when you pass a segment a 0, and
turns off when you pass a segment a 1.
B. The layout of the 7 Segment HEX display is clockwise meaning segment
0 is at the very top, segment 3 is at the very bottom, segments 1 and 2
make up the right side, segments 4 and 5 make up the left side and
segment 6 is the middle. You can refer to the user documentation if you
would like additional information.
C. The additions we’ve asked you to add can be done just by adding
additional states. Think about what changes between each set the
players play and use that as a way to keep track of what state you are
in.
D. If you design your game correctly you won’t have to change the
(.qsf) file from the simple version to the expanded version. If you add
some new inputs or ouputs you’ll have to write your own (.qsf) file! If
you do need to write your own (.qsf) file you can look at the pin-outs
here.
Lab Demonstration/Turn-In Requirements
A TA needs to "Check You Off" for each of the tasks listed below.
-
Have a TA check you off for your working 4-Bit Up Counter.
-
Have a TA check you off for your working 8-Bit Up Counter.
-
Have a TA check off your expanded Tug-of-War game.
Comments to: cse370-
webmaster@cs.washington.edu