For homework #1, you will finish our implementation of two C data structures: in part A, a doubly-linked list, and in part B, a chained hash table.
Please read through this entire document before beginning the assignment, and please start early! This assignment involves messy pointer manipulation and malloc/free puzzles, and these can cause arbitrarily awful bugs that take time and patience to find and fix.
Part A: doubly linked list
If you’ve programmed in Java, you’re used to having a fairly rich library of elemental data structures upon which you can build, such as vectors and hash tables. In C, you don’t have that luxury: the C standard library provides you with very little. In this assignment, you will add missing pieces of code in our implementation of a generic doubly-linked list.
At a high-level, a doubly-linked list is incredibly simple; it looks like this:

Each node in a doubly-linked list has three fields:
- a payload,
- a pointer to the previous element in the list (or
NULLif there is no previous element), and - a pointer to the next element in the list.
If the list is empty, there are no nodes. If the list has a single
element, both of its next and previous pointers are NULL.
So, what makes implementing this in C tricky? Quite a few things:
-
First, we want to make the list useful for storing arbitrary kinds of payloads. In practice, this means the payload element in a list node needs to be a pointer supplied by the customer of the list implementation. Given that the pointer might point to something malloc’ed by the customer, this means we might need to help the customer free the payload when the list is destroyed.
-
Second, we want to hide details about the implementation of the list by exposing a high-level, nicely abstracted API. In particular, we don’t want our customers to fiddle with next and previous pointers in order to navigate through the list, and we don’t want our customers to have to stitch up pointers in order to add or remove elements from the list. Instead, we’ll offer our customers nice functions for adding and removing elements and a Java-like iterator abstraction for navigating through the list.
-
Third, C is not a garbage-collected language: you’re responsible for managing memory allocation and deallocation yourself. This means we need to be malloc’ing structures when we add nodes to a list, and we need to be free’ing structures when we remove nodes from a list. We also might need to malloc and free structures that represent the overall list itself.
Given all of these complications, our actual linked list data structure ends up looking like this:
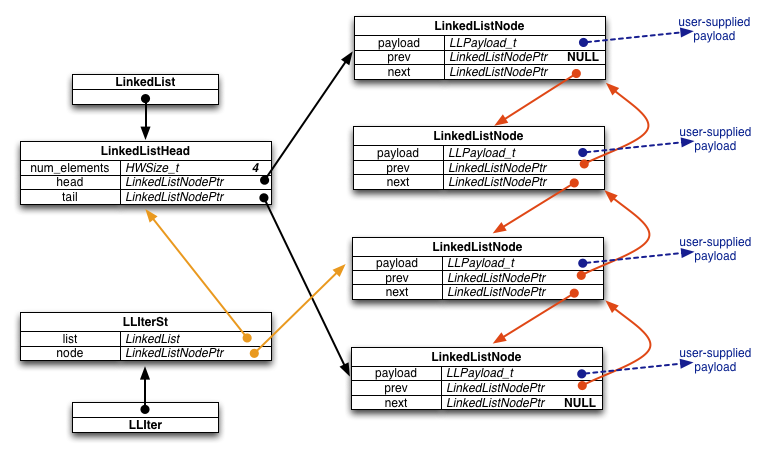
Specifically, we define the following types and structures:
-
LinkedList: a pointer to aLinkedListHeadstructure. When our customer asks us to allocate a new, empty linked list, we malloc and initialize aLinkedListHeadstructure, and return a pointer to that malloc’ed structure to the customer. -
LinkedListHead: this structure contains bookkeeping information about an entire linked list, including the number of nodes in the list and pointers to the head and tail nodes of the list. -
LinkedListNodePtr: a pointer to aLinkedListNodestructure. -
LinkedListNode: this structure represents a node in a doubly-linked list. It contains a field for stashing away (a pointer to) the customer-supplied payload, and fields pointing to the previous and nextLinkedListNodein the list. When a customer requests that we add an element to the linked list, we malloc a newLinkedListNodeto store the pointer to that element, then we do surgery to splice theLinkedListNodeinto the data structure and we update theLinkedListHeadas well. -
LLIter: sometimes customers want to navigate through a linked list. To help them do that, we provide them with an iterator.LLIterpoints to a structure that keeps the state of an iterator. When a customer asks for a new iterator, we malloc aLLIterSt, and return a pointer to it to the customer. -
LLIterSt: this structure contains bookkeeping associated with an iterator. In particular, it tracks the list that the iterator is associated with and the node in the list that the iterator currently points to. Note that there is a consistency problem here: if a customer updates a linked list by removing a node, it’s possible that some existing iterator becomes inconsistent by pointing to the deleted node. So, we make our customers promise that they will free any live iterators before mutating the linked list. (Since we are generous, we do allow a customer to keep an iterator if the mutation was done using that iterator.)
What to do
You should follow these steps to do this assignment:
Make sure you are comfortable with C pointers, structures, malloc, and free. We will cover them in detail in lecture, but you might need to brush up and practice a bit on your own; you should have no problem Googling for practice programming exercises on the Web for each of these topics.
To fetch the source files for hw1, navigate to the directory where you want to store your work. (You will use this directory for this assignment and the remaining three parts of the project over the rest of the quarter. Be sure to back up this directory regularly if it is on your own computer. You may want to use a source control system like git or subversion to manage your files.).
Click (or right-click if needed) on this hw1.tar.gz
link to download the archive containing the starter code. Extract
its contents and verify that you have everything.
(If your hw0 directory is also stored here, that’s fine. It won’t
have any affect on the project.)
$ tar xzf hw1.tar.gz
$ ls
clint.py  gtest  hw1  hw1.tar.gz  LICENSE.TXT
Look inside the hw1 directory. You’ll see a number of files and
subdirectories, including these that are relevant to Part A:
-
Makefile: a makefile you can use to compile the assignment using the Linux command make all. -
LinkedList.h: a header file that defines and documents the API to the linked list. A customer of the linked list includes this header file and uses the functions defined within in. Read through this header file very carefully to understand how the linked list is expected to behave. -
LinkedList_priv.h,LinkedList.c:LinkedList_priv.his a private header file included byLinkedList.c; it defines the structures we diagrammed above.LinkedList.ccontains the partially completed implemented of our doubly-linked list. Your task will be to finish the implementation. Take a minute and read through both files; note that there are a bunch of places inLinkedList.cthat say “STEP X:” these labels identify the missing pieces of the implementation that you will finish. -
example_program_ll.c: this is a simple example of how a customer might use the linked list; in it, you can see the customer allocating a linked list, adding elements to it, creating an iterator, using the iterator to navigate a bit, and then cleaning up. -
test_linkedlist.cc: this file contains unit tests that we wrote to verify that the linked list implementation works correctly. The unit tests are written to use the Google Test unit testing framework, which has similarities to Java’s JUnit testing framework. As well, this test driver will assist the TA in grading your assignment: as you add more pieces to the implementation, the test driver will make it further through the unit tests, and it will print out a cumulative score along the way. You don’t need to understand what’s in the test driver for this assignment, though if you peek inside it, you might get hints for what kinds of things you should be doing in your implementation! -
solution_binaries: in this directory, you’ll find some Linux executables, includingexample_program_llandtest_suite. These binaries were compiled with a complete, working version ofLinkedList.c; you can run them to explore what should be displayed when your assignment is working!
Run make to verify that you can build your own versions of
example_program_ll and test_suite. Make should print out a few
things, and you should end up with new binaries inside the hw1
directory.
Since you haven’t yet finished the implementation of LinkedList.c,
the binaries you just compiled won’t work correctly yet. Try running
them, and note that example_program_ll halts with an assertion error
or a segfault and test_suite prints out some information indicating
failed tests, and may crash before terminating.
This is the hard step: finish the implementation of LinkedList.c.
Go through LinkedList.c, find each comment that says “STEP X”, and
replace that comment with working code. The initial steps are meant
to be relatively straightforward, and some of the later steps are
trickier. You will probably find it helpful to read through the
code from top to bottom to figure out what’s going on. You will
also probably find it helpful to recompile frequently to see what
compilation errors you’ve introduced and need to fix. When compilation
works again, try running the test driver to see if you’re closer
to being finished.
Debugging hint
Verify333 is used in many places in the code to
check for errors and terminate execution if something is wrong. You
might find it helpful to discover the function that is called when
this happens so you can place a debugger breakpoint there.
We’ll also be testing whether your program has any memory leaks. We’ll be using Valgrind to do this. To try out Valgrind for yourself, do this:
cdinto thesolution_binariessubdirectory, and run the following command:
$ valgrind --leak-check=full ./example_program_llNote that Valgrind prints out that no memory leaks were found.
- Similarly, try running the test driver under Valgrind:
$ valgrind --leak-check=full ./test_suiteNote that Valgrind again indicates that no memory leaks were found.
- now,
cdback up into thehw1directory, compile your versions of theexample_program_llandtest_suitebinaries, and try running them under Valgrind. If you have no memory leaks and thetest_suiteruns the linked list tests to completion, you’re done with part A!
Part B: a chained hash table
A chained hash table is also a fairly simple data structure. It consists of an array of buckets, and each bucket contains a linked list of elements. When a user inserts a key/value pair into the hash table, the hash table uses a hash function to map the key into one of the buckets, and then adds the key/value pair onto the linked list. (As an important corner case, if the key of the inserted key/value pair already exists in the hash table, the hash table replaces the existing key/value pair with the new one, and returns the old key/value pair to the customer.)
So, over time, as more and more elements are added to the hash table, the linked lists hanging off of each bucket will start to grow. As long as the number of elements is a small multiple of the number of buckets, lookup time is small: you hash the key to find the bucket, then iterate through the chain (linked list) hanging off the bucket until you find the key. As the number of elements gets longer, lookup gets less efficient, so our hash table includes logic to resize itself to maintain short chains.
As with the linked list in Part A, we’ve given you a partial implementation of a hash table. Our hash table implementation looks approximately like this:
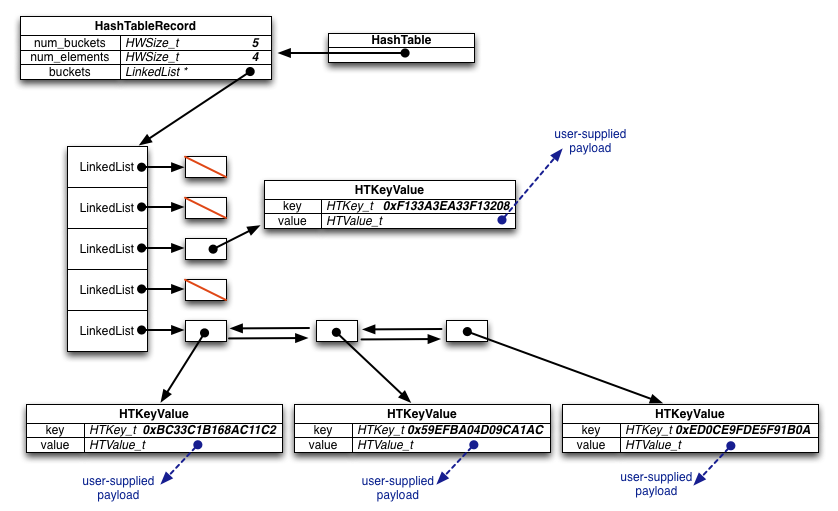
Specifically, we defined the following types and structures:
-
HashTable: a pointer to a HashTableRecord structure. When our customer asks us to allocate a new, empty hash table, we malloc and initialize aHashTableRecordstructure (including malloc’ing space for the bucket array inside it, and allocating LinkedLists for each bucket), and return a pointer to that malloc’ed structure to the customer. -
HashTableRecord: this structure contains bookkeeping information about the hash table. -
HTIter: (not shown in the diagram) sometimes customers want to iterate through all elements in the hash table. To help them do that, we provide them with an iterator.HTIterpoints to a structure that keeps the state of a hash table iterator. When a customer asks for a new iterator we malloc anHTIterRecordand return a pointer to it. -
HTIterRecord: this structure contains bookkeeping associated with an iterator. In particular, it tracks the hash table that the iterator is associated with, the bucket within the hash table the iterator currently points at, and uses linked list iterator to track which element in the chain linked list the hash table iterator is pointing at. As well, we use a field to track whether or not the iterator is currently valid (i.e., whether it is pointing somewhere in the table, or whether it has been run off the end of the table).
What to do
You should follow these steps to do this assignment:
-
The code you fetched in Part A also contains the files you’ll need to complete your hash table implementation and test it. Similar to the linked list, the hash table implementation is split across a few files:
HashTable.ccontains the implementation you need to finish, HashTable.h contains the public interface to the hash table and documents all of the functions and structures that customers see, andHashTable_priv.hcontains some private, internal structures thatHashTable.cuses. -
Read through
HashTable.hfirst to get a sense of what the hash table interface semantics are. Then, take a look atexample_program_ht.c; this is a program that uses the hash table interface to insert/lookup/remove elements from a hash table, and uses the iterator interface to iterate through the elements of the hash table. -
test_hashtable.cccontains our Google Test unit tests for the hash table. As before, run this (on its own, and using valgrind) to see how close you are to finishing your hash table implementation. -
Look through
HashTable.c, find all of the missing pieces (identified by STEP X comments, as before), and implement them. -
As before, in
solution_binaries, we’ve provided you with linux executables (example_program_htand the sametest_suiteas before) that were compiled with our complete, working version ofHashTable.cYou can run them to explore what should be displayed when your part B implementation is working.
Bonus
You’ll note that we provided a second Makefile called Makefile.coverage.
You can use it to invoke the gcov code coverage generation tool.
Figure out how to
- use it to generate code coverage statistics for
LinkedList.candHashTable.c, - note that the code coverage for HashTable is worse than that for the LinkedList, and
- write additional HashTable unit tests to improve HashTable’s code coverage.
The bonus task is simple, but we’re (deliberately) providing next to no detailed instructions on how to do it—figuring out how is part of the bonus task!
Please make sure your additional unit tests don’t change the scoring mechanism that we use, obviously. (We’ll be checking that.) Place your additional unit tests in a separate file from the original test suite. That will make it easier for us to find and evaluate your tests.
What to turn in
When you’re ready to turn in your assignment, do the following:
In the hw1 directory:
$ make clean
$ cd ..
$ tar czf hw1_<username>.tar.gz hw1
$ # make sure the tar file has no compiler output files in it, but
$ # does have all your source
$ tar tzf hw1_<username>.tar.gz
Turn in hw1_<username>.tar.gz using the course dropbox linked on the main course webpage.
Grading
We will be basing your grade on several elements:
-
The degree to which your code passes the unit tests contained in
test_linkedlist.ccandtest_hashtable.cc. If your code fails a test, we won’t attempt to understand why: we’re planning on just including the number of points that the test drivers print out. -
We have some additional unit tests that test a few additional cases that aren’t in the supplied test drivers. We’ll be checking to see if your code passes these as well.
-
The quality of your code. We’ll be judging this on several qualitative aspects, including whether you’ve sufficiently factored your code and whether there is any redundancy in your code that could be eliminated.
-
The readability of your code. While we don’t have detailed, formal coding style guidelines that you must follow, you attempt to mimic the style of code that we’ve provided you. Aspects you should mimic are conventions you see for capitalization and naming of variables, functions, and arguments, the use of comments to document aspects of the code, and how code is indented. We strongly suggest using the
clint.pytool to check your code for style issues.