Software Setup Guide
Contents:
- Why you should begin your setup with this guide!
- Determine your operating system
- Bash
- Git
- Node and NPM
- VSCode
- Create an SSH Key
- Turning in Assignments
Why you should begin your setup with this guide!
This step-by-step set of instructions is meant to speed up and familiarize you with the tools listed under the Tools section of the course website.
Please do the following steps before you arrive at our first section of the quarter. If you have any trouble, get as far as you can on your own and come to section with what you have. Also, feel free to reach out to us on Ed or attend OH, we are happy to help guide you through this process! :)
Determine your operating system
Figure out if you're using a MacOS, Windows, or Linux. Then, make sure that you follow the instructions that work for your computer as you proceed through this document. For this course, we recommend that you do any and all coding locally.
A note for Windows users: For any downloads you perform in this course (both downloading tools in the following instructions and downloading/cloning any section or homework code) you should make sure that you are storing things in local directories. Specifically, do not place code or other downloads in a OneDrive folder. This can cause various issues with tools not working as expected.
Bash
Bash is the command-line shell that you use on your laptop. It is sometimes also referred to as the terminal.
-
MacOS or Linux: Your command-line shell is built-in. It will be an application on your laptop titled "Terminal".
-
Windows: You can install your own version of bash. On the Git for Windows page select Download and then follow any prompts that you are given.
Git
Is a version control system. We won't need to use git for anything more than downloading the starter code. However, it is an extremely useful tool that would be worth your time to learn.
-
MacOS or Linux: Git is built-in.
If you'd like to install the full Apple developer command line tools package instead, which includes git, you can run the command
xcode-select --installfrom the terminal. This includes many additional tools that some people will find useful for other courses (like c/c++ compilers and debuggers.) Note: this does not install the full XCode IDE, just the command line developer tools. The tools are also installed automatically if you have installed the Homebrew package manager (also not required for CSE 331, but popular with many MacOS developers). -
Windows: Git comes with Bash. If you followed the above instructions for Bash, you should already have it!
Node and NPM
Node executes JavaScript code on the command-line. NPM is a package manager that comes with Node.
Please note that absolutely everyone in this course should install Node. Even if you already have it installed, do it again! The Node installer will handle all duplicate and outdated Node versions on your OS, so there's no harm in re-installing!
-
MacOS or Linux: First, navigate to the Node.js homepage and select the LTS version of Node.js. This will also install the correct version of NPM automatically. You may get a warning about the installer not coming from a “verified developer.” To resolve this, open System Preferences and navigate to Security & Privacy > General. There, you'll be able to click “Open” to run the Node/NPM installer.
-
Windows: First, navigate to the Node.js homepage and select the LTS version of Node.js for Windows. This will also install the correct version of NPM automatically. Make sure that the “Add to PATH” option is enabled with the “Will be installed on local hard drive” sub-option during the installation process. Keep the “Tools for Native Modules” option disabled. These selections should be the default instalation options, so just verify they are made.
NPM comes with Node.js, so you should have it now as well!
VSCode
The staff will only provide help with VSCode. In other words, if you prefer to use a different editor, the staff will be unable to help you with any setup related bugs you encounter throughout the quarter.
VSCode is an editor with excellent support for TypeScript (and practically all other programming languages under the sun). If you ask the staff, we think it's pretty great! This is an editor that is popularly used in industry as well, so it is definitely a good tool to be familiar with! :)
-
MacOS: First, navigate to the VSCode homepage and select the big blue Mac button. Then, follow any prompts that you are given.
-
Linux: First, navigate to the VSCode homepage and select the big blue .deb or .rpm buttons, depending on which of the 2 designated categories that your OS falls under. Then, follow any prompts that you are given.
-
Windows: First, navigate to the VSCode homepage and select the bug blue Windows button. Then, follow any prompts that you are given.
Recommended VSCode Extensions
The following are a list of suggested VSCode extensions that enable even more functionality on VSCode, which can be especially helpful when interacting with an editor for the first time! To install an extension, follow the link to the VSCode website which provides more information on the extension, click the big green Install button which will redirect you to VSCode, and then prompt you to install there. You will have to complete these steps for each extension that you wish to install.
- IntelliCode: provides AI-assisted development features for TypeScript in Visual Studio Code, with insights based on understanding your code context combined with machine learning.
- Check back throughout the quarter! We will add extensions as they become useful to you here.
Set up an ssh key
(If you plan to work from multiple computers, do this for each)
-
Open a Terminal window (Git Bash if on Windows), and run the following command, replacing "your@email.com" with any identifying text (This is just "comment" text, as indicated by
-C. Make sure it is something you'll recognize and do not remove the quotations).ssh-keygen -o -t rsa -b 4096 -C "your@email.com"
Press enter when asked for a file name (use the default name)
Do not use a passphrase
-
You'll receive a message stating that
your public key is
                saved in [some public key file name]
. The file is probably called~/.ssh/id_rsa.pubif on Mac andC:\Users\yourUser\.ssh\id_rsa.pubif on Windows, but take note of whatever is listed from the command for the next step, it will end with ".pub". -
Open the file where the key has been saved by running the following command:
Mac:
cat [public key file name here] | pbcopy
Windows:
cat [public key file name here] | clip
-
After running the command, the public key you created will be copied automatically; save it for the next step.
-
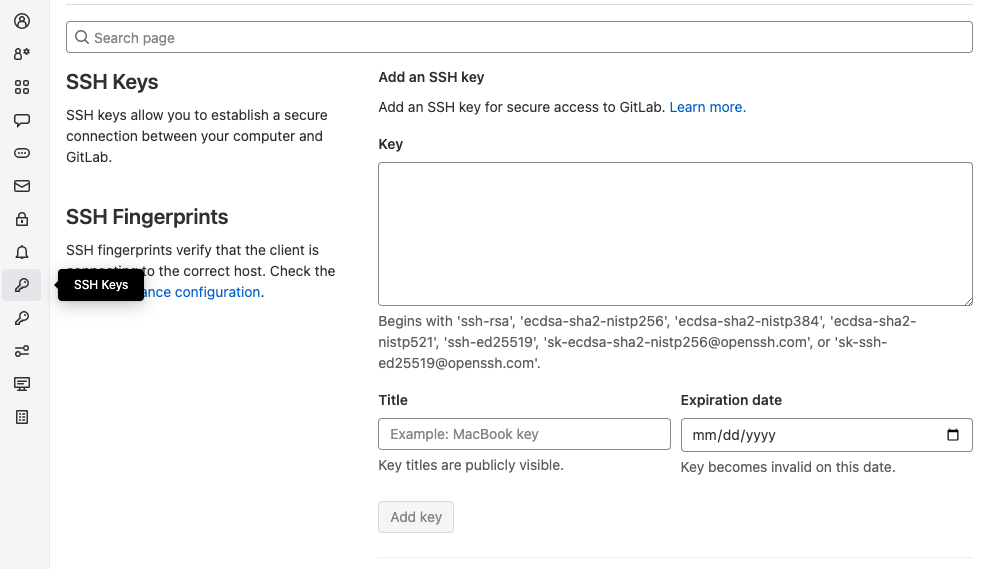
Navigate to CSE Gitlab and sign in. Open the profile menu in the top right corner and click "Preferences". Choose "SSH Keys" from the left options bar, then paste your public key copied from the previous step into the text box. The "Title" field can be whatever you want - we recommend writing something that identifies which computer you created the key on (i.e. "Personal Laptop" or "attu."). Finally, click the "Add Key" button.
-
Run the following command to ensure that your key is correctly setup. You should receive a welcome message and should not be prompted for a password. If you receive a message saying "the authenticity of the host could not be established", it's safe to type 'yes' to bypass this message.
ssh -T git@gitlab.cs.washington.edu
How to turn in assignments
All work will be turned in via Gradescope. For each assignment, you will turn in your written work and code seperately.
You will turn in your written work to the "HW# Written" assignment on Gradescope. Make sure that any handwritten work is legible (and dark enough) for us to read. Also, when you turn in your written HW to Gradescope, please match each HW problem to where you did your work. If you do not do this, you may receive a point deduction.
You will turn in your code to the "HW# Code" assignment on Gradescope.
In the HW instructions, for each coding problem, we will identify which
files that you will need to upload to Gradescope. It is crucial that you
only upload the files that we instruct you to, or else you may not pass
the autograder. For example, if HW1 Problem 30 says to upload file
example.ts and Problem 60 says to upload fun.ts,
you should only upload example.ts and fun.ts
to Gradescope. You should not put example.ts and
fun.ts into a folder, and then upload the folder to
Gradescope, as this will cause you to fail the autograder.