Goals
- Learn how to add Processing projects to your portfolio.
- Get into the habit now, so you don't rush when a portfolio check comes around.
Adding Processing Projects to Your Website
- You may also watch this 15 minutes video instead: https://vimeo.com/161422107
Step 1: Browse to your website in Cyberduck
- Open Cyberduck
- Click "Open Connection" in the left-hand corner
- Select SFTP (SSH File Transfer Protocol) in the drop-down menu at the top
- Type in
vergil.u.washington.eduas the server name - Enter 22 as the Port number
- Enter your UWNetID as your username
- Enter your UWNetID password as your password
- Click "Connect"
- If you get an unknown host key popup, click "Allow"
Step 2: Create new folders [DO THIS ONLY THE FIRST TIME!]
- Double click the
public_htmlfolder - Click the gear icon (Action) in the top menu and select "New Folder..."
- Name the folder "js", which is short for javascript
- Double click the new
jsfolder - Download p5.js to your desktop and then drag it into the Cyberduck window to upload it to the
jsfolder - Create a new folder called "projects"
- Navigate back out to
public_htmland then into theimgfolder - Create a new folder called "project-images"
- Your Cyberduck window should like something like this from your
public_htmlfolder: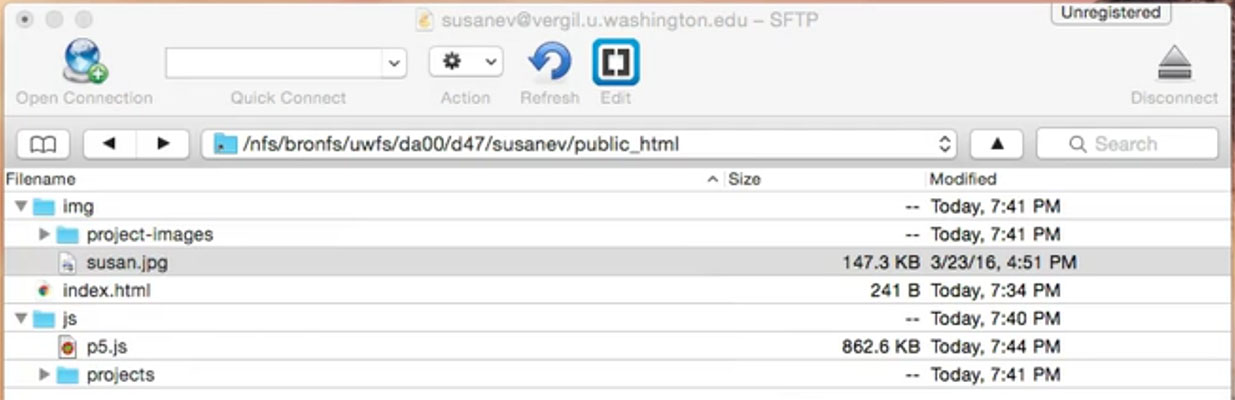
Step 3: Create a new javascript file for your project
- Navigate into the
projectsfolder (inside ofjs) - Click the gear icon (Action) in the top menu and select "New File..."
- Name the file
<proj name>.js, where <proj name> is the name of your project (e.g.robot.js)
Step 4: Edit your project javascript file
- Click on your new file and then click on the Brackets symbol (Edit) in the top menu
- Open this p5.js converter website
- Copy your project Processing code from Processing into the left box and then click "Convert to p5.js"
- Click "Select all converted code" and copy the converted code into your javascript file in Brackets
- Unfortunately, there are a few things you may still need to change manually.
- Move global variable assignments (declarations are okay) into
setup():int x = 5; void setup() { ... }⇨ var x; function setup() { x = 5; ... } - Remove variable types from all function arguments (and for loops):
void something(int i, float f, color c) {
   ...
}
⇨ function something(i, f, c) { ... }for ( int i=0; i<max; i++ )
⇨ for ( i=0; i<max; i++ )
- Replace any lingering instances of the variable type
colorwithvarin variable declarations. Definitions of colors (e.g.color(#,#,#)) should remain untouched.color c = color(0,0,255); void setup() { ... }⇨ var c; function setup() { c = color(0,0,255); ... } - Ask your TAs for assistance with arrays.
- Check if you had anything along the lines of "print", as the "int" part will have been replaced by "var".
- If you are using
keyPressed(), remove the check forCODEDand replace the key names withUP_ARROW,RIGHT_ARROW,DOWN_ARROW, andLEFT_ARROW.
- Move global variable assignments (declarations are okay) into
- Save your javascript file
Step 5: Create a new HTML file for your project
- Navigate back out to your
public_htmlfolder - Create a new file called
<proj name>.html, where <proj name> is the name of your project (e.g.robot.html) - Open your new html file in Brackets
- Paste the following into your html file:
<html> <head> <script language="javascript" type="text/javascript" src="js/p5.js"> </script> <script language="javascript" type="text/javascript" src="js/projects/robot.js"> </script> </head> <body> <p>Project description and details</p> </body> </html>- Notice that the first
scripttag is importingp5.js - Change
robot.jsin the secondscripttag to import the correct javascript file for your project - Update the body with your actual project description and details
- Notice that the first
- Save your file!
Step 6: Add a screenshot of your project to index.html
- Run your project in Processing
- Take an interesting partial screenshot of the running project
- Save your screenshot to your desktop with your project name and using
.jpgor.pngas the file extension - Drag the image file into the
project-imagesfolder (inside ofimg) in Cyberduck to upload it - Now edit your
index.htmlto include the following below all of your other text in the body:<a href="robot.html"><img src="img/project-images/robot.png" /></a>
- Change
robot.htmlandrobot.pngto the correct file names for your project
- Change
- (Optional) Adjust the layout of your images and text in
index.htmlusing HTML- We will not be covering more HTML in this course, so you will have to teach yourself
- There are many online resources for HTML, such as this one
Checklist
- Your website displays a (non-broken) picture of your newly-added Processing project.
- Clicking on that picture takes you to a separate html page for that project.
- The project page has your working Processing project along with a project description and details.