Goals
- Practice using the Processing language by modifying an existing program.
- Learn the difference between a static and dynamic program.
Setup
Copy the contents of this robot code into a Processing window and run it to make sure that it works.
Building a Robot
Step 1: Color the Robot
 Make the robot more interesting by coloring it with a theme (e.g. sports team, favorite food, cartoon character).
Your coloring theme should be unique - show us your own style; please do not copy another person's work.
These steps will help you color your robot:
- Find the robot part you want to color in the code.
- Find a color using the color selector [Tools -> Color Selector].
- Transfer the three RGB color numbers to the
fill()function, or thestroke()function before the the of code that draws the robot's part. - Run the program to make sure it still works and looks the way you want it to.
- Add in a comment that describes the line of code you just wrote or changed.
Checklist
- All parts of the robot should be colored.
- Every line of your code should have a comment clearly describing what it does.
Step 2: Make the Robot Dynamic
The program you have written so far is static. The Processing code runs, draws your beautiful robot, and then quits.
We want it to be active (keep running) and make our robot move.
Notice the two programs below.
The one on the left is the static robot and the one on the right is the dynamic version.
The new code groups the instructions for the robot into two functions, the setup() function and the draw() function.
Tip: In programming, functions are written with a pair of parentheses after the name.
You should make the highlighted changes to your code, including adding indentation.
// original code
size(720, 480);
smooth();
strokeWeight(2);
ellipseMode(RADIUS);

// Neck
stroke(102);
line(266, 257, 266, 162);
line(276, 257, 276, 162);
line(286, 257, 286, 162);

// Antennae
line(276, 155, 246, 112);
line(276, 155, 306, 56);
line(276, 155, 342, 170);

// Body
noStroke();
fill(102);
ellipse(264, 377, 33, 33);
fill(0);
rect(219, 257, 90, 120);
fill(102);
rect(219, 274, 90, 6);

// Head
fill(0);
ellipse(276, 155, 45, 45);
fill(255);
ellipse(288, 150, 14, 14);
fill(0);
ellipse(288, 150, 3, 3);
fill(153);
ellipse(263, 148, 5, 5);
ellipse(296, 130, 4, 4);
ellipse(305, 162, 3, 3);
|
// updated, dynamic code void setup() { size(720, 480); smooth(); strokeWeight(2); ellipseMode(RADIUS); } void draw() { // Neck stroke(102); line(266, 257, 266, 162); line(276, 257, 276, 162); line(286, 257, 286, 162); // Antennae line(276, 155, 246, 112); line(276, 155, 306, 56); line(276, 155, 342, 170); // Body noStroke(); fill(102); ellipse(264, 377, 33, 33); fill(0); rect(219, 257, 90, 120); fill(102); rect(219, 274, 90, 6); // Head fill(0); ellipse(276, 155, 45, 45); fill(255); ellipse(288, 150, 14, 14); fill(0); ellipse(288, 150, 3, 3); fill(153); ellipse(263, 148, 5, 5); ellipse(296, 130, 4, 4); ellipse(305, 162, 3, 3); } |
What is Happening?
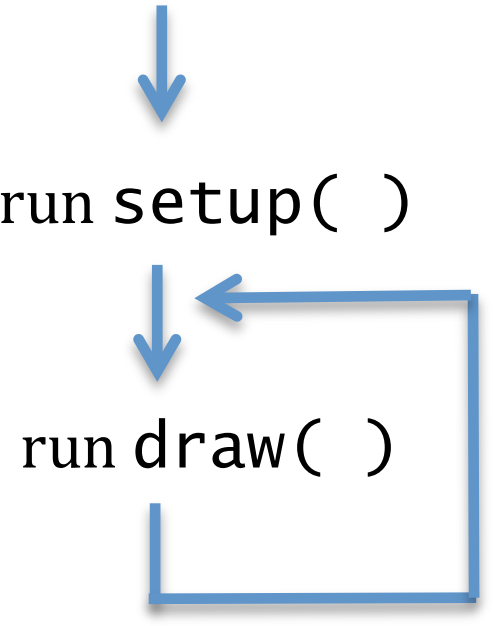
The setup() function runs once, when the program starts running.
After setup() runs, then the draw() function runs over and over again.
This redraws the image.
The diagram below shows what is happening when the Processing engine runs a dynamic program.

The way to read this diagram is that the Processing engine starts running setup(), finishes it, starts running draw(), finishes that, and then goes around and runs draw() again, again, and again...
Step 3: Move the Robot
Add two more instructions to your dynamic program at the top of your draw() function:
void draw() {
   background(205);
   translate(mouseX, mouseY);
   ...
The instructions go inside of draw() - right after the draw() function declaration line and before the //Neck comment.
Caution: Notice that "mouse" is written in lowercase letters and the "X" and "Y" are capitals; this is required.
Run your program and move your mouse.
Checklist
- Make sure your robot follows your mouse as you move it.
Step 4: Robot Explosion!
Now comment out the line background(205); from the draw() function of your program and run it again.
Add a comment at the top of your program that clearly explains what is happening when you comment out the background line of code and what happens when you uncomment it.
Need help understanding this? Reach out to us!
Submission
- Make sure your code has the
background(205);call uncommented before you submit. - Make sure your comment explaining Step 4 is at the very top of your file.
- Submit your robot program (
.pdefile) to the Canvas assignments page. - You should also add this program to your website portfolio. This will be demoed in lab.