FIT 100
Introduction to Relational Databases
through Microsoft Access
Creating
tables for data storage
1. Create the Database Structure
2. Identify the Important Entities and
Relationships
6. Breaking One Table Into Two
Reading
to be done for this lab:
·
Chapter 13, pp.231-top
242 of Fluency with Information Technology:
Foundations and Fundamentals of Information Technology
Introduction:
The last part of the FIT 100
Course is a study of databases, and in particular, relational databases. We will use Microsoft Access as a way to
demonstrate concretely the various layers of complete database
architectures. Relational Database
Management Systems usually consist of Data Services:
- Data storage
- The data storage engine and
- The query processor.
Many RDBM systems also include a mechanism to create user interfaces and to program those interfaces to work with the data. These additional layers are known as Logic and Presentation services. Microsoft Access is an application environment that allows you to provide Data Storage, Logic Services and Presentation Services all from the same application:
Data
Services The
main unit of data services (data storage) is a Table. Data storage allows for persistent data
(the data stays even when the power goes off). A table is a collection of data about a specific topic. Tables
organize that data in columns (called attributes) and rows (called
records). One of the attributes
(columns) of the table is almost always a number data type that is used as
a key. A key is used to uniquely
identify the data in a particular row. Key values must be unique and not null. A primary key is just the attribute(s)
that have been designated as the main key for the table. Data
Services also includes the storage engine and the query engine which deal
with the saving, accessing and manipulation of the data. A Query is used to access, view and
manipulate the data. Queries are also called views because they are a
user’s “view” of the data in the database.
A query that selects certain data from one or more tables and
returns results is also called a virtual table. You will use simple queries to gather data from tables. Logic
Services This
area deals with the processes that control the more complex logic
determining a user’s manipulation of data in the Data Services level. Logic
is usually implemented in the code module of an application. In Access, the language used in the code
is VBA, Visual Basic for Applications.
Your interaction with logic services for this project will be
minimal. Presentation
Services The
interfaces created to allow users of the Database application the ability
to enter data and to view output of data.
A Form is the typical interface used for input and output of
data that goes through logic services and talks to the Query Engine. There are other interfaces in Access
such as Reports and Data Access Pages, but you will only be dealing with
Forms for the first part of Project 3.
Forms are a way of entering data into and viewing data from one or
more tables.
In today’s lab the main focus will be on Data Storage: creating tables to hold data instances (rows of information) of the entity represented by the table.
Objectives:
- To connect the abstract concepts of Entities, Attributes (properties of an entity) and Tuples (instances of an entity) in the Relational Database Model with the corresponding objects in Access that are concrete representations of those concepts.
- To become familiar with MS Access, one of many different Relational Database Systems that can create complete database applications.
- To create tables that are associated with each other
based on a specific type of attribute, a key attribute.
1. Create the Database Structure
A.
Open Microsoft Access
Programs>Microsoft Access
The first thing you have to do
is save the database. This may seem
weird, since other applications allow you to add text or create objects and
then save, but this is what Access requires. You are defining/creating a database structure and that space
will be the only way to access the tables and queries created in it.
B. Select the “Blank Access database” option and click OK.
C. When the window called “File New Database” shows up, name the database as YourName.mdb and save it to the Desktop.
|
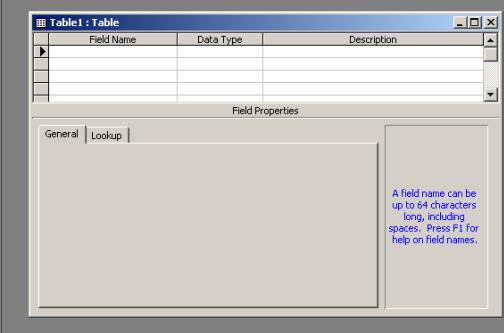
Creating a table in Design view will let you build the table from scratch, adding attributes (the names of the columns) and deciding what data types will be allowed for stored values in each cell. |
2.
Identify the
Important Entities and Relationships
You
are creating your first database today in order to hold/track information
about two different entities: the Student
entity and the Advisor entity.
In layman’s terms - you’re going to create two tables: tblStudent and tblAdvisor. The “tbl” at the front is a naming convention so that you know you
are dealing with a table and not, as we will do later, dealing with queries
or forms The
Student table will hold data about, what else? Students! This table
(Entity) should contain attributes for Student ID, Last Name,
First Name, Major, and the student’s advisor. The
Advisor table will hold data about the Advisor. This table should contain attributes for Advisor ID, Last
Name, First Name and Department. These
tables are associated with each other in the following manner: A
student, when they first enter school, is assigned an advisor to help them
plan out the courses they will take each quarter. That student may change advisors- for example, if they change
majors- but they will only have one advisor at a time during their college
career. An
advisor, on the other hand, may have many students that they advise over
the duration of a quarter or a year. We
indicate the association between the Advisor and the Student in the
following manner: An
Advisor may have many students that they advise, but a student will have
one and only one advisor at any given time. The
formal way to say this when talking about the relational database model is: There is a one-to-many
relationship between the Advisor table and the Student table. A one-to-many
relationship is the most common type of relationship used in the Relational
Database Model. In a one-to-many relationship, like the one between Advisor
and Student, a record in the Advisor table can be associated with many
matching records in the Student table, but a record in the Student table
has only one matching record in the Advisor table. Here is how you
can indicate this relationship in graphical terms: Advises (1 to Many)
The Student/Advisor Database
![]()
3.
Creating
Entity Tables
- Double Click on “Create table in Design view” to
start building your tables. The
screen that comes up will look like this:
Place notes to yourself
about what each attribute contains in the Description column. These notes are only available in this
screen. Indicate the data type
allowed for the value of an attribute in the Data Type column Place the names of the
table attributes in the Field Name column
![]()

![]()
- Create the Advisor table with the following attributes:
Field Name Data
Type
AdvisorID AutoNumber (use
AutoNumber so that Access
will produce a
unique number to be
used as a Primary
Key)
LName Text (Text is one data type that
Access
uses to indicate a
String value)
Fname Text
Department Text
- Identify the primary key for the table.
The last thing to do after adding the attributes and data types (and maybe some notes to yourself), is to indicate the attribute(s) that will be used to hold the unique key value in this table: AdvisorID
Highlight the AdvisorID row in table design view by clicking the area just to the left of the AdvisorID. Then click on the key icon on the tool bar.
![]()

Once you do that, a small key icon
should appear just to the left of AdvisorID.
- When you have finished establishing the Primary Key, save your table with the name tblAdvisor:
File>Save
- Close the table.
- Create the Student table with the following
attributes and data types. (Repeat
steps 3A-3C)
Field Name Data
Type
StudentID AutoNumber (use
AutoNumber so that Access
will produce a
unique number to be
used as a Primary
Key)
LName Text
Fname Text
Major Text
AdvisorID Number (This is the column where you will
indicate the
AdvisorID number that
matches the student’s assigned
advisor name.
It is known as the foreign key
when used here
because it is a primary key sitting in a table
not defined as its own.)
- Save your table with the name tblStudent.
- Explain to the person sitting next to you how these two Entities (tables) are associated with (related to) each other?
You now have 2 tables holding data related to 2 different entities. One is the Student entity. The other is the Advisor entity.
4.
Add Data to
Entity Tables
- Go to the Tables Window and open tblAdvisor.

- Add the following 2 instances, or rows, so that there is some data in the table:


- After you add the data, switch to design view of the
table by clicking the design icon in the upper left corner of the database
screen:
![]()
 What
is the view of the table? It is the
view you first saw when creating the attributes of the entity.
What
is the view of the table? It is the
view you first saw when creating the attributes of the entity.
Switch back to Datasheet View by clicking the appropriate icon now in the left corner of the database screen

- Close the table.

5.
Establishing
Relationships
In order to enforce referential integrity among tables, and to be able to create forms based on information from more than one table you should establish relationships between your tables. They might be one-to-one or one-to-many. In order to ensure data integrity, allow Access to enforce the relationships as you create queries and forms.
- Go to the Relationships window:
|
· Right click while on the database window OR ·
Go to Tools> · Find the icon on the Tool Bar |
The Show Table window box
should come up:
|
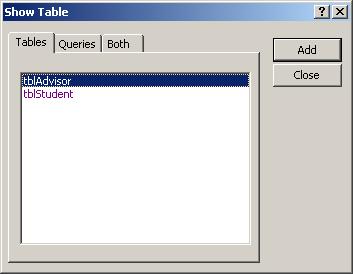
- Add each table to the Relationship form by selecting
it and clicking Add. Do not add each
table more than one time. IF
the Show Table window does not appear when you open the Relationship form,
right click to find it.
- Close the Show Table window.
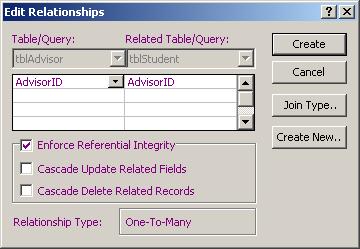
- Drag the attributes holding the keys that correspond to each other from one table to the next. Once you have placed them, an Edit Relationships window comes up.
Use the drag and drop
method to show where the tables are associated
![]()
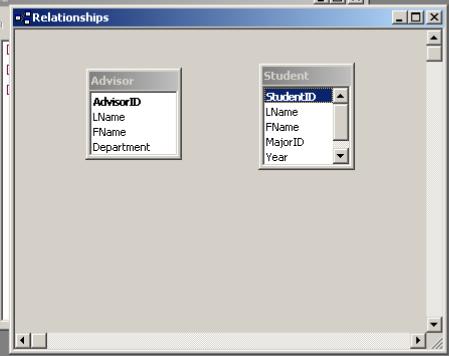
- Check the Enforce Referential Integrity window and Create the relationship:
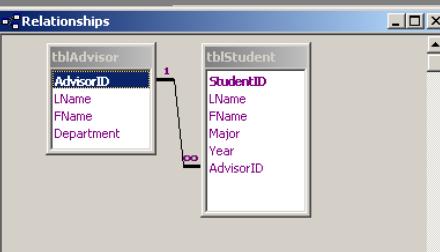
When you have created all the proper
relationships, your window should look like this:
The infinity symbol
indicates the “many” side of the relationship
![]()
![]()
- Save and close the Relationships Window.
- Open up the Student table. Add 4 records of student information for yourself and 3 friends. Assign them each an advisor and place the ID number that corresponds with the advisor in the correct column:


- You now have two entities in your database. They are populated with instances (rows of data). Take a look at each of your tables. What attribute (besides the foreign key attribute) in each of our tables could have been separated out, a new table created, and a key number put in its place to reduce data redundancy (the number of times we had to type in the same information)?
Normalization is the process of efficiently organizing data in a
database. Two main goals of the
normalization process are to eliminate redundant data (for example, storing
the same data in more than one table) and ensure data dependencies make
sense (only storing data about a single entity in a table). This process has many levels involved in
it. Let’s look at one of the most
basic: revising a table structure when it has more than one entity
described in it. Let’s start to normalize one of
the two tables you created today.
This process is usually done before creating table structures, but
we are going through it on a database that has already been created so that
you get an idea of how it is done. Currently your database
consists of two tables. The Student
table includes in it textual information about another potential entity.
This means there is the possibility that values in some of the columns may
be filled with redundant information.
Can you identify the column that
holds semantic (textual, meaningful) information about a separate “thing”
in the student table?
Normalization
6. Breaking One Table Into Two
- Add a table called Major to hold the list of majors that a student can declare.
For our database, a student will only be allowed to declare
one major. This will maintain a one –
to - many relationship between the Student and Major entities.
- Create a table called tblMajor with the
following attributes:
MajorID as the Primary Key (use autonumber)
MajorName as a text attribute
School_Dept as a text attribute
Refer to step 3 to create this table if needed.
- Save the table as tblMajor and close it.
To use the data in tblMajor how
will we associate it with the tblStudent?
To do this requires removing one attribute and adding another
attribute to the Student table. ·
What attribute should be
removed from the Student table? ·
What attribute will we put
in its place? ·
Are there additional
themes represented in the Advisor table that should be removed? (You are not
required to remove them, just identify them)
- Open the tblStudent table in Design view. Do this by clicking once on the Student table object and then click the Design icon above,
Domain Integrity: There is a rule in database
design that any attributes that are part of a relationship between 2 tables
must have the same data type. This
is called “maintaining domain integrity”.
By creating a new table for
Majors with a primary key that is a number data type, we can no longer use
the attribute Major in tblStudent as the foreign key field because it is a
text data type. The data type of any attribute
holding foreign key information from the Major table will have to
match. Since you already have a
couple rows of data in that column, it will be easier to delete the
attribute and then create another field called MajorID, this time with a
number data type.
- Delete the field Major. When asked if you want to “permanently Delete the selected fields….”, click Yes. Now the old attribute Major and all the corresponding data in your table have been removed.
- Insert a new row right above the field AdvisorID.
- Add a new field (attribute) to the table Student
where you inserted the row.
- Name it MajorID and make the data type a number. Why are you doing this???? Because this field will hold the key number of the related record in tblMajor. Since the primary key for tblMajor is a number, the field set up in tblStudent must also be a number data type to maintain domain integrity.
This attribute will hold the
key numbers that corresponds with particular instances of the Major
entity. It is placed in the Student
table as a way to indicate the major that the student has declared. (The
attribute AdvisorID is used in the same manner.)
- Save and close the table. There are now 3 table structures created to hold instances of the entities Student, Advisor and Major.
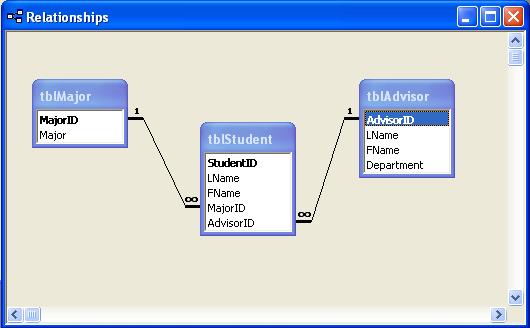
- Add the Major Table to your relationship window. Associate the Major table with the
Student table based on the MajorID. Create the relationship and enforce referential integrity.
 Close the database completely and
transfer your database to Dante.
You will use it again in the next lab.
Close the database completely and
transfer your database to Dante.
You will use it again in the next lab.